Off-Grid, On Point: Exploring “The Shenandoah Escape” (Wild Azalea House)
Posted on: July 17, 2026
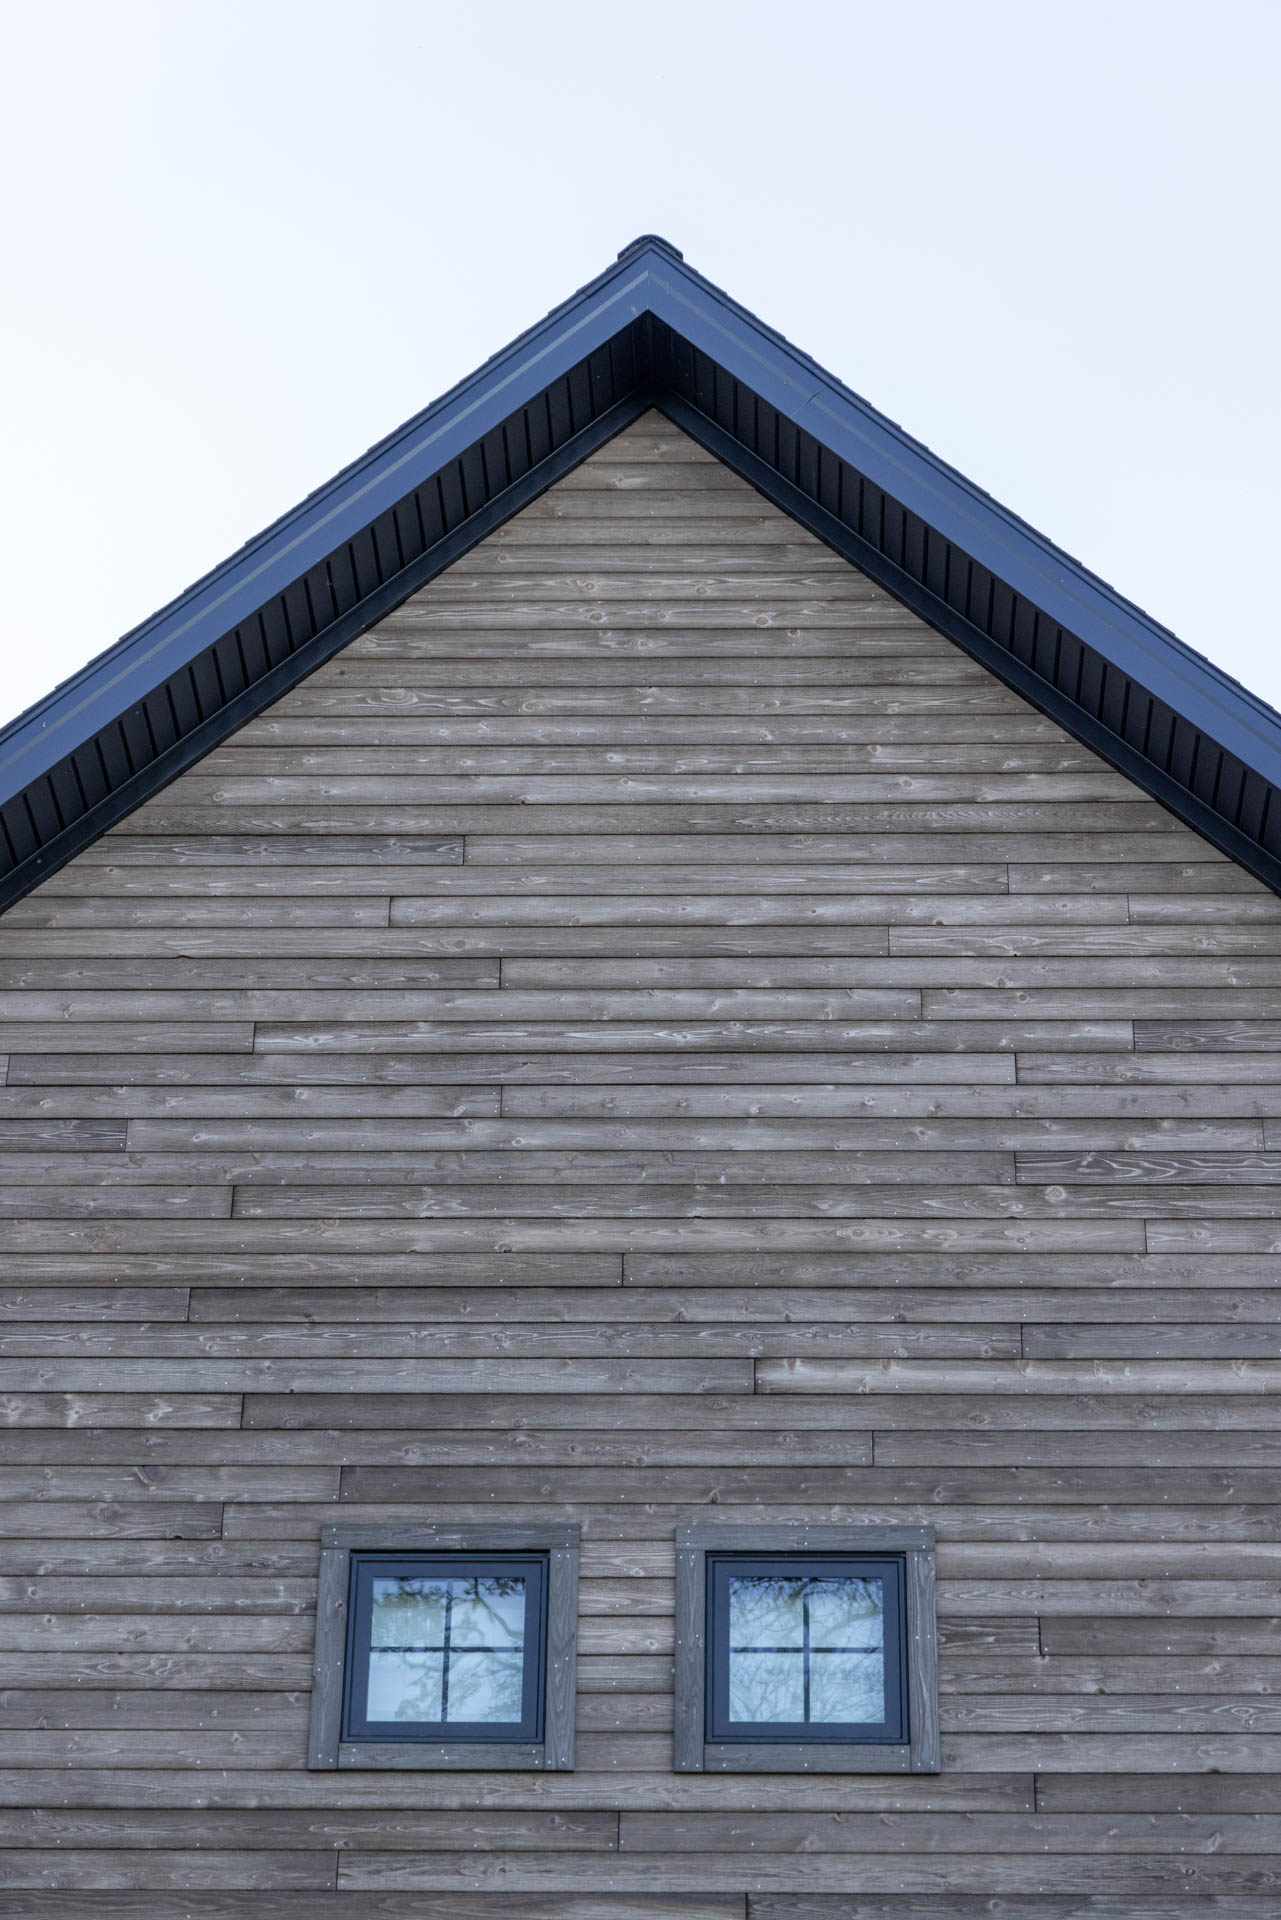
A Masterclass in Modern Scandinavian Design and High-Contrast Timber Integration
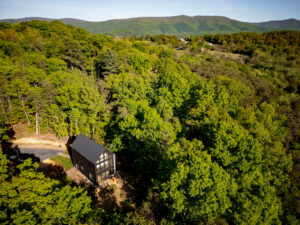
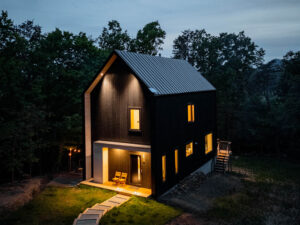
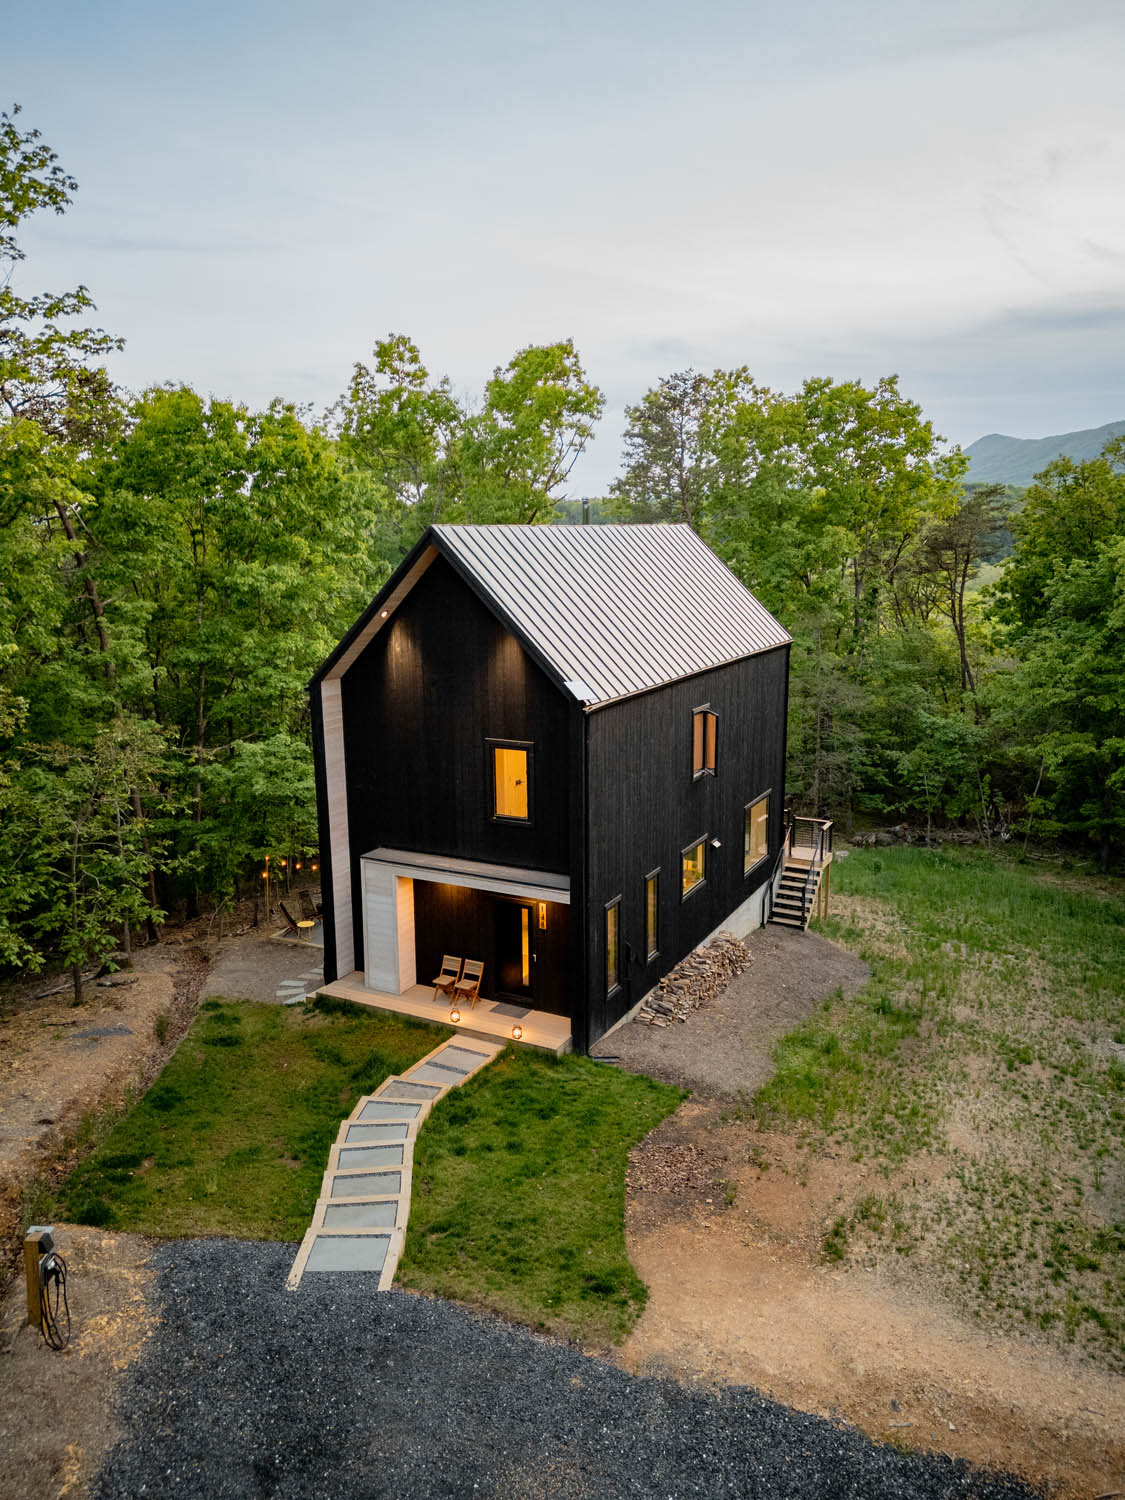
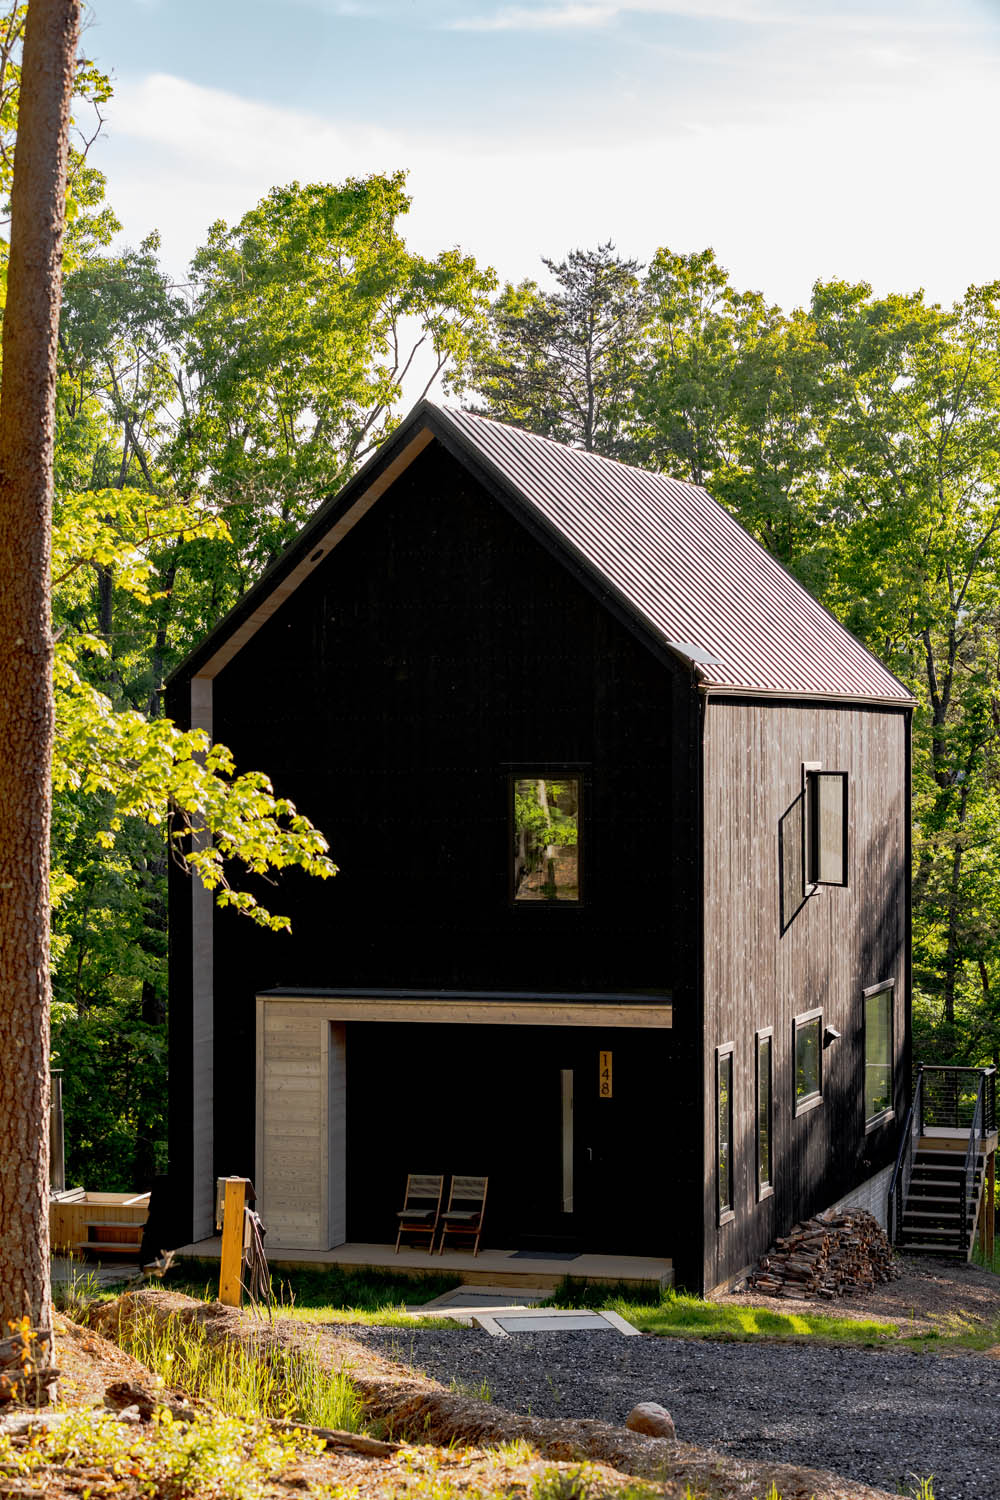
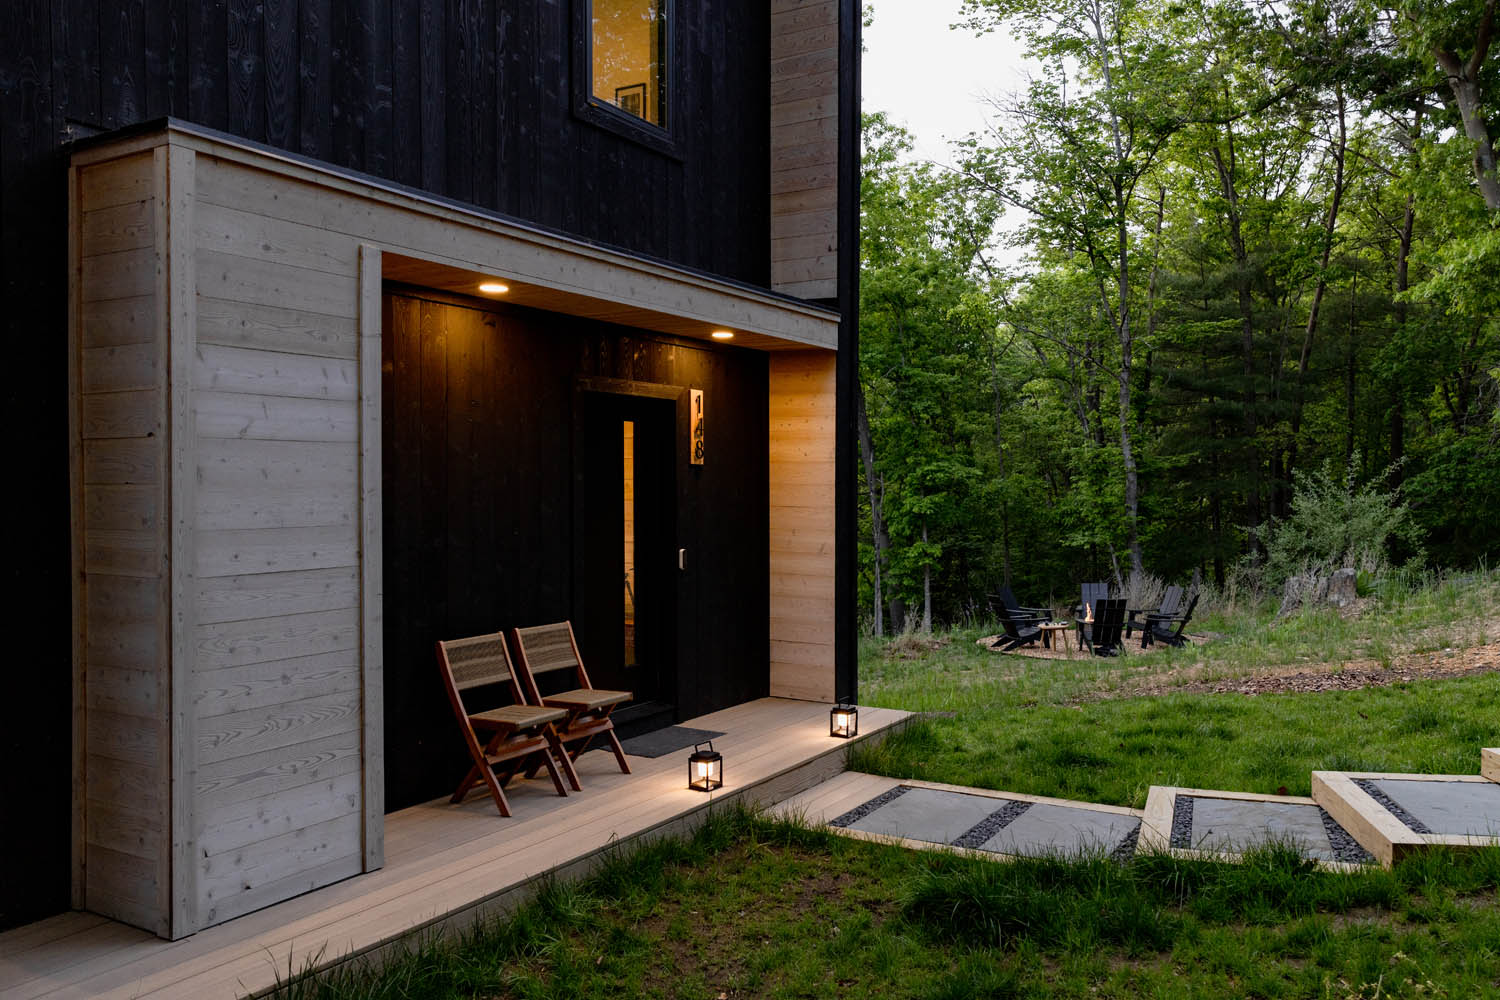
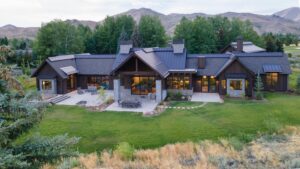
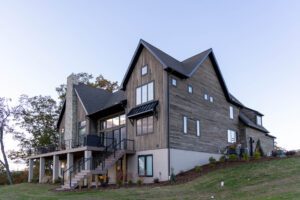
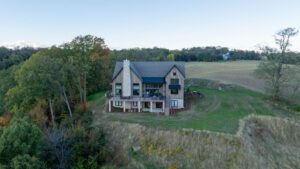
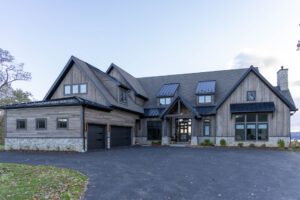
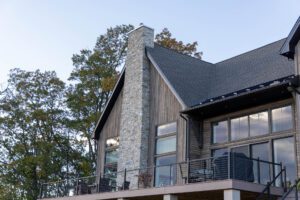
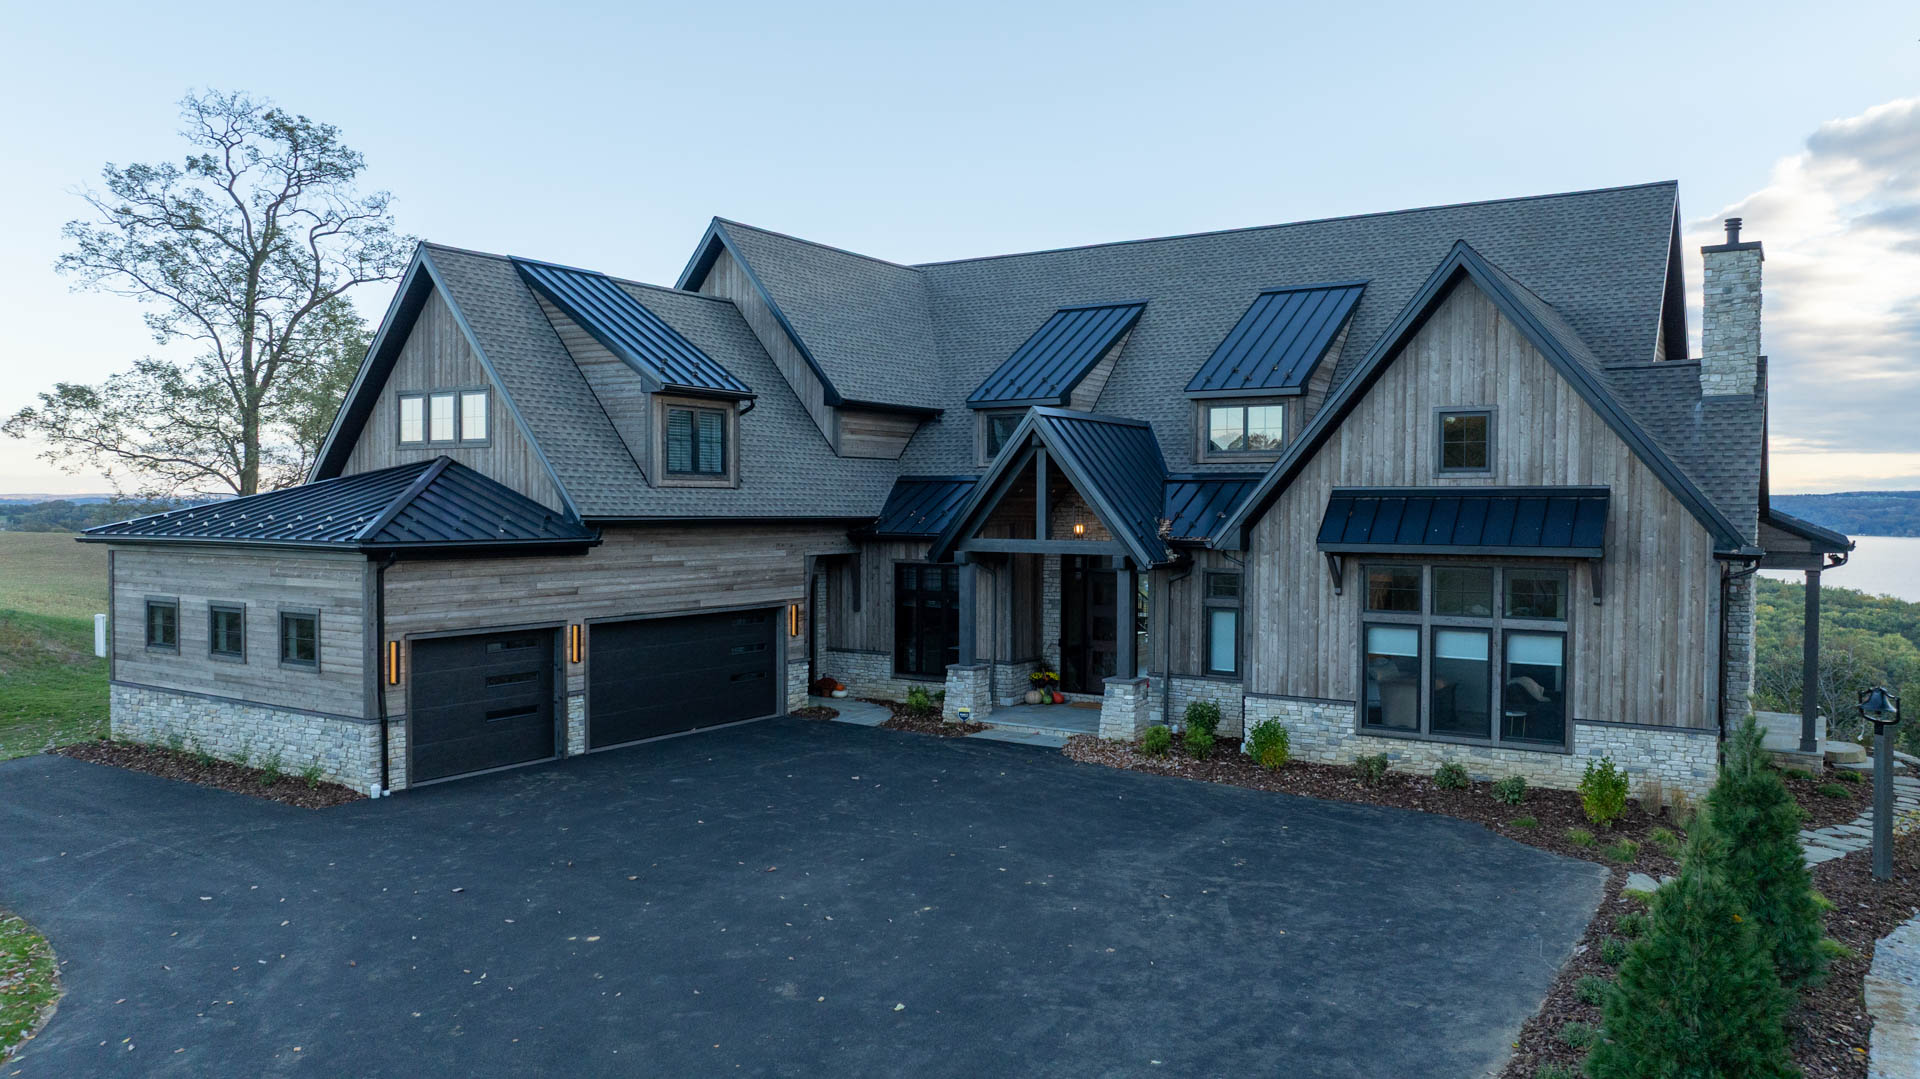
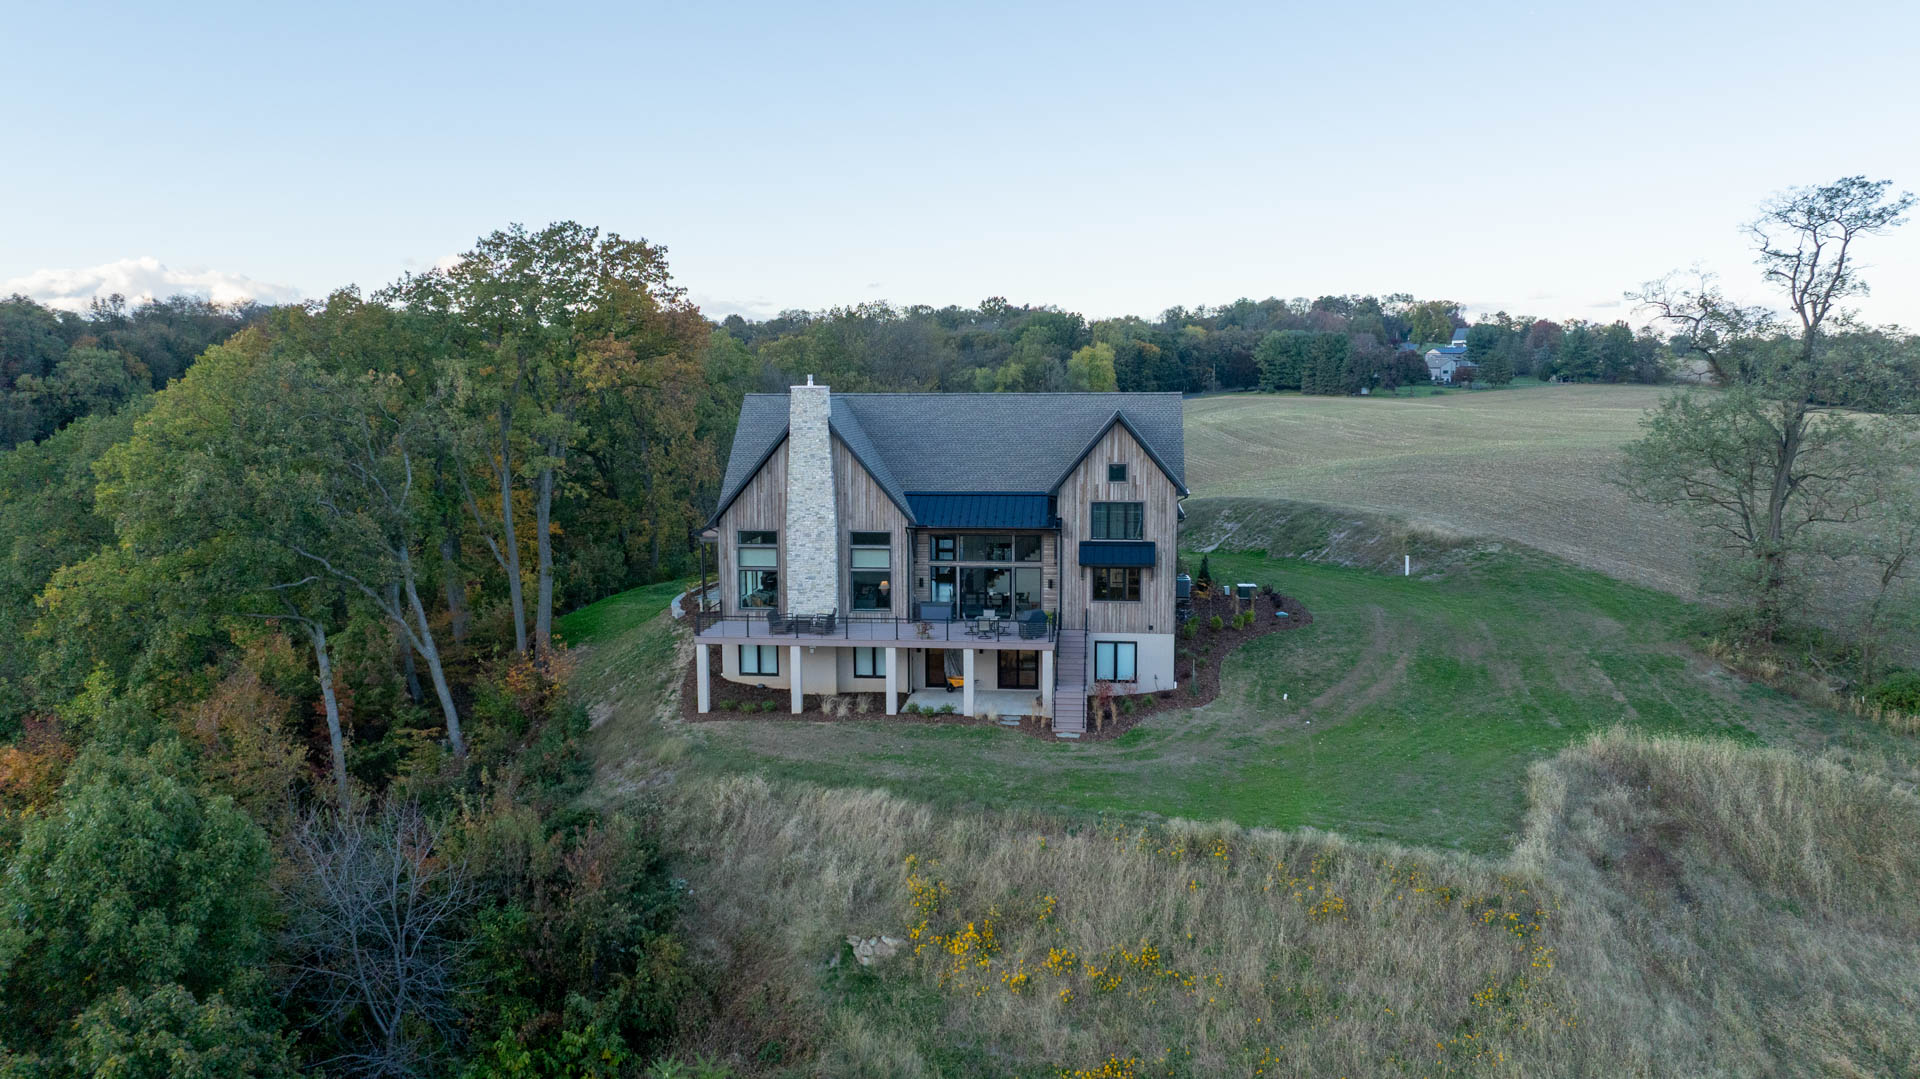
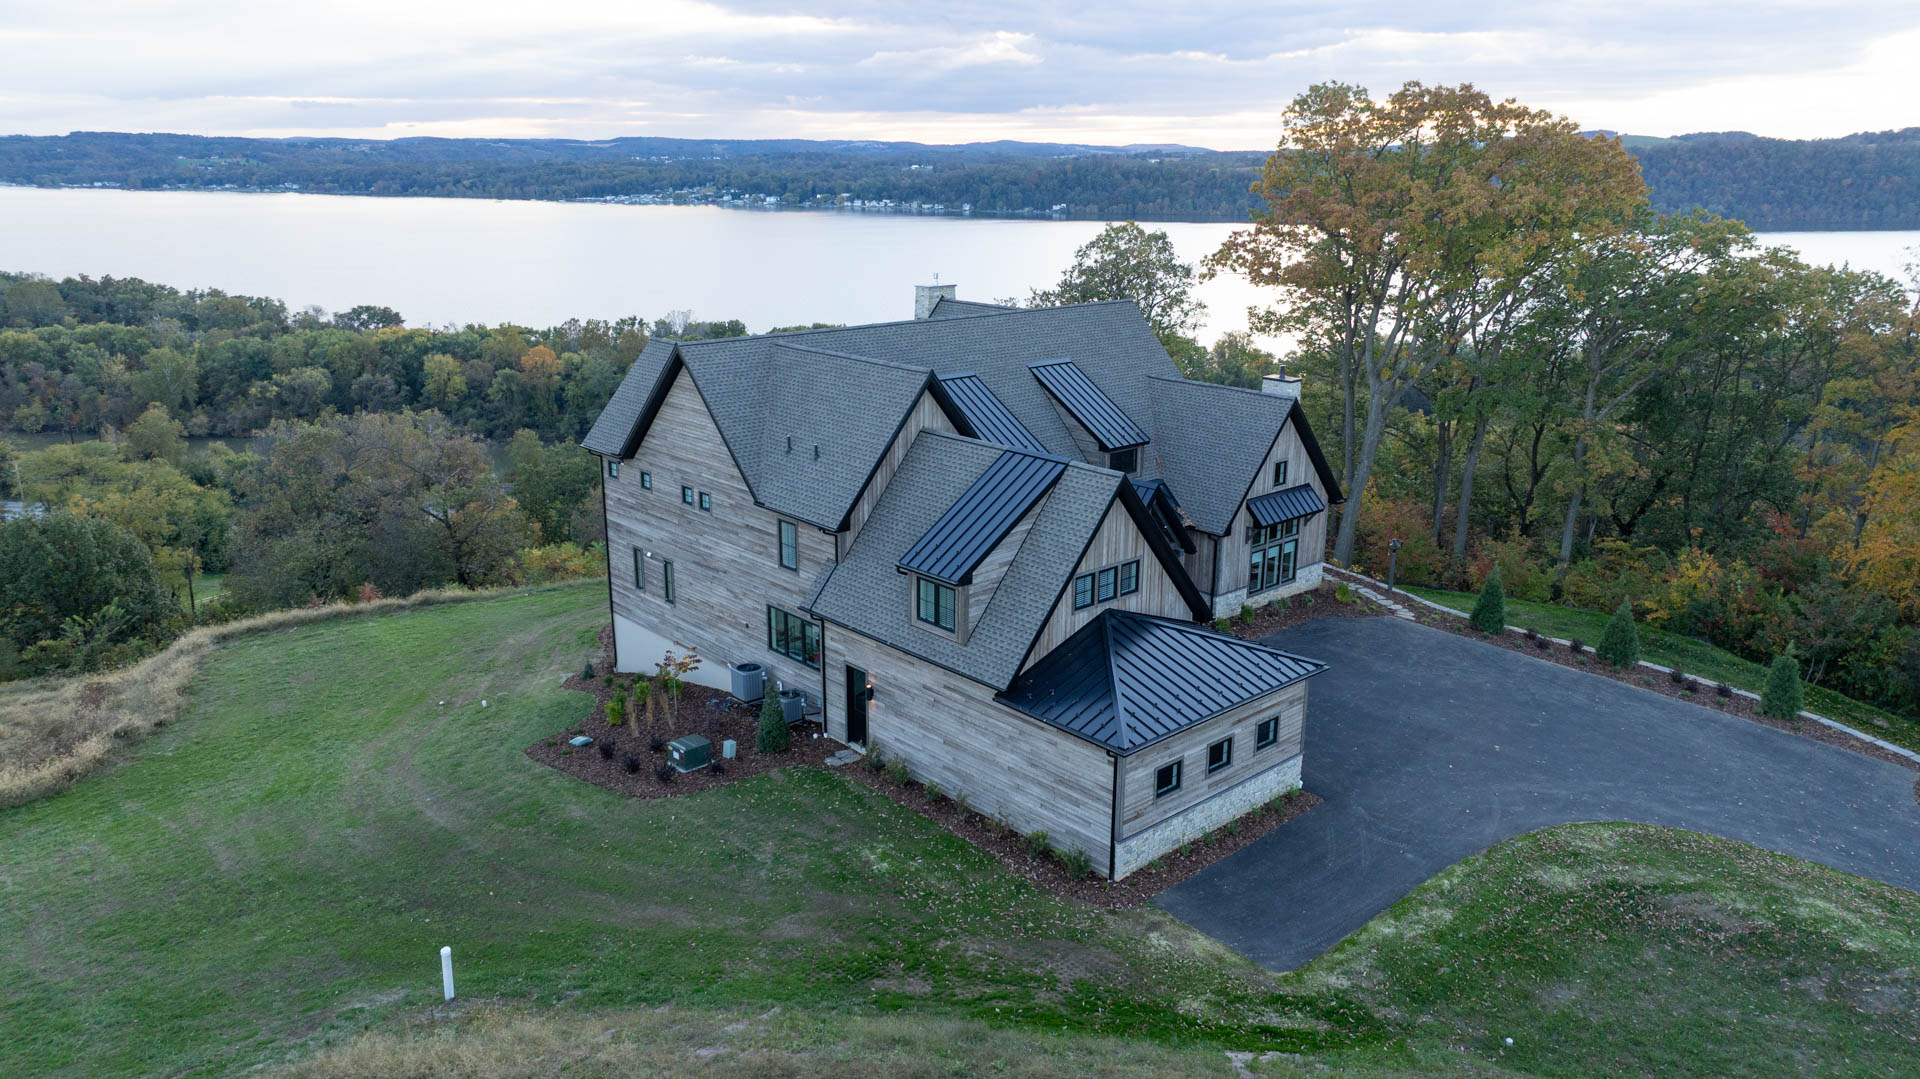
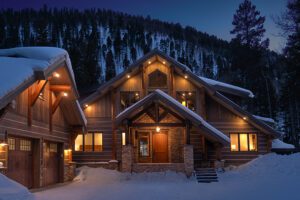
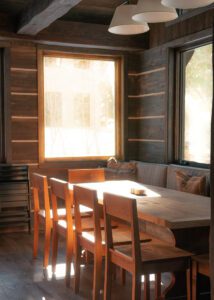
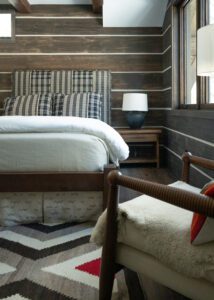
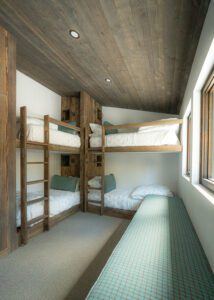
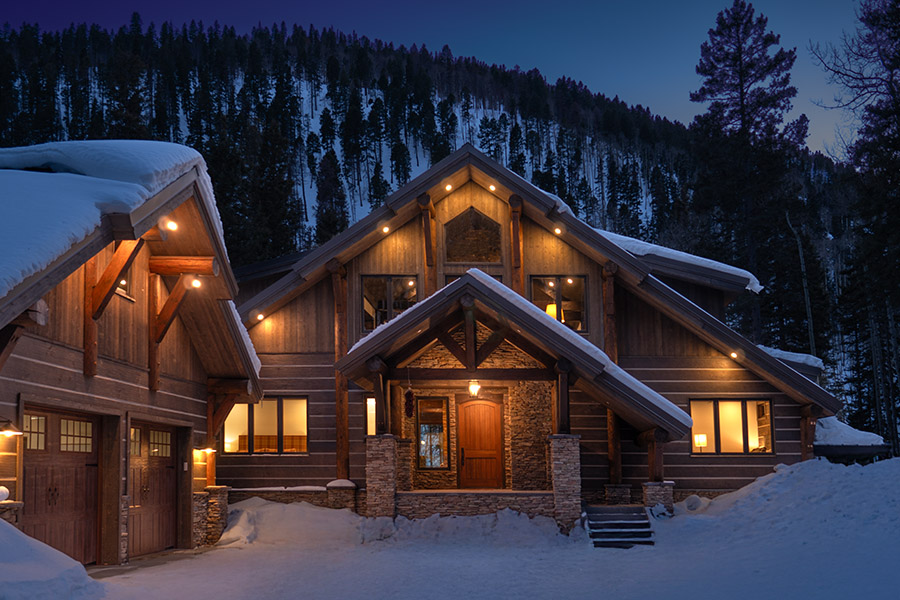
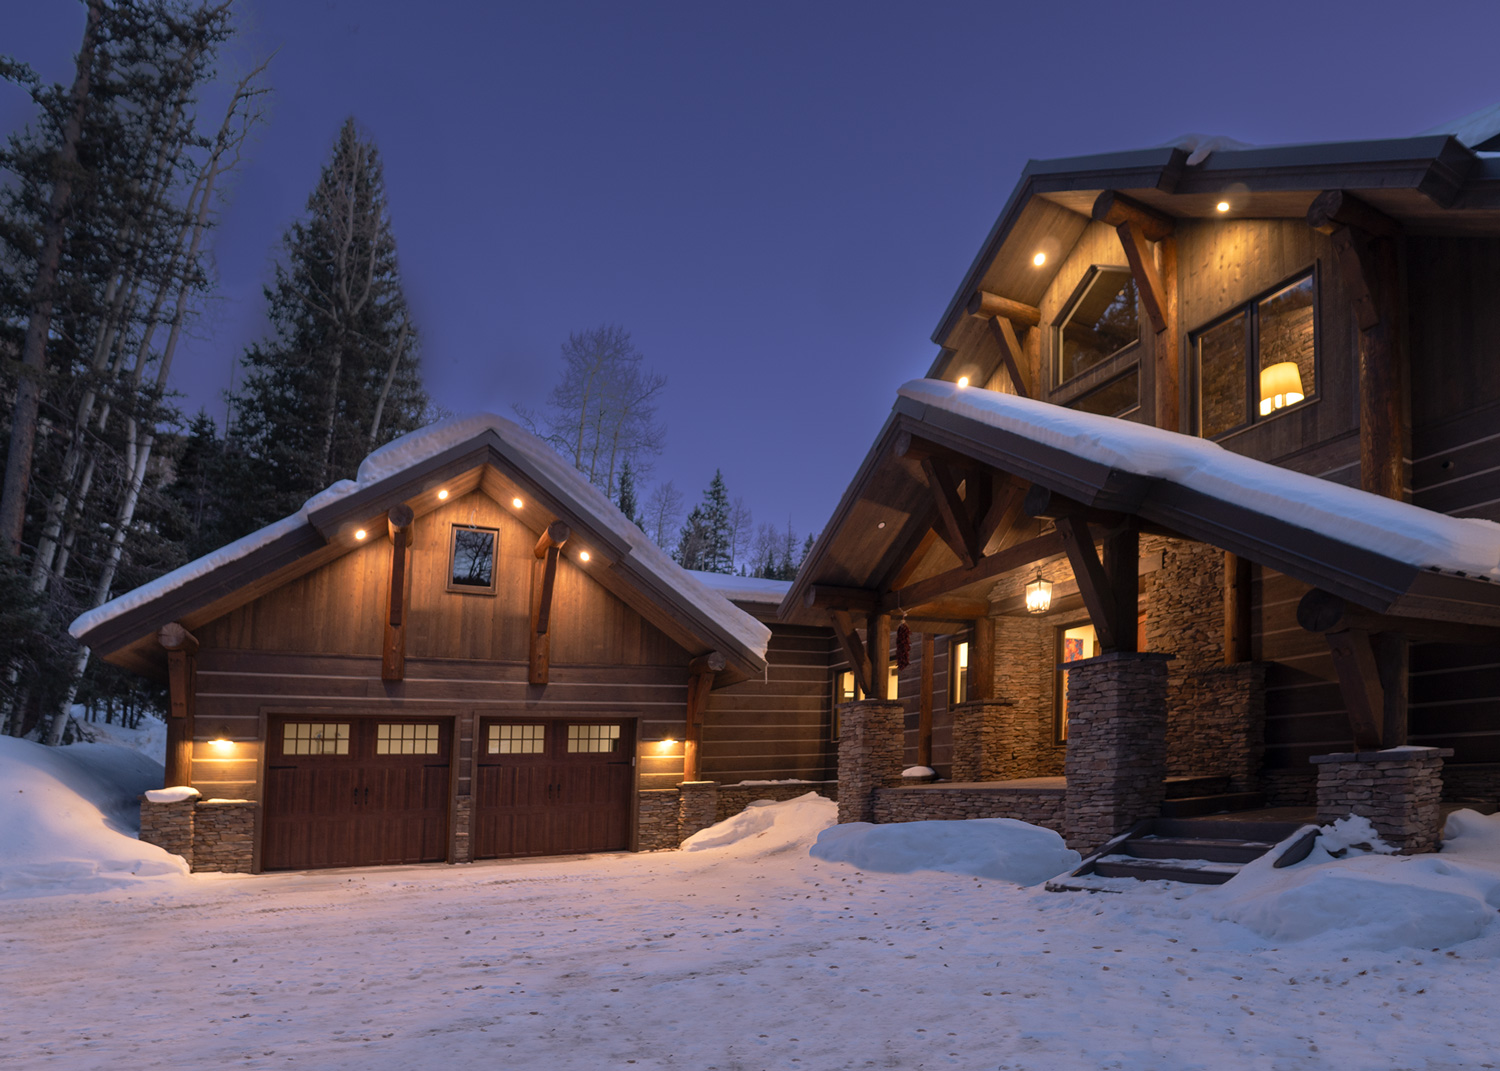
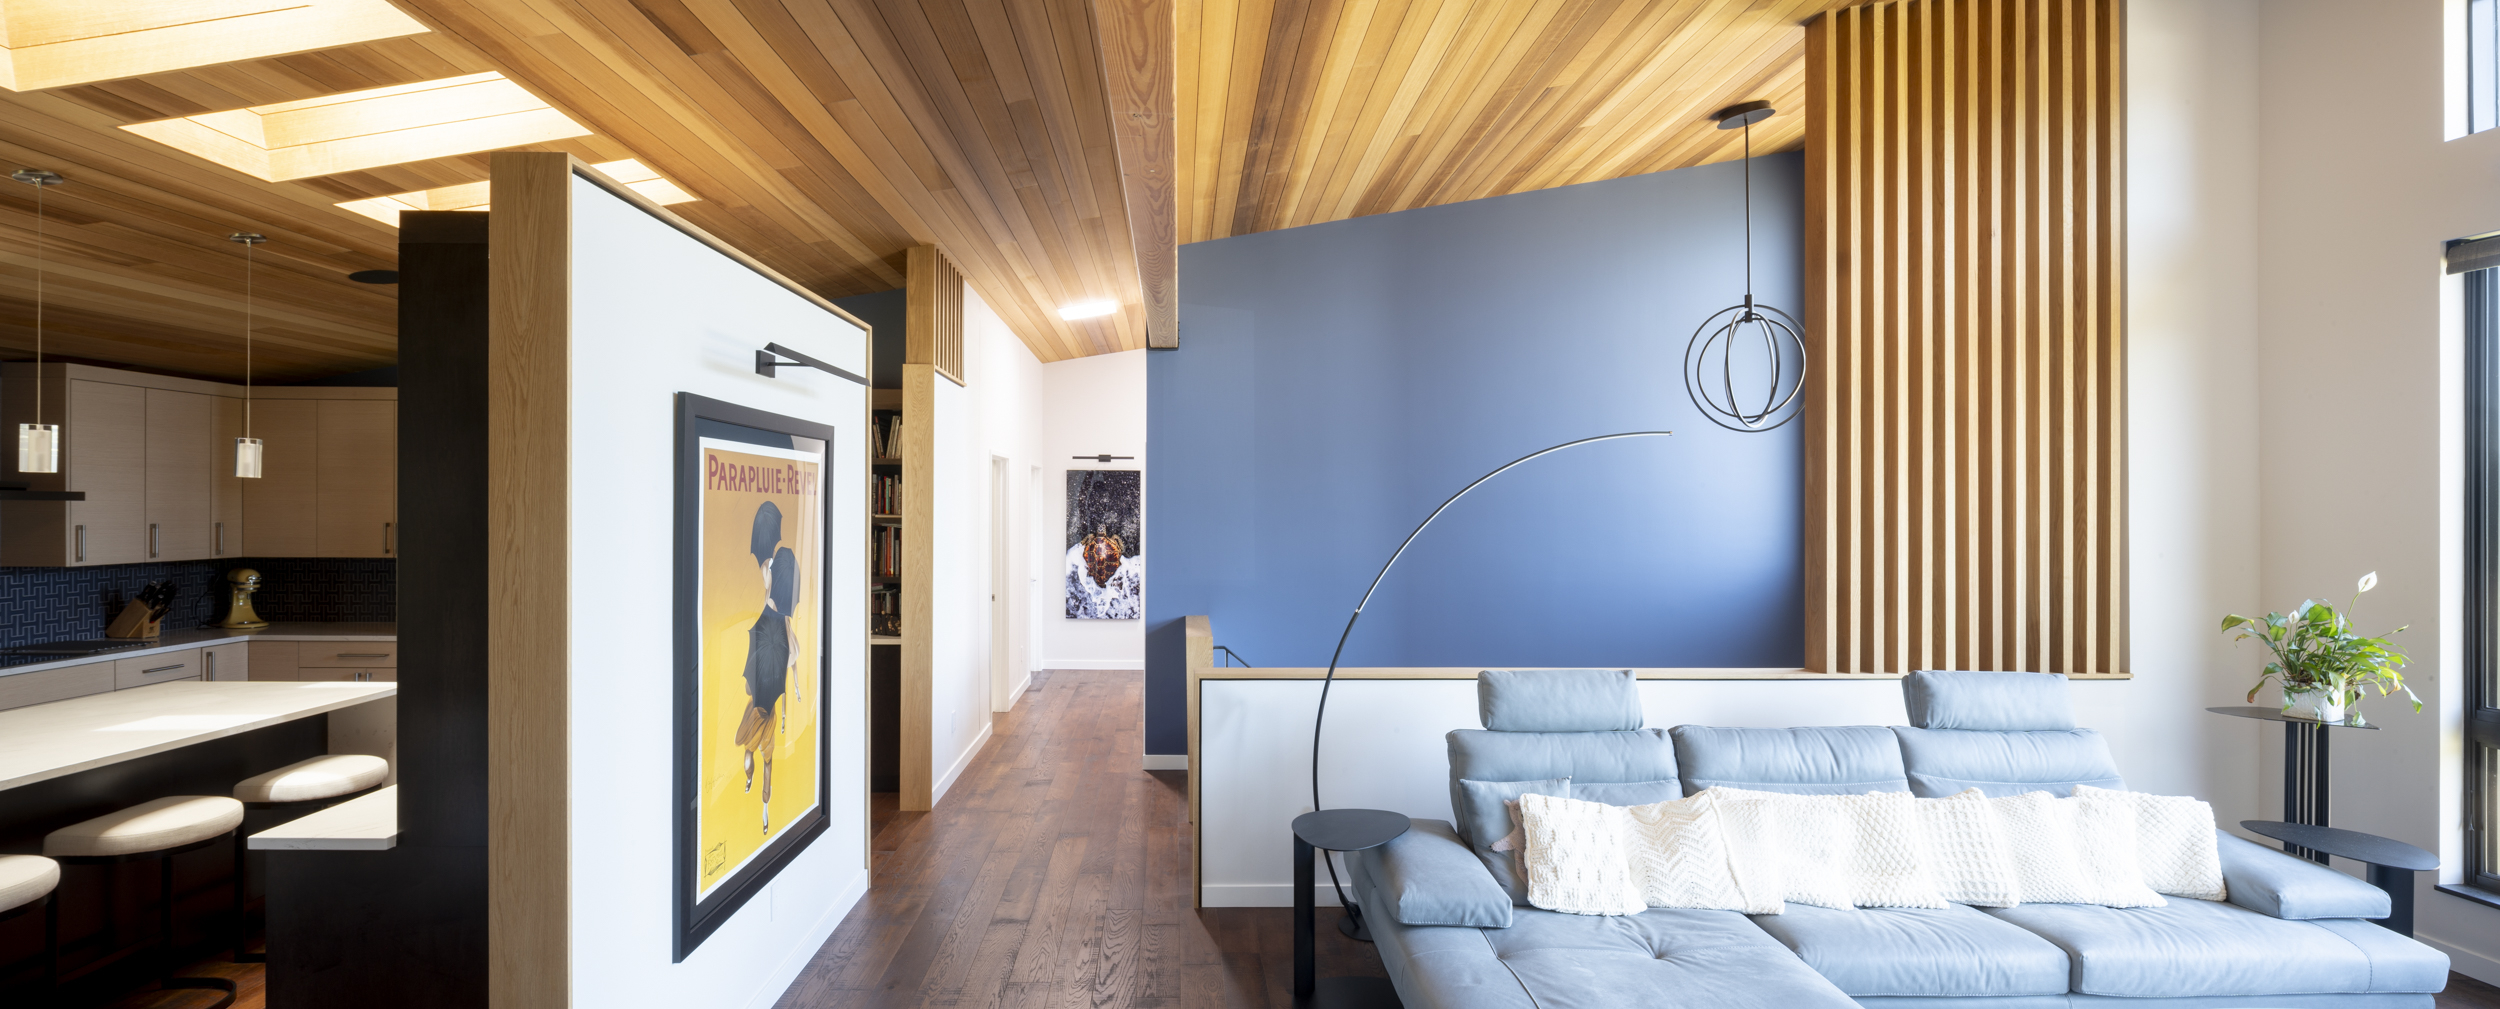
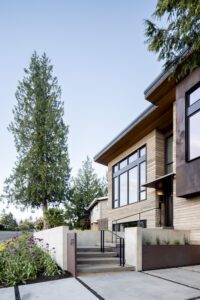
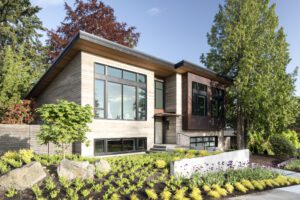
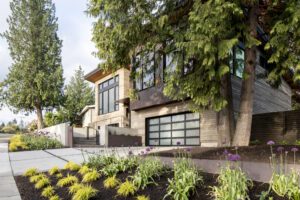
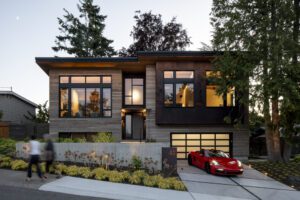
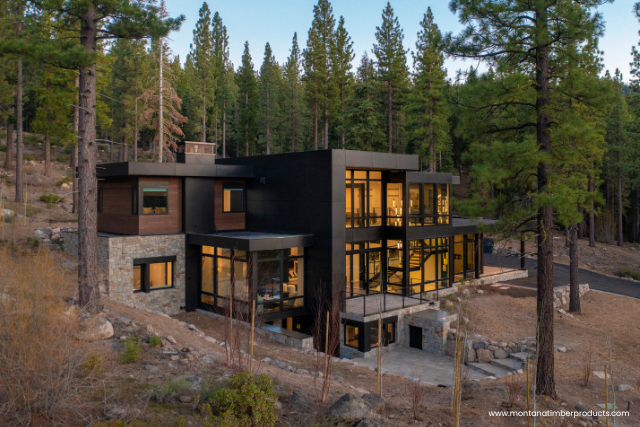
Deep in the heart of the Blue Ridge Mountains in Luray, Virginia, sits a cabin that completely redefines mountain living. Remarkably, while this retreat feels worlds away, it sits just a short, scenic drive from the bustling Washington, D.C. metro area. The Shenandoah Escape presents a stunning vacation property where guests can easily escape the city to unplug, inhale the crisp mountain air, and connect with nature.
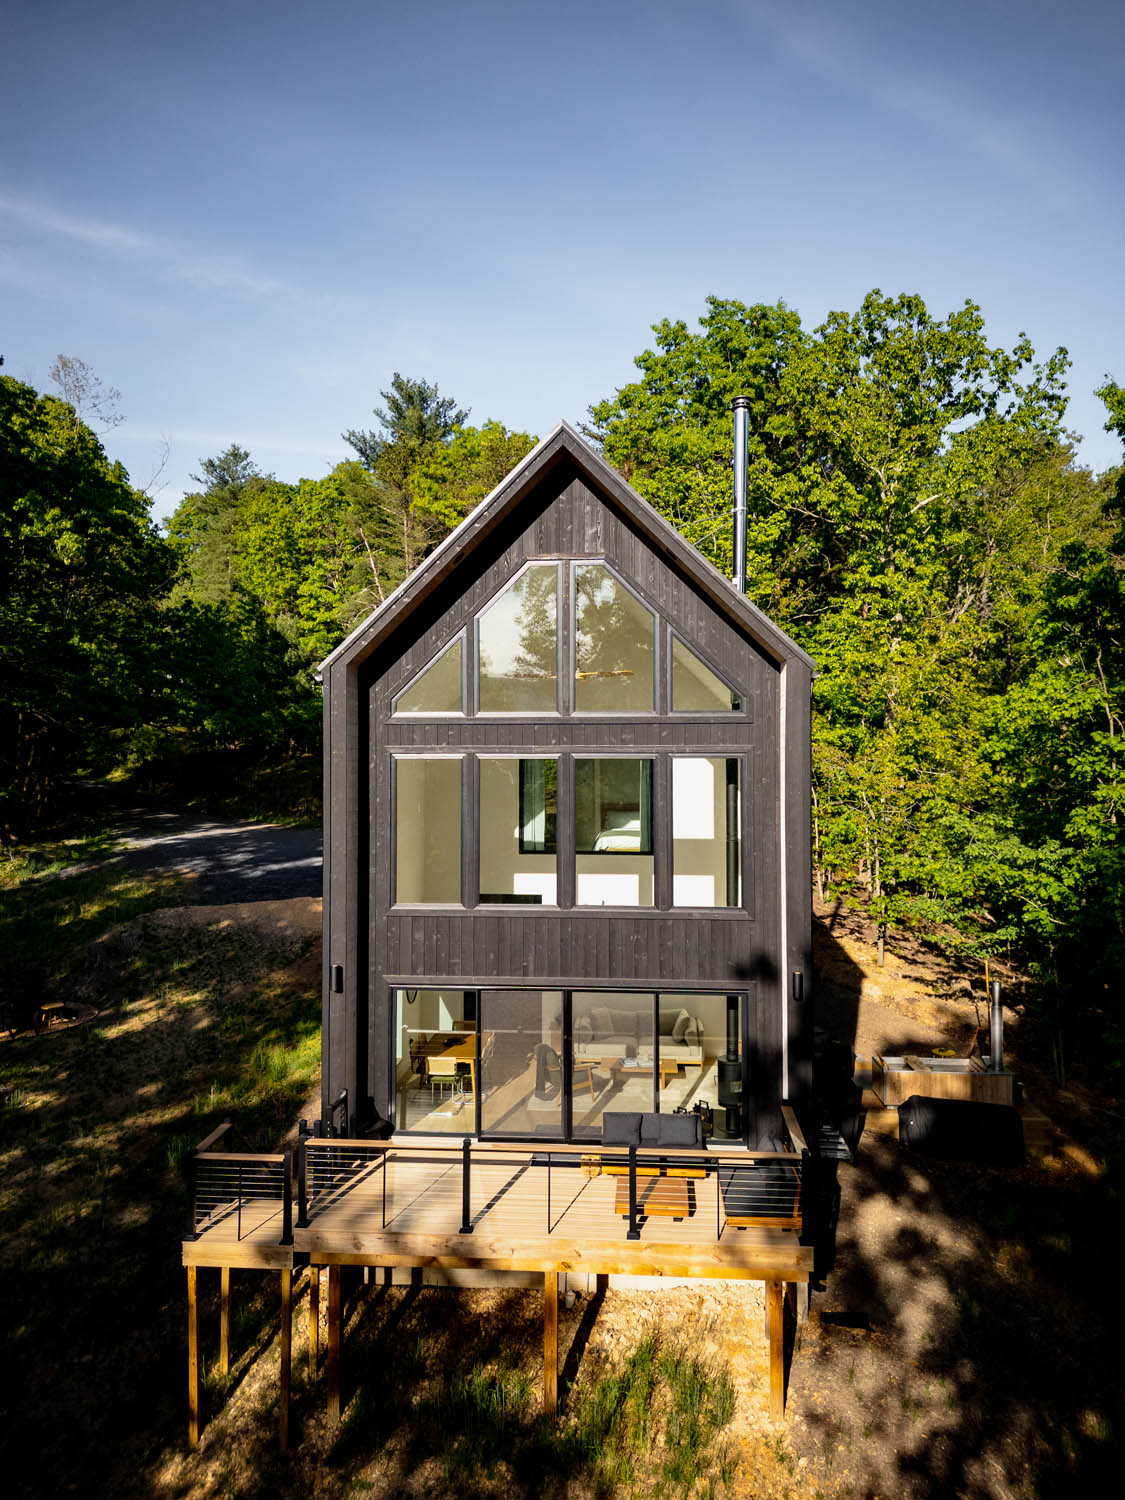
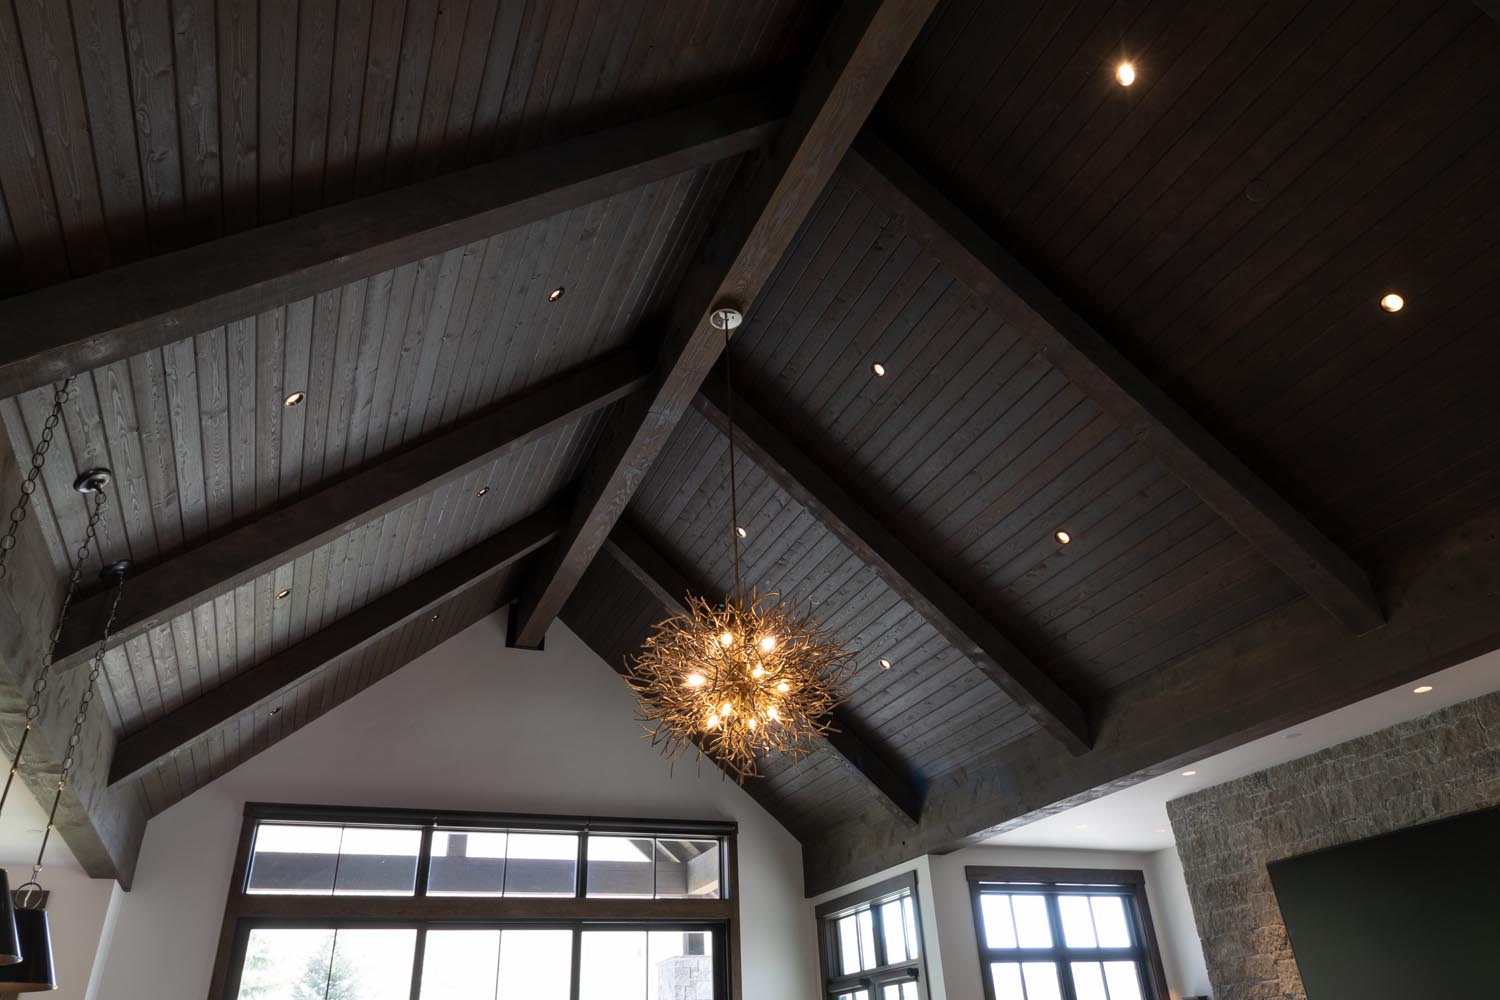
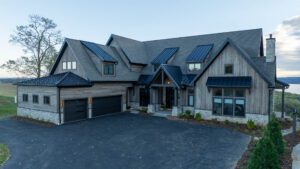
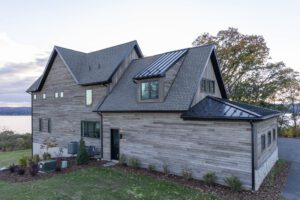
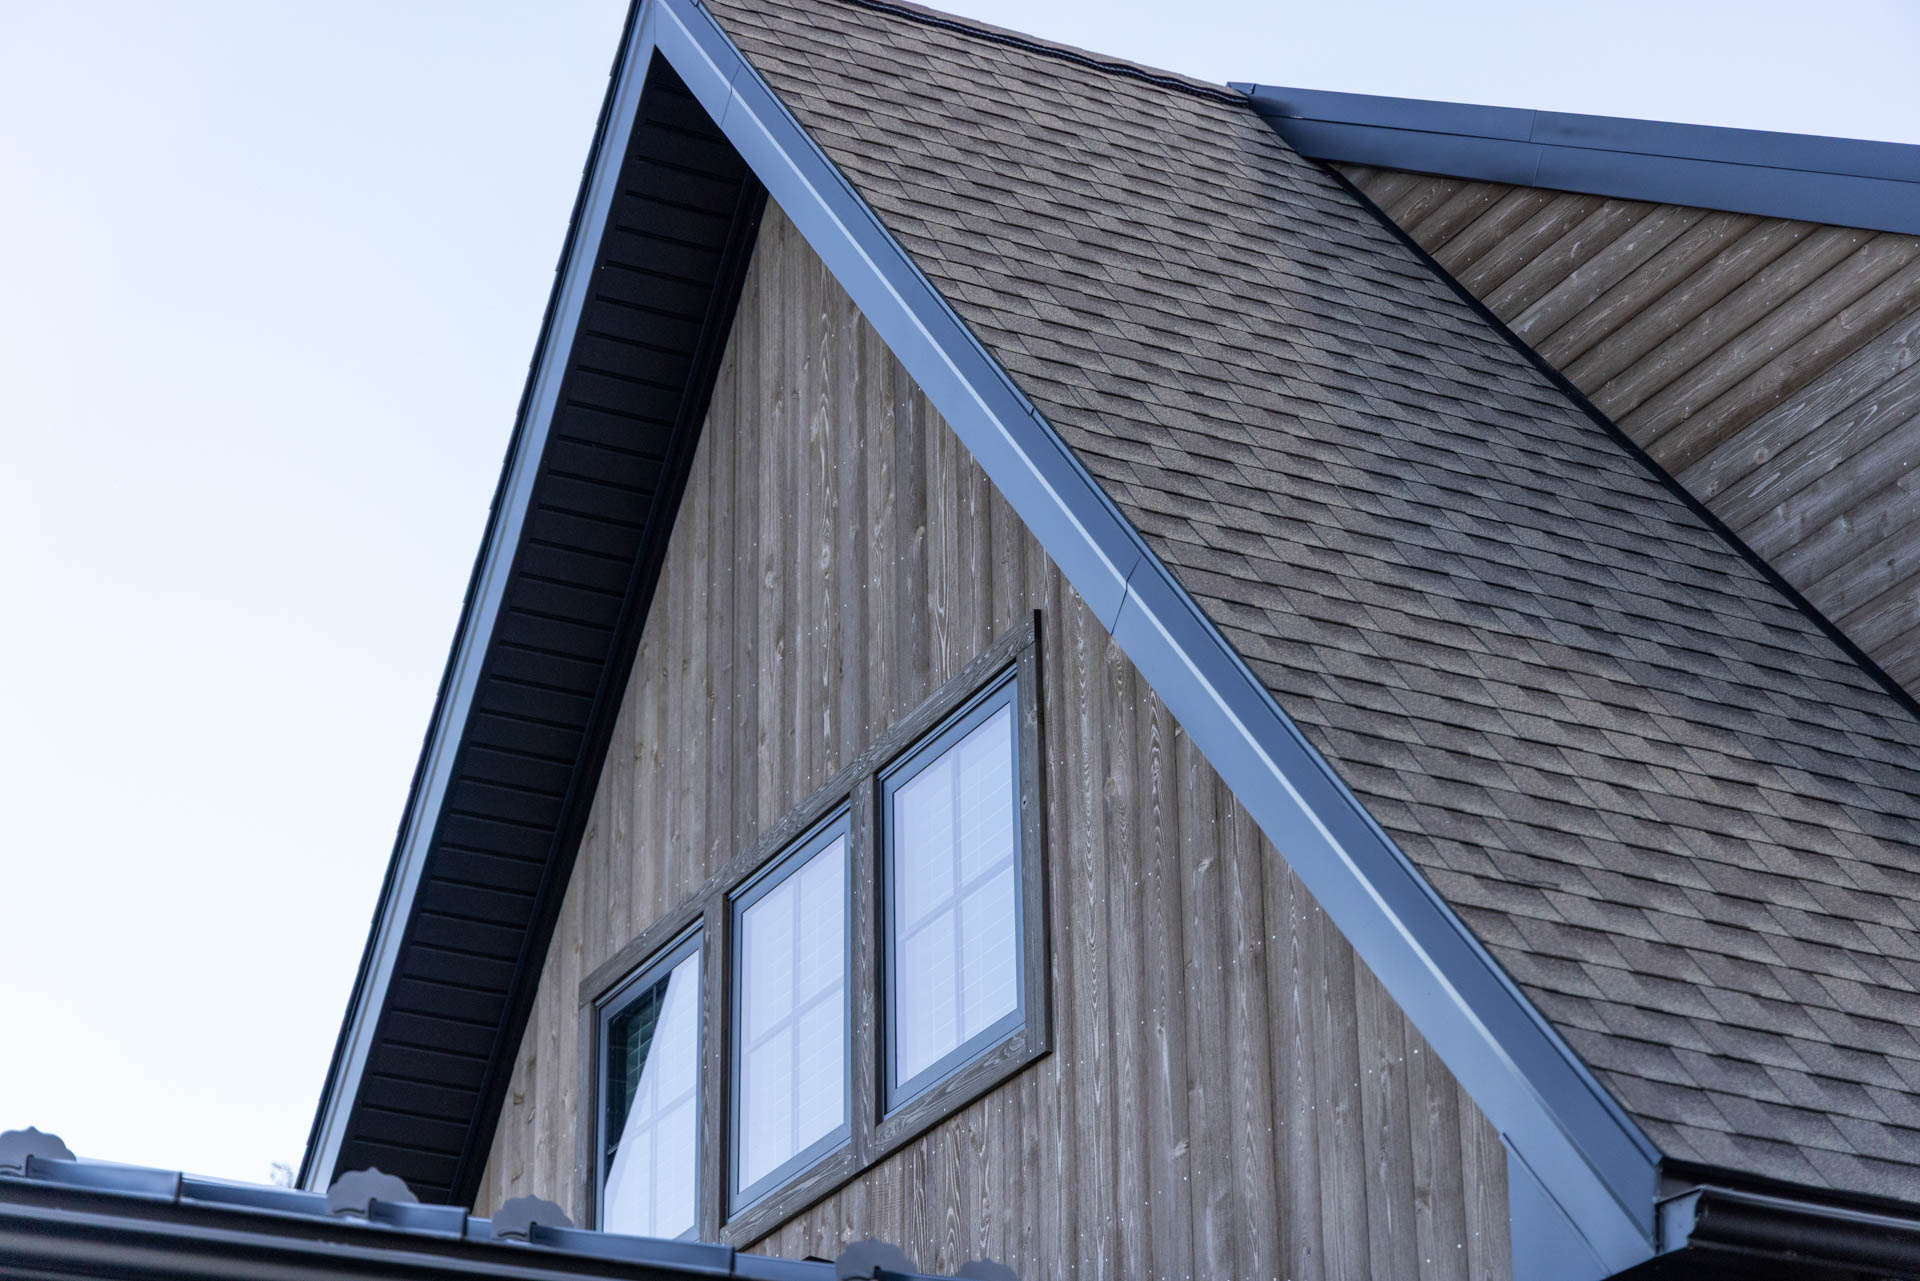
Significantly, the architecture of this modern Scandinavian-style chalet draws heavy inspiration from the traditional Norwegian hytte, the country’s iconic mountain cabin getaway built for quiet reflection and remote wilderness living. A simple, powerful philosophy guides the entire design: create a modern footprint that seamlessly doubles as a quiet retreat. Photographer Nick Bruce captured this vision beautifully in a series of breathtaking photographs, providing a definitive lesson in poetic site integration.
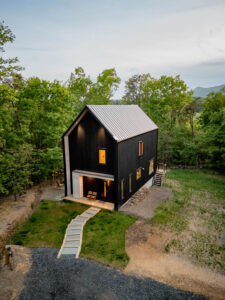
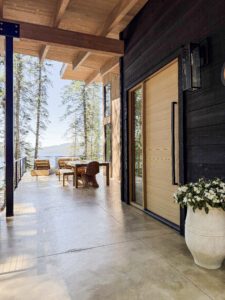
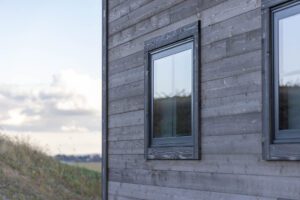
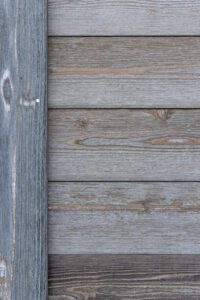
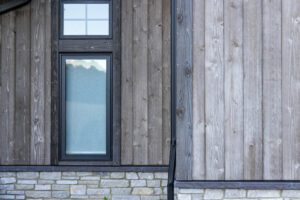
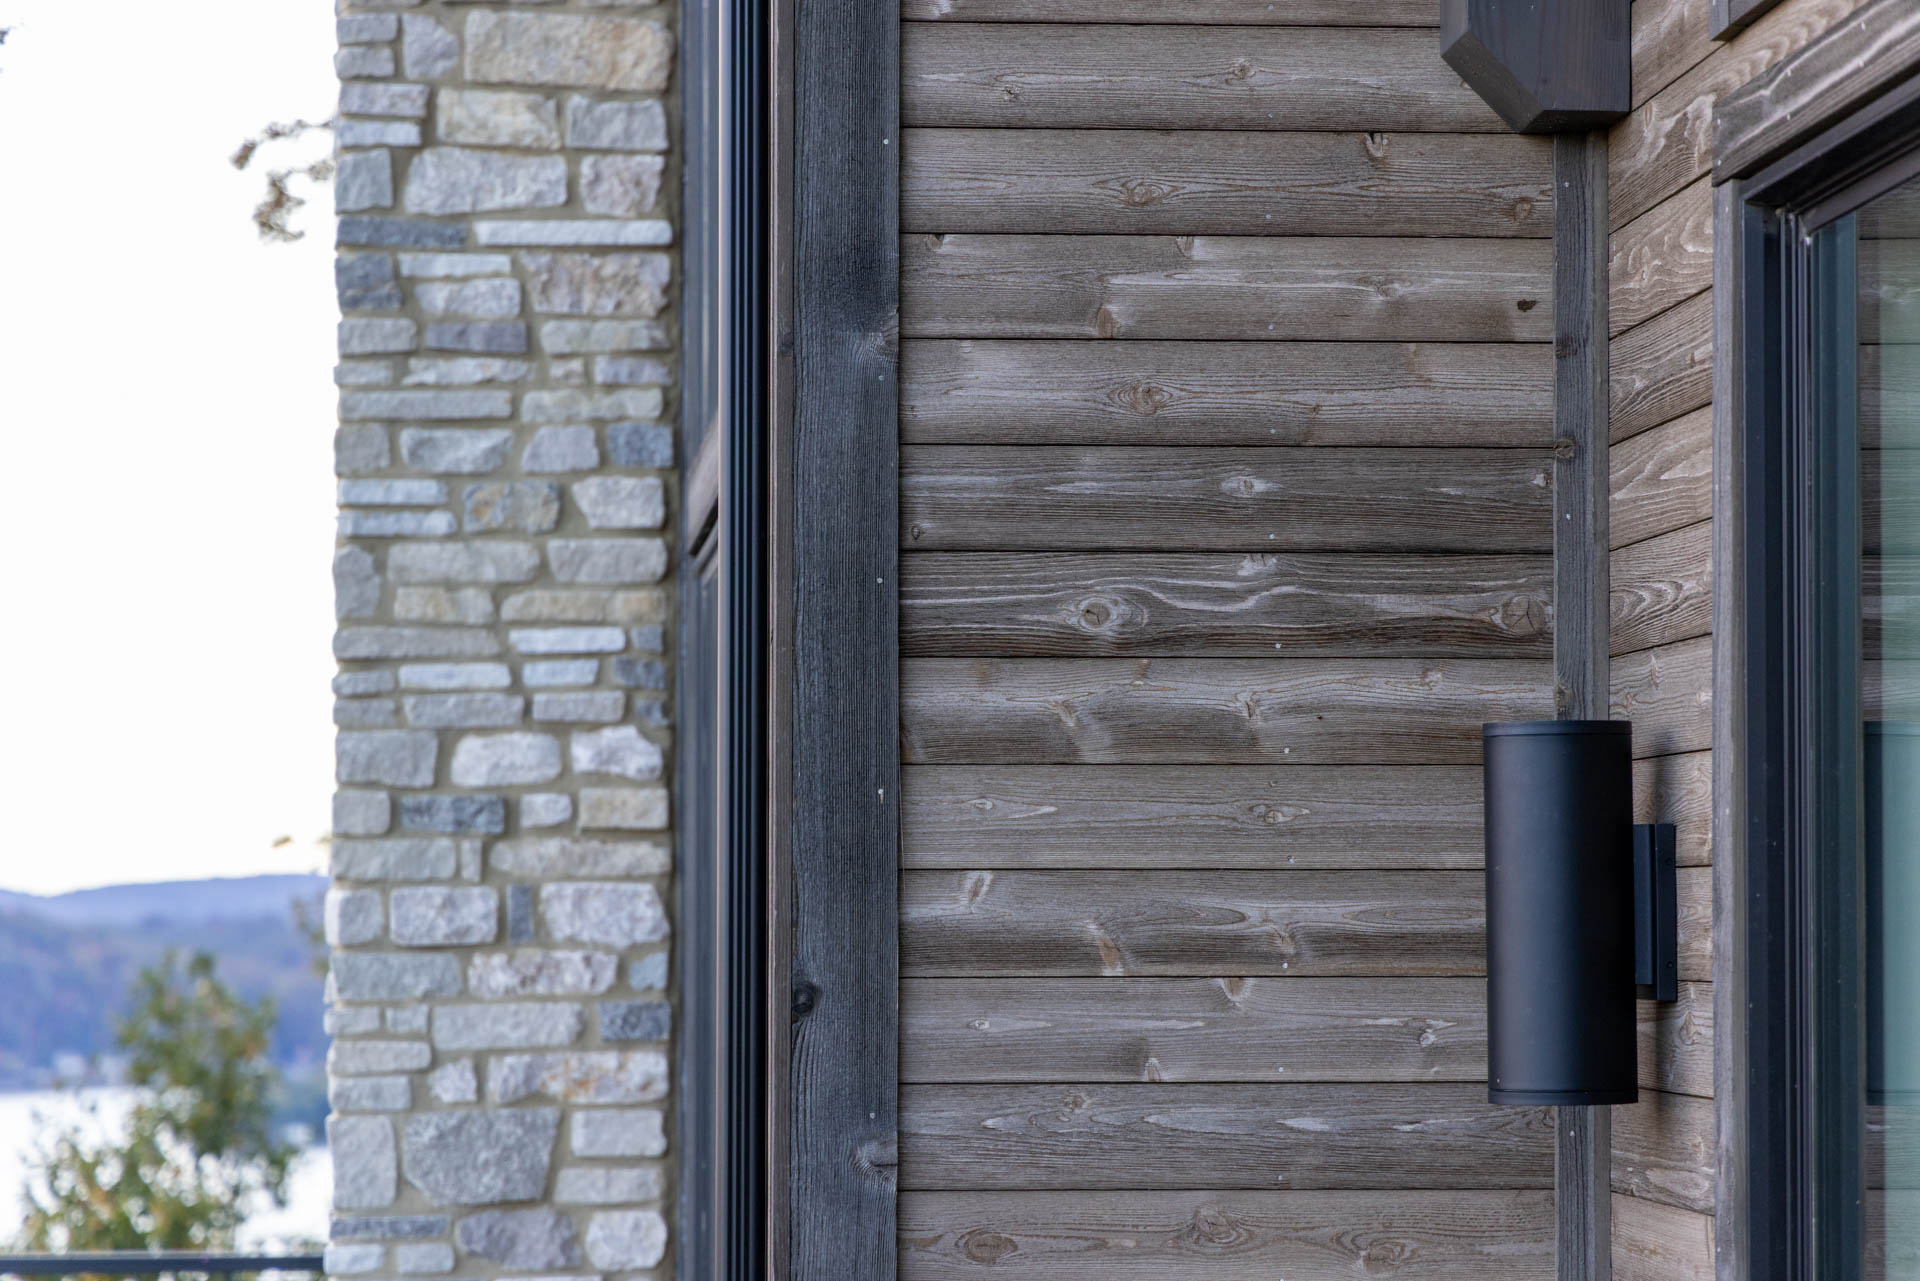
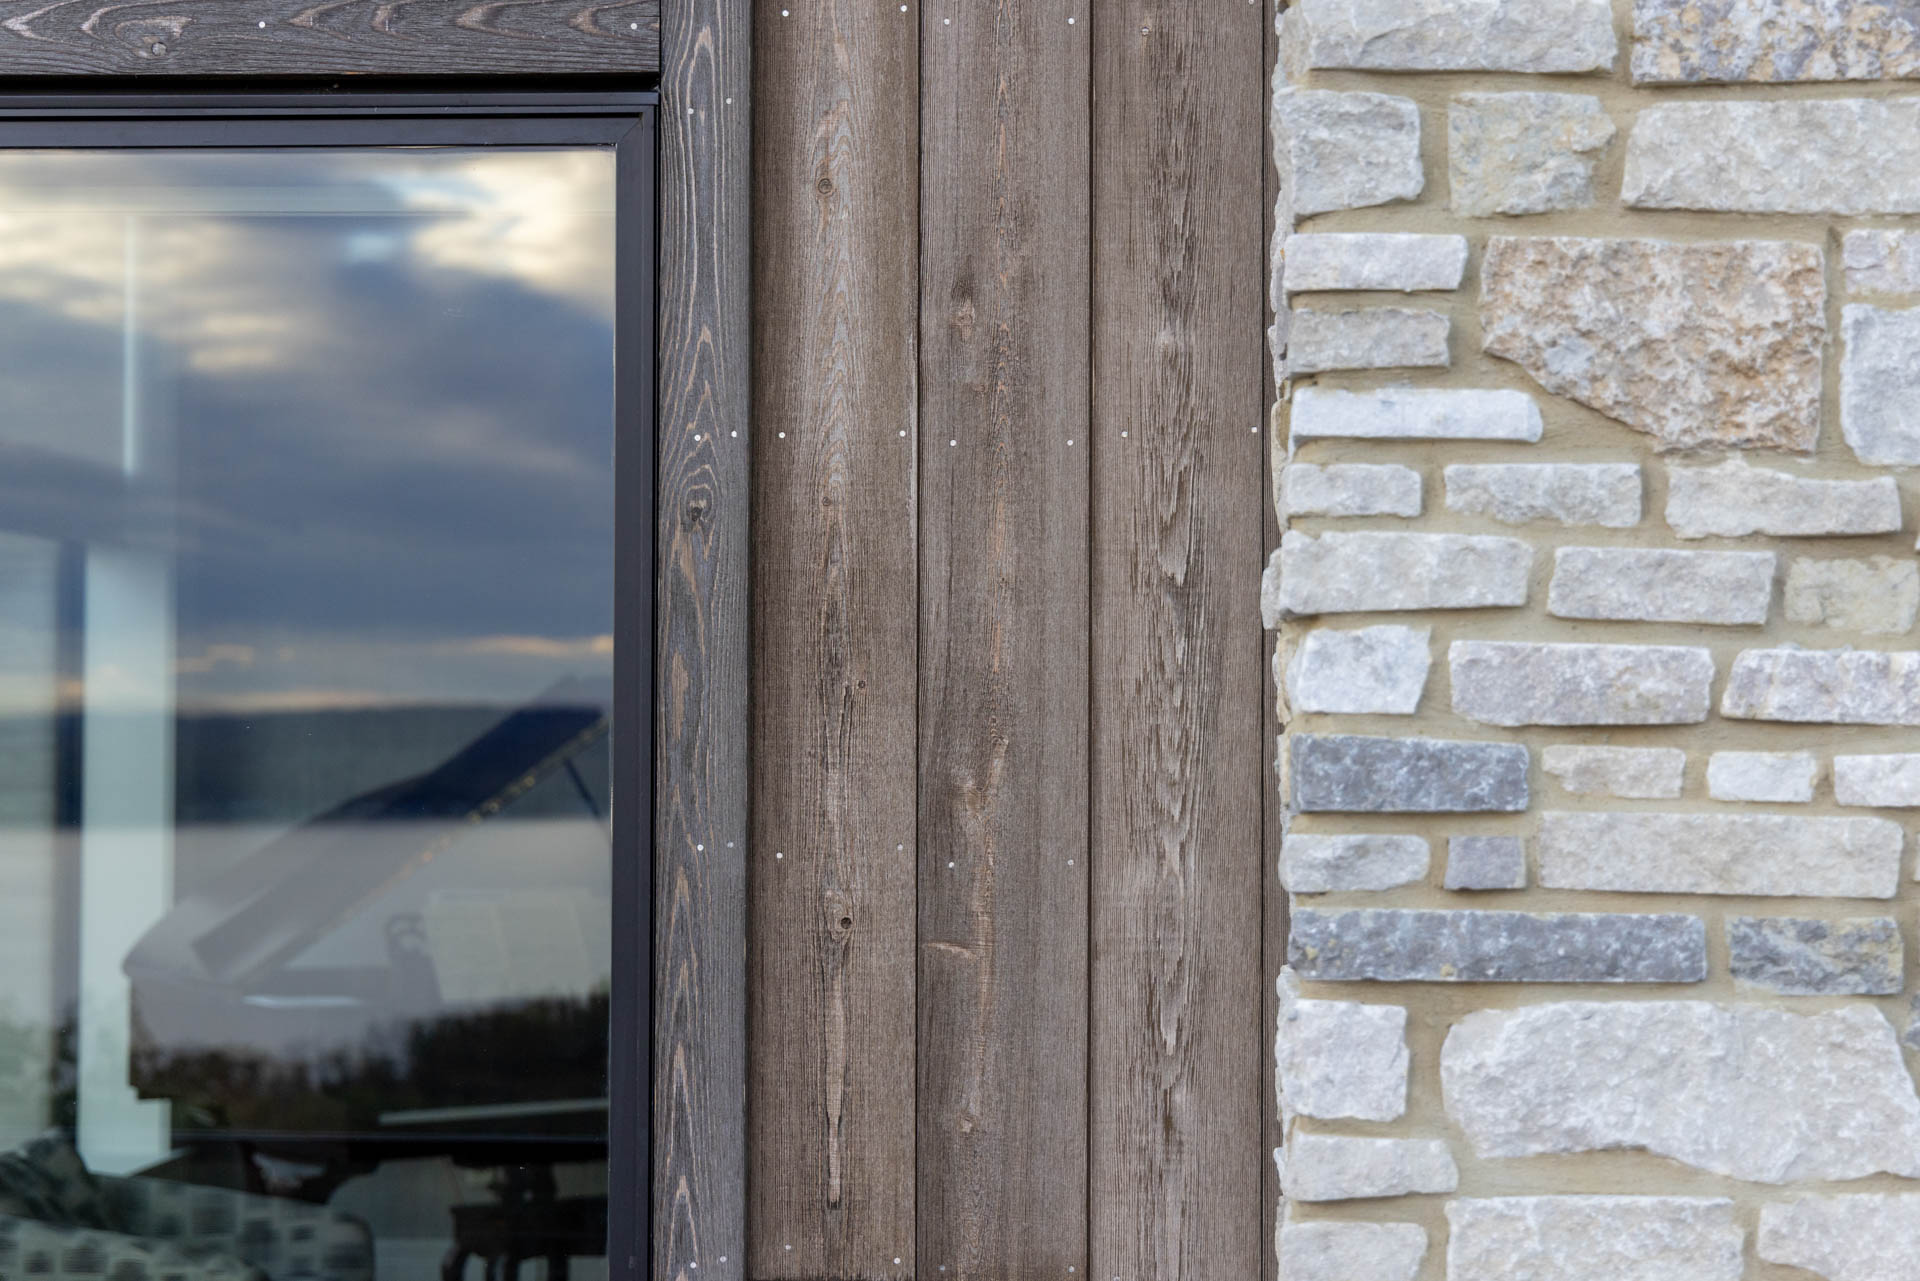
The design palette relies on the intentional pairing of our textured Charwood™Midnight with the crisp, smooth AquaFir™White line to establish clean visual boundaries and striking architectural depth.
Species & Grade Kiln Dried Douglas Fir | Knotty #2btr
Total Board Ft: 4,014 BF
Siding/Trim Element
Product Line & Color
Size & Profile
Finish / Texture
Vertical Siding Main Siding
Charwood™ Midnight
1″ x 8″ Shiplap (RL)
Charred
Horizontal Siding Entry Accent
AquaFir™ White
1″ x 8″ Shiplap (RL)
Smooth
Soffits Porch Ceilings
AquaFir™ White
1″ x 6″ Tongue & Groove (RL)
Smooth
Frieze Boards Trim Work
Charwood™ Midnight
1″ x 3″ Square Edge (RL)
Charred
Window/Door Trim
Charwood™ Midnight
1″ x 4″ Square Edge (RL)
Charred
Edge / Fascia Boards Roof Edges
Charwood™ Midnight
1″ x 10″ & 1″ x 6″ Sq. Edge (RL)
Charred / Both Sides
DESIGN HIGHLIGHTS
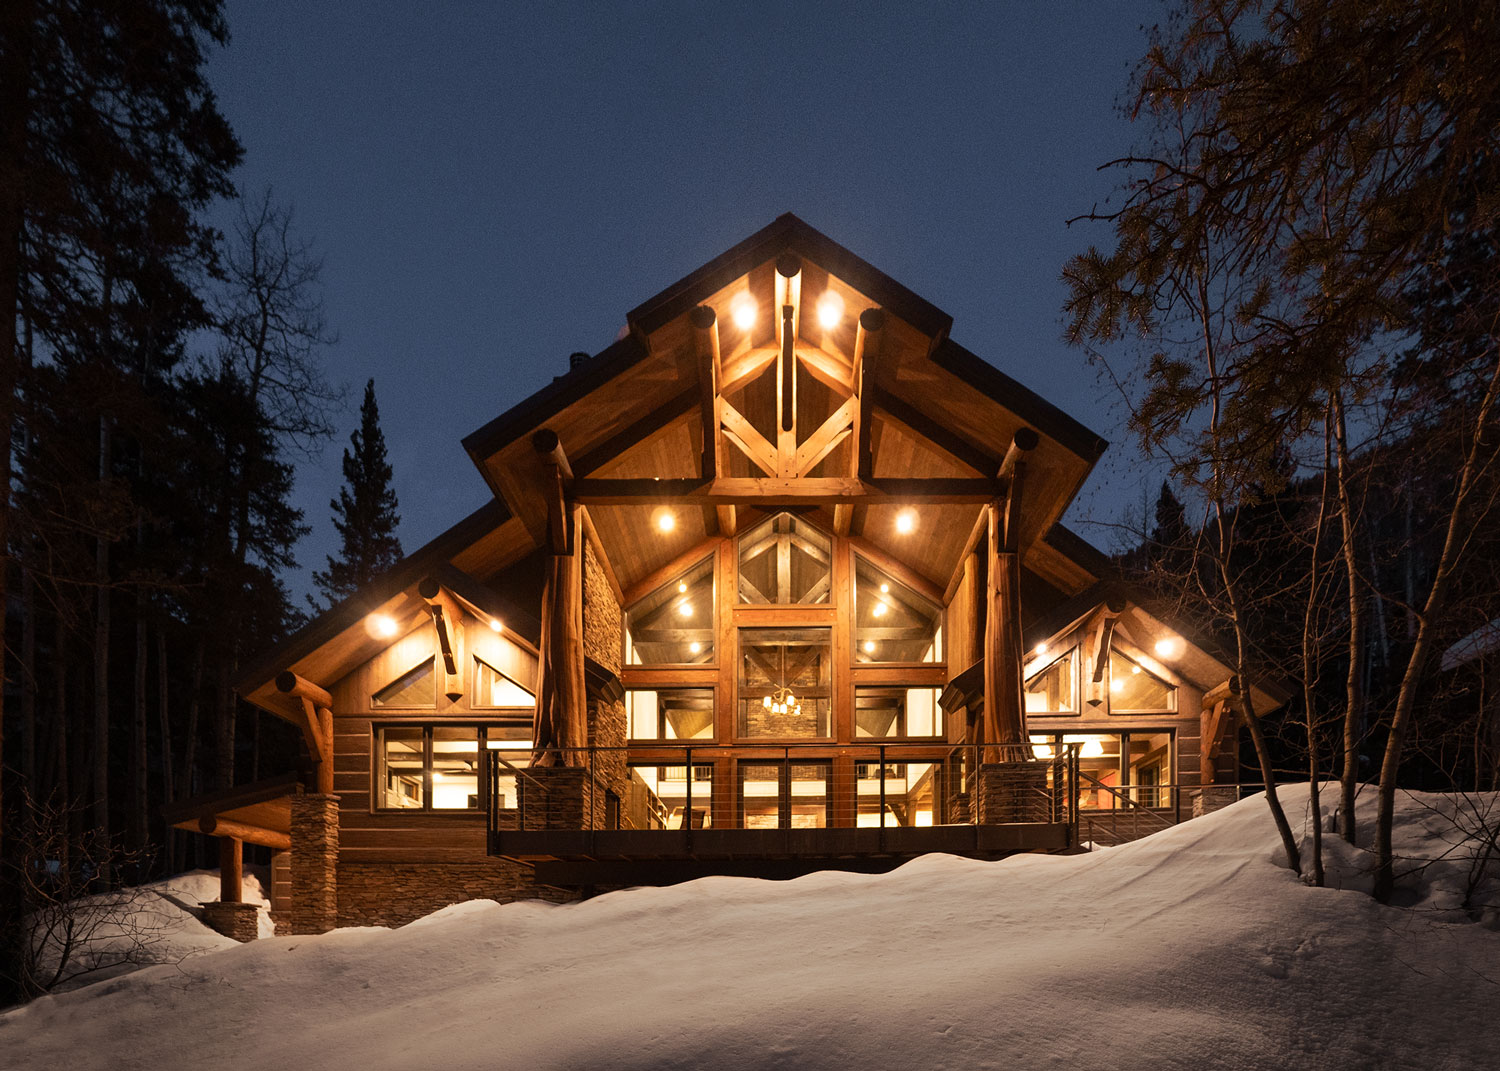
The Visual Muffler: Melding into the Tree Line
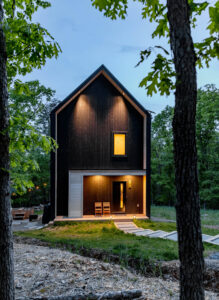
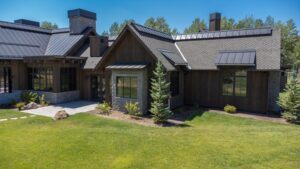
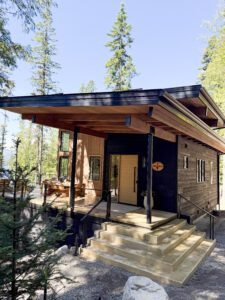
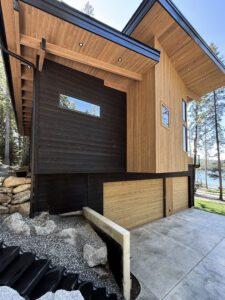
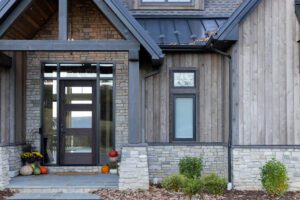
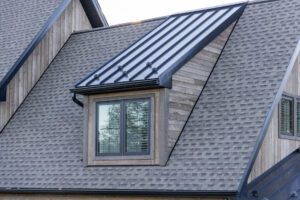
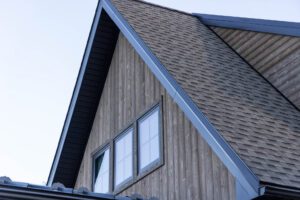
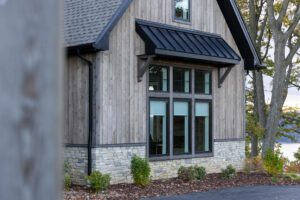
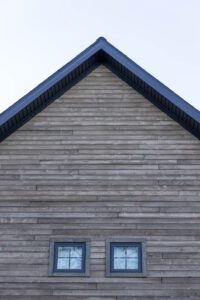
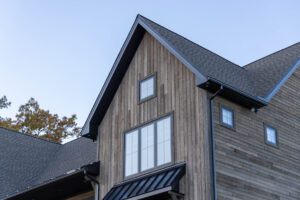
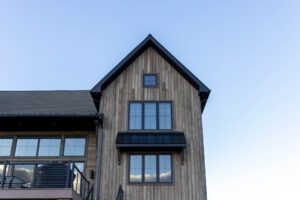
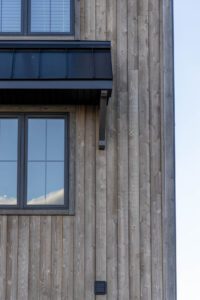
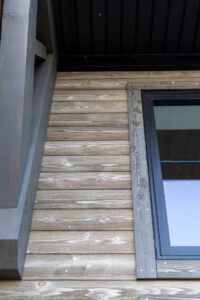
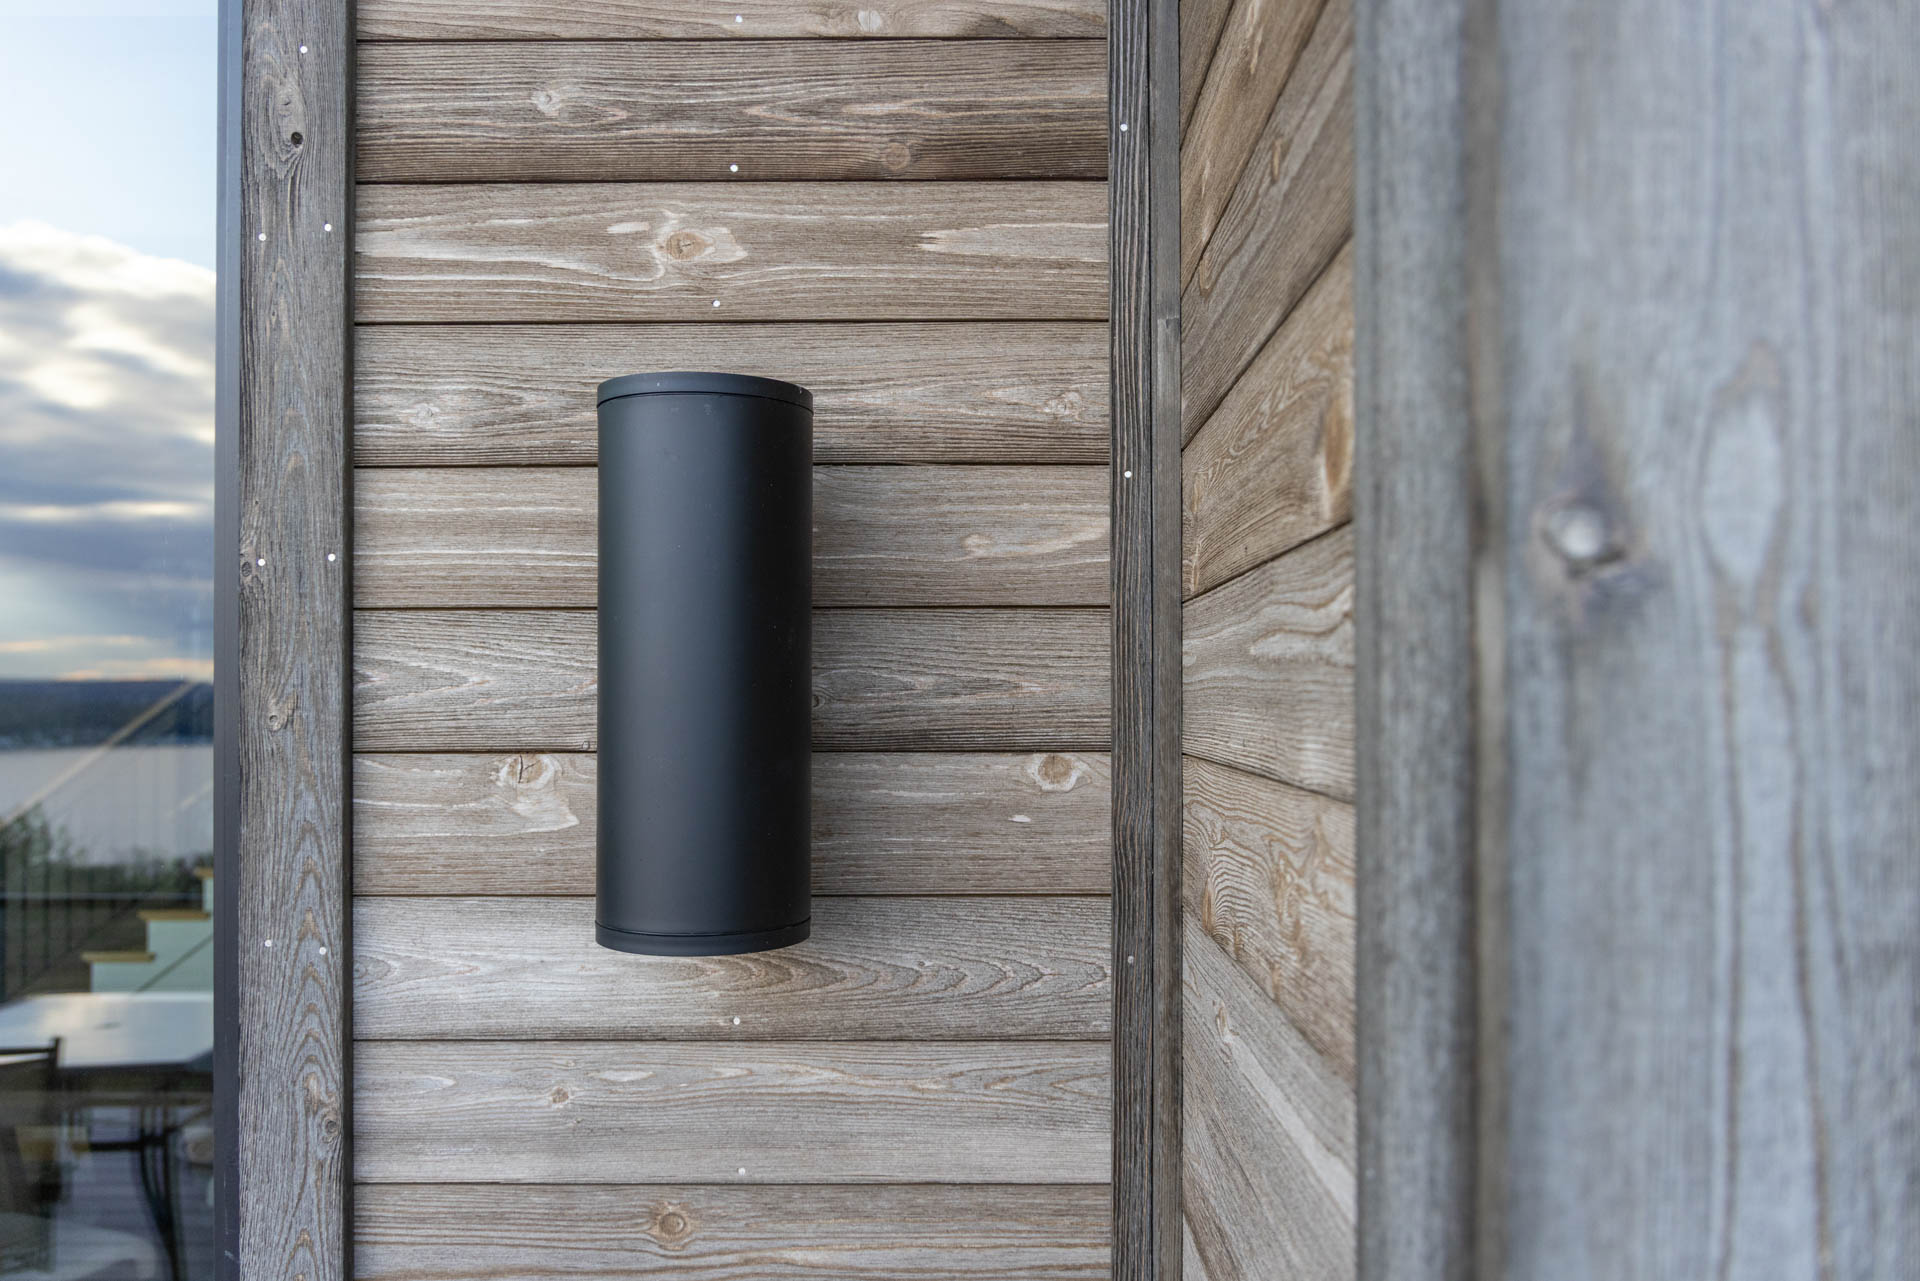
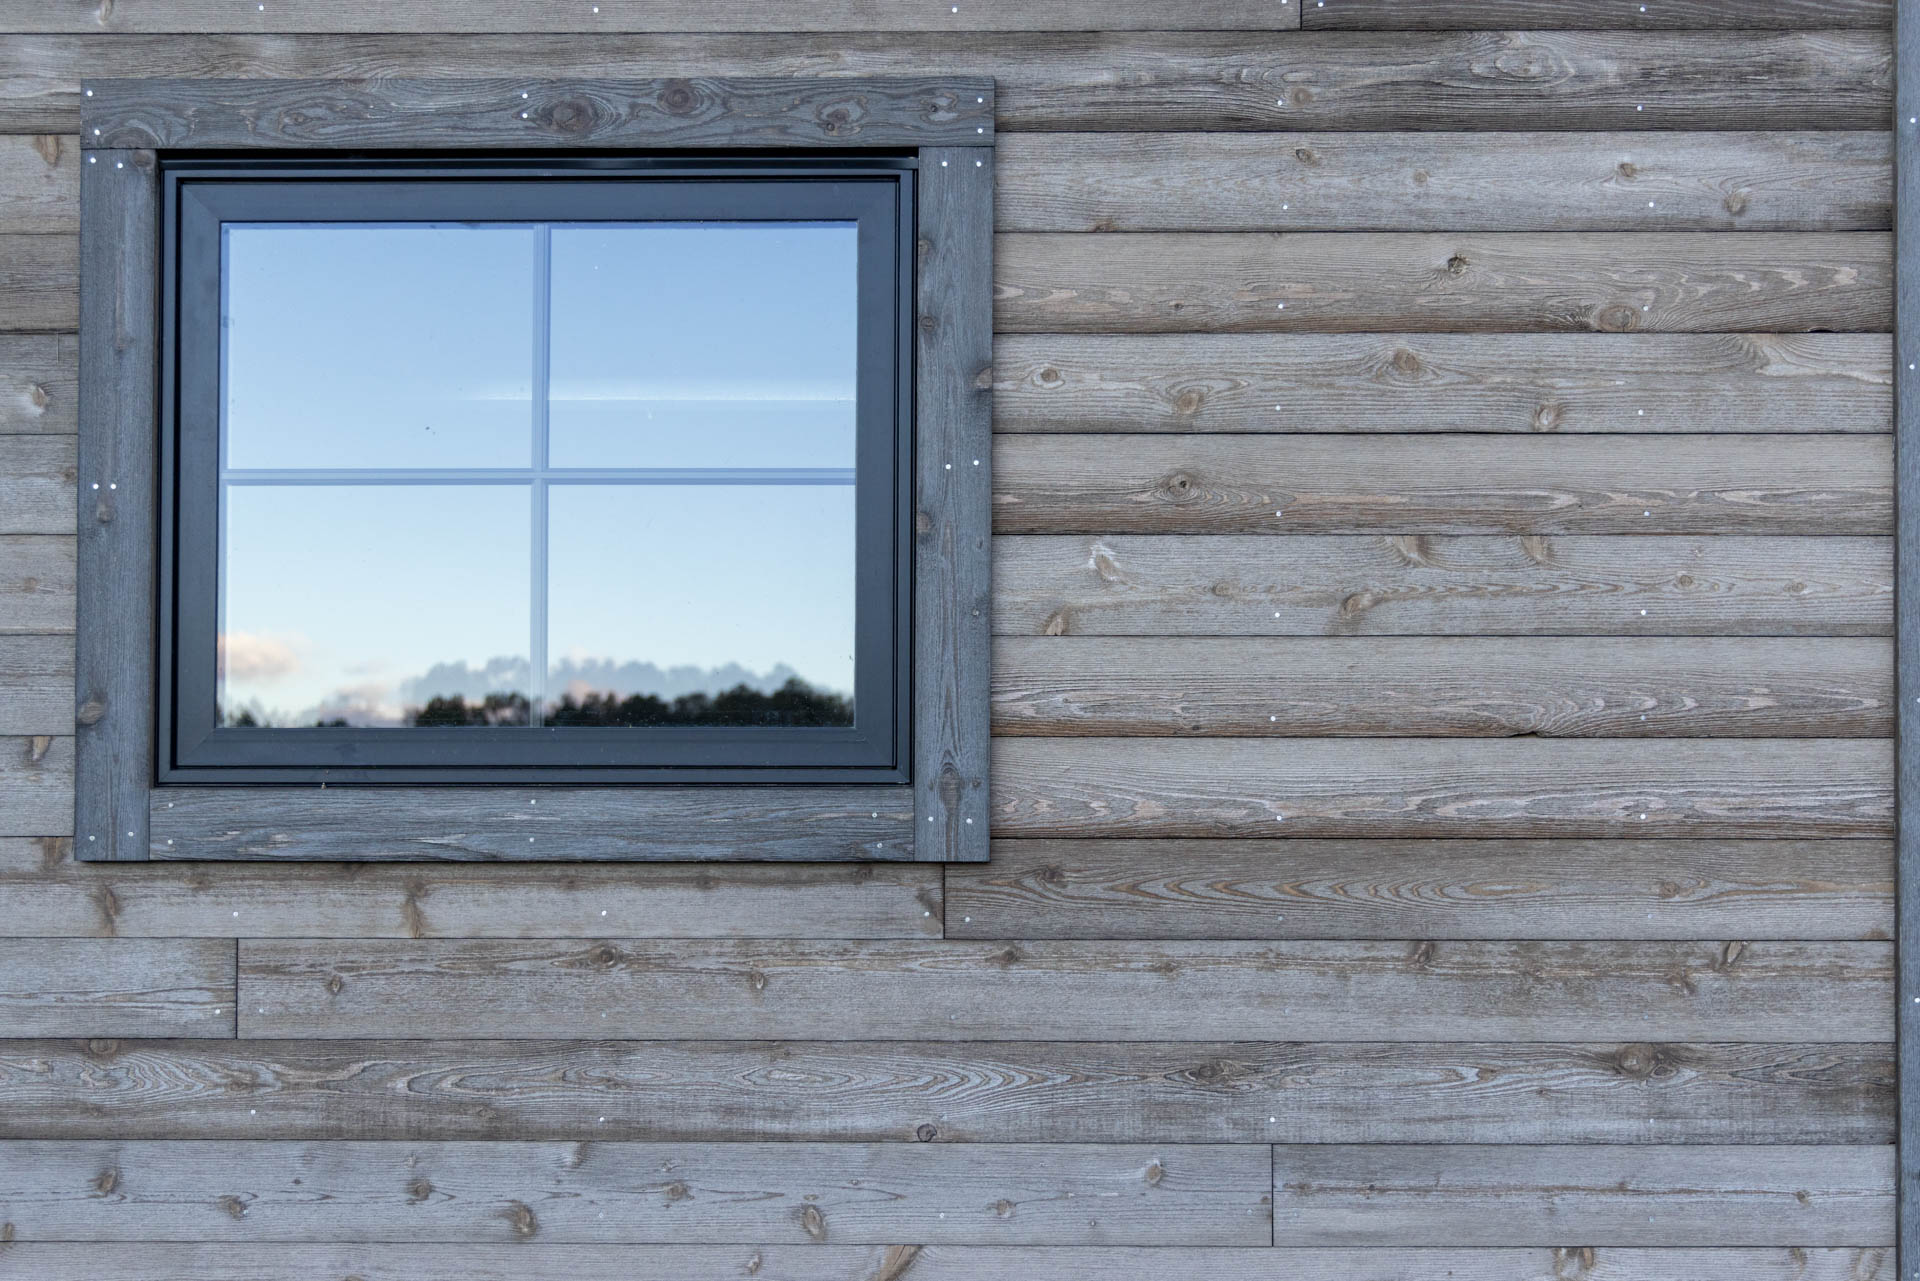
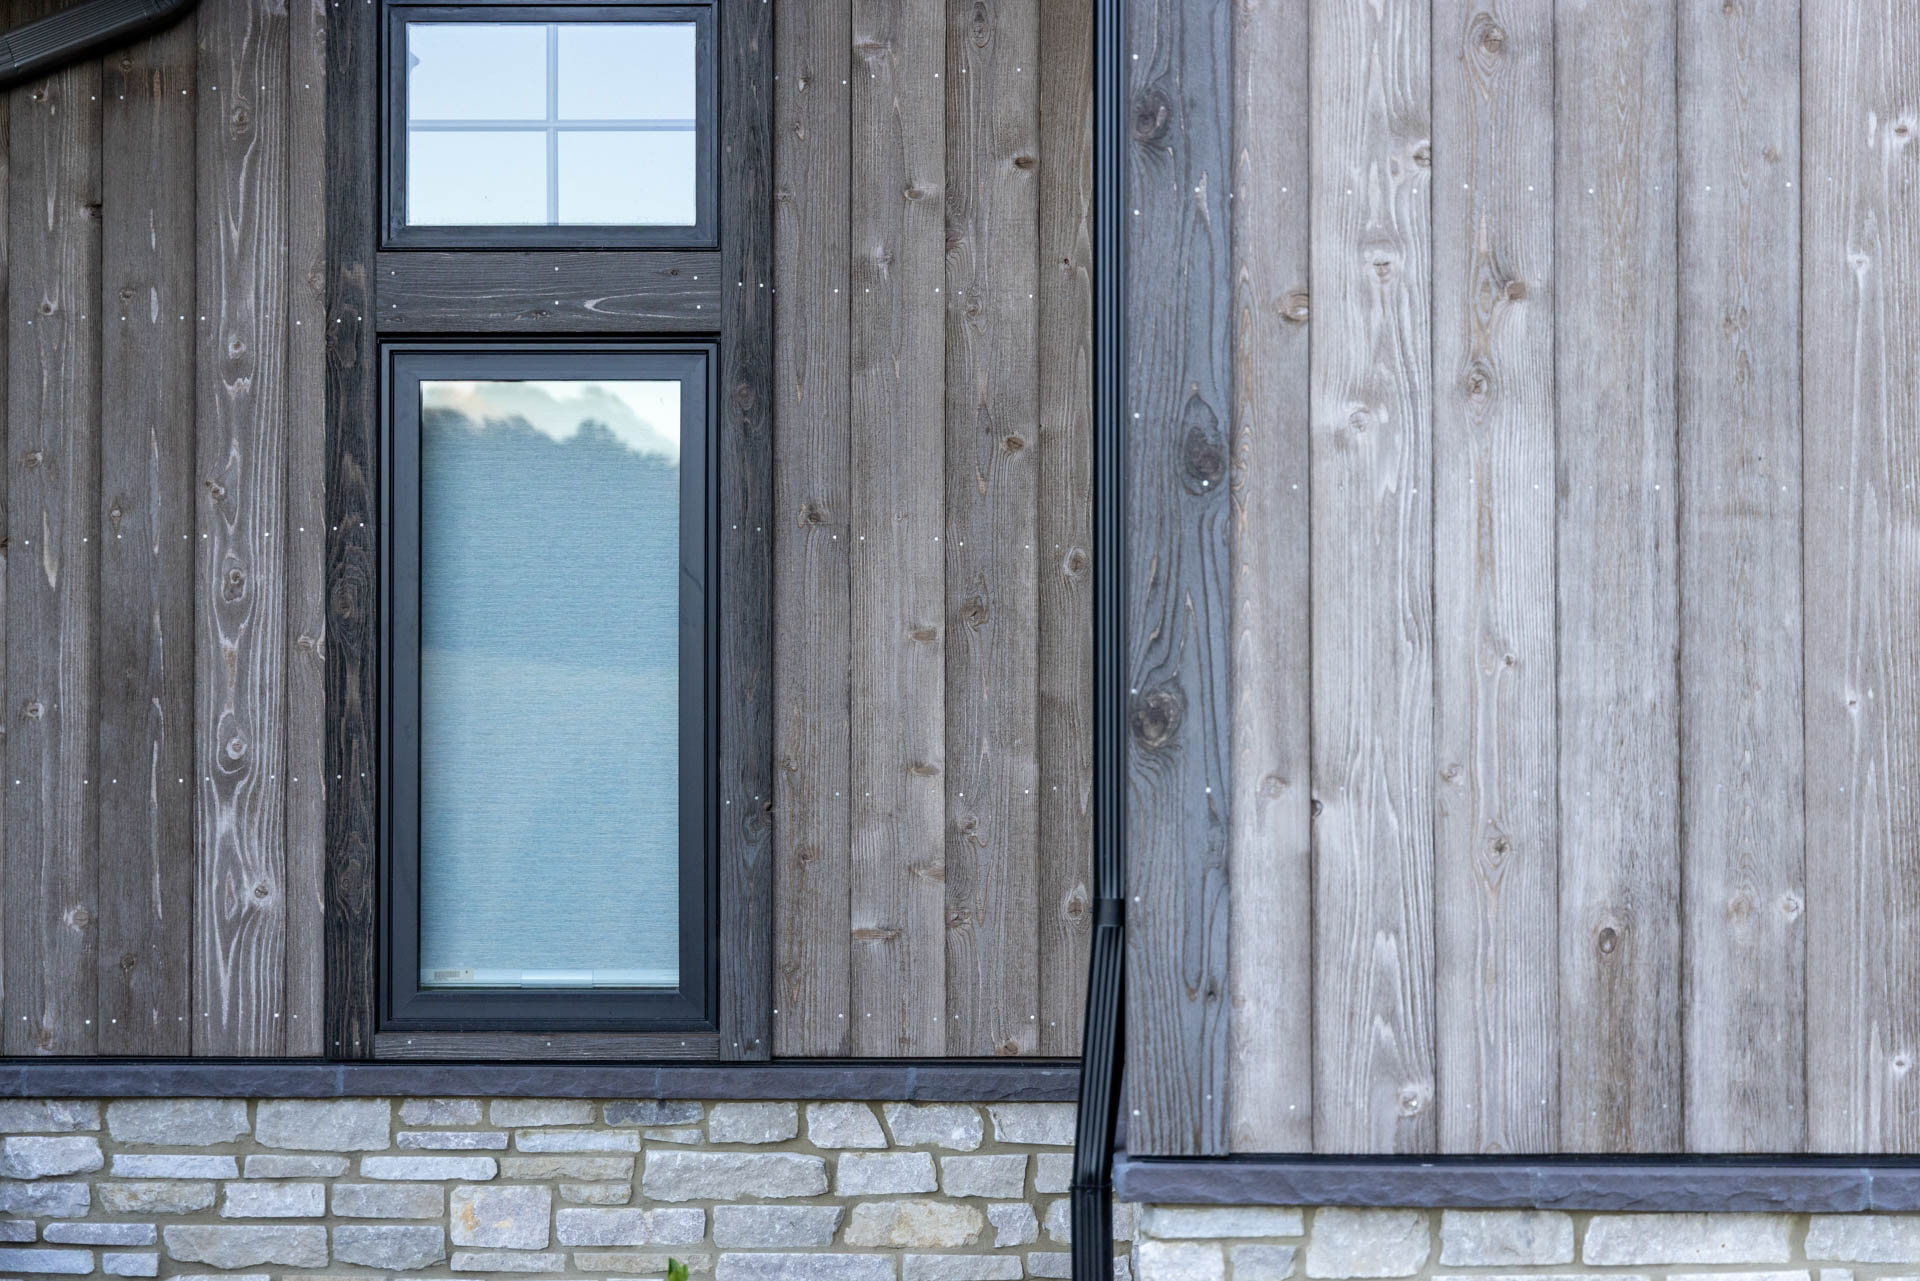
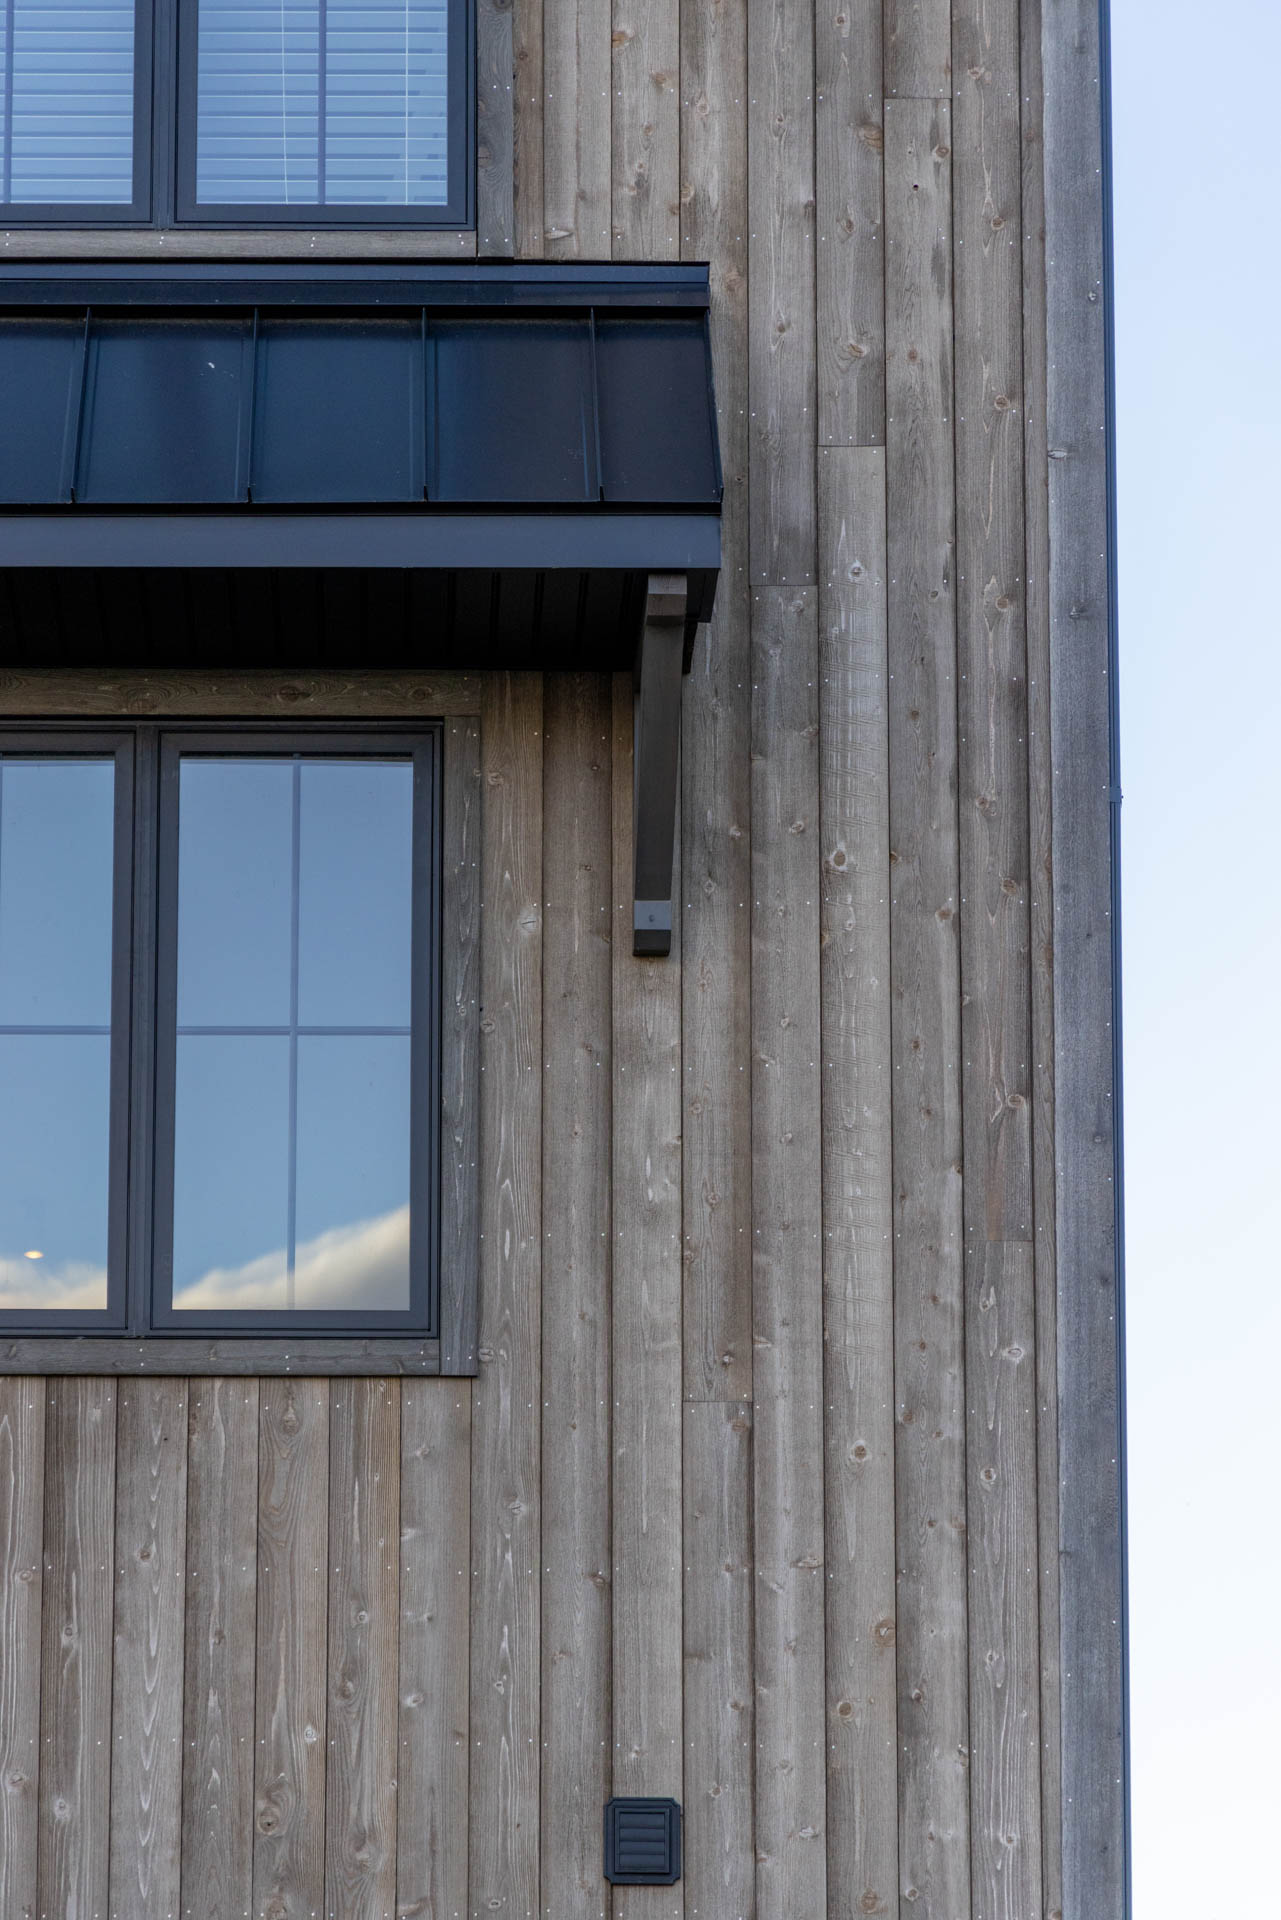
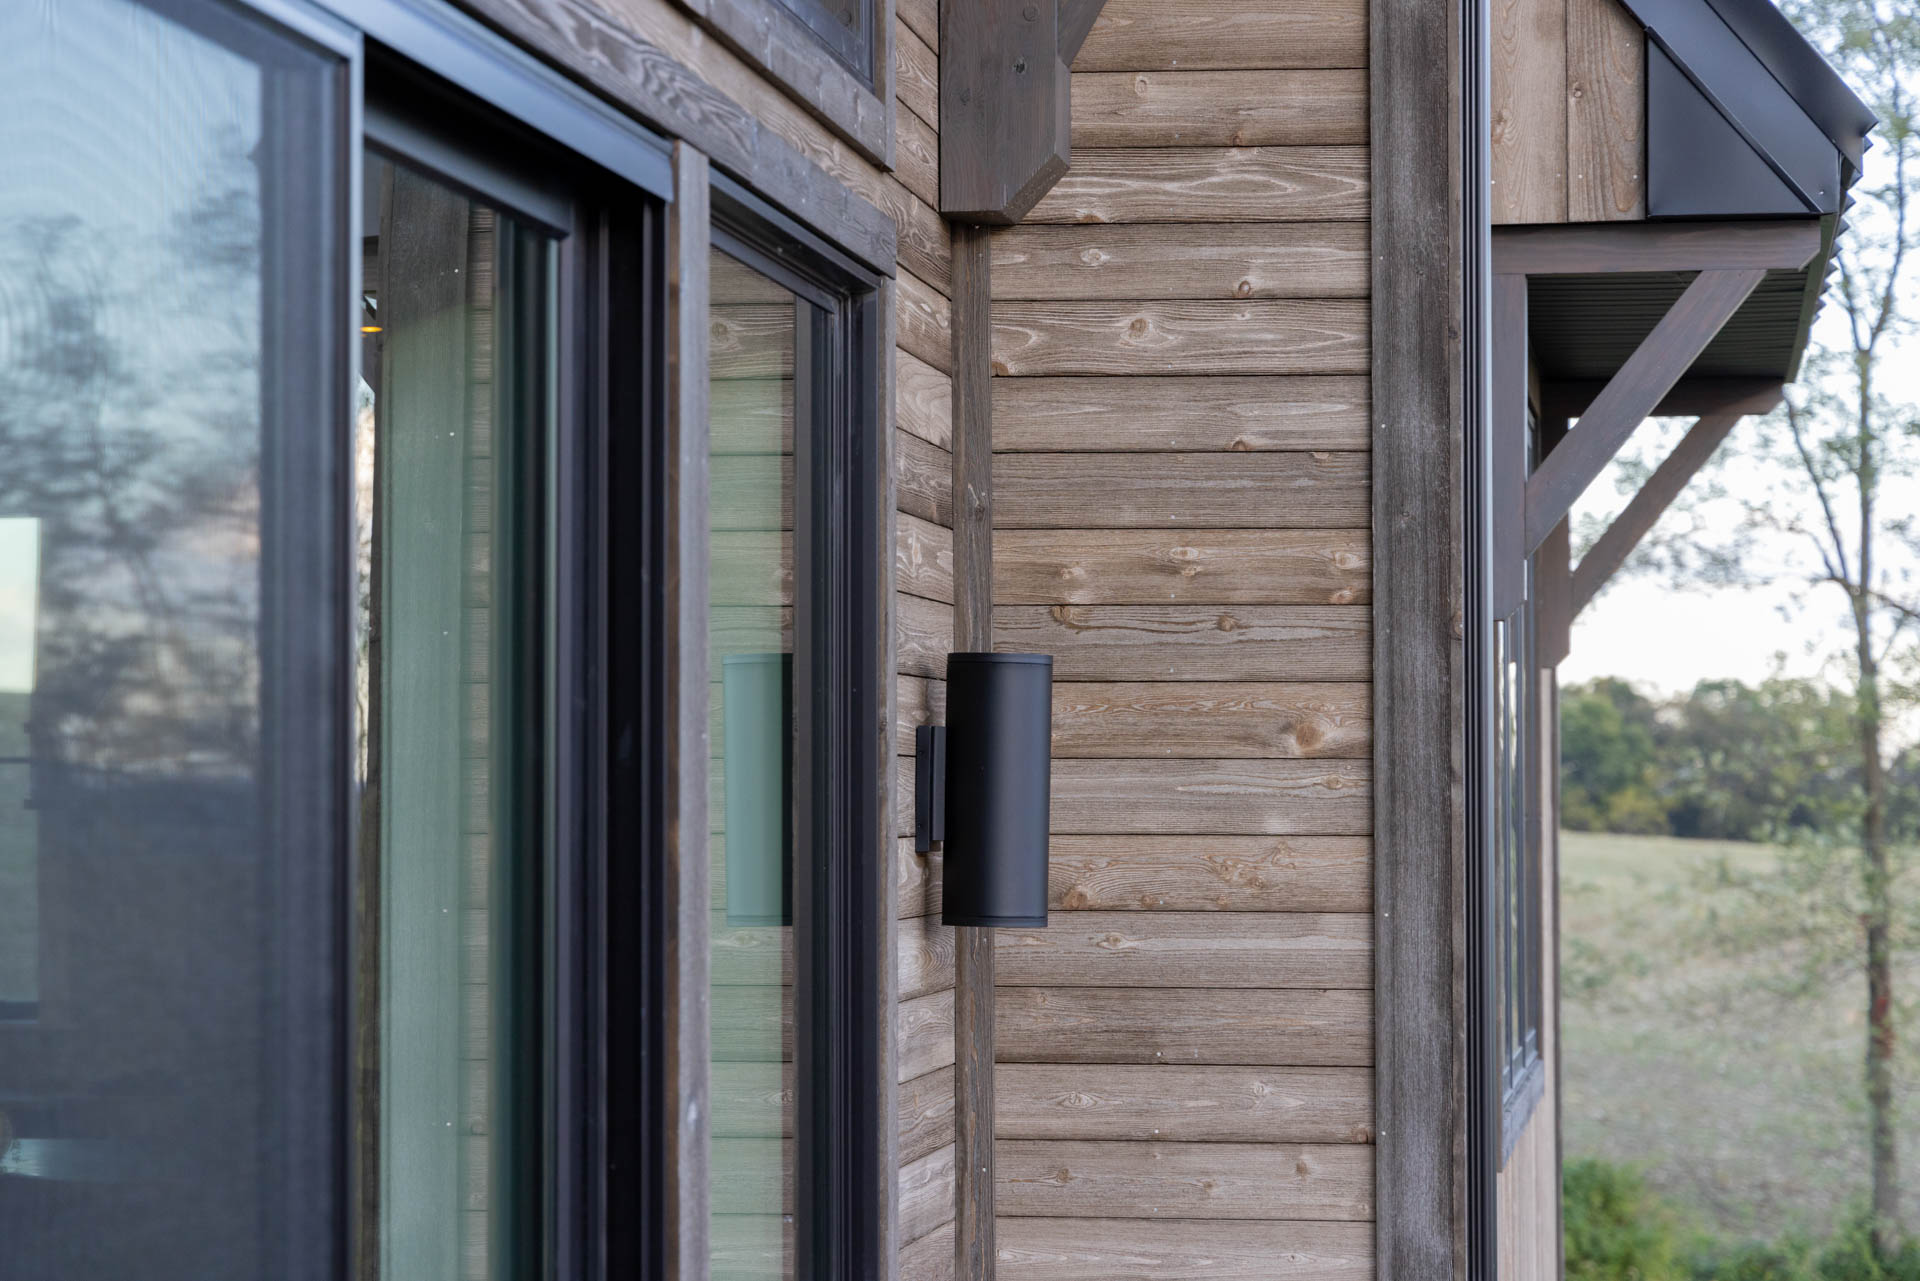
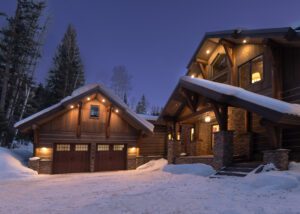
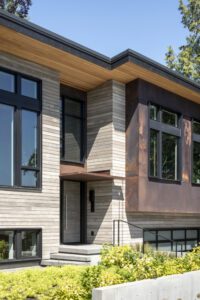
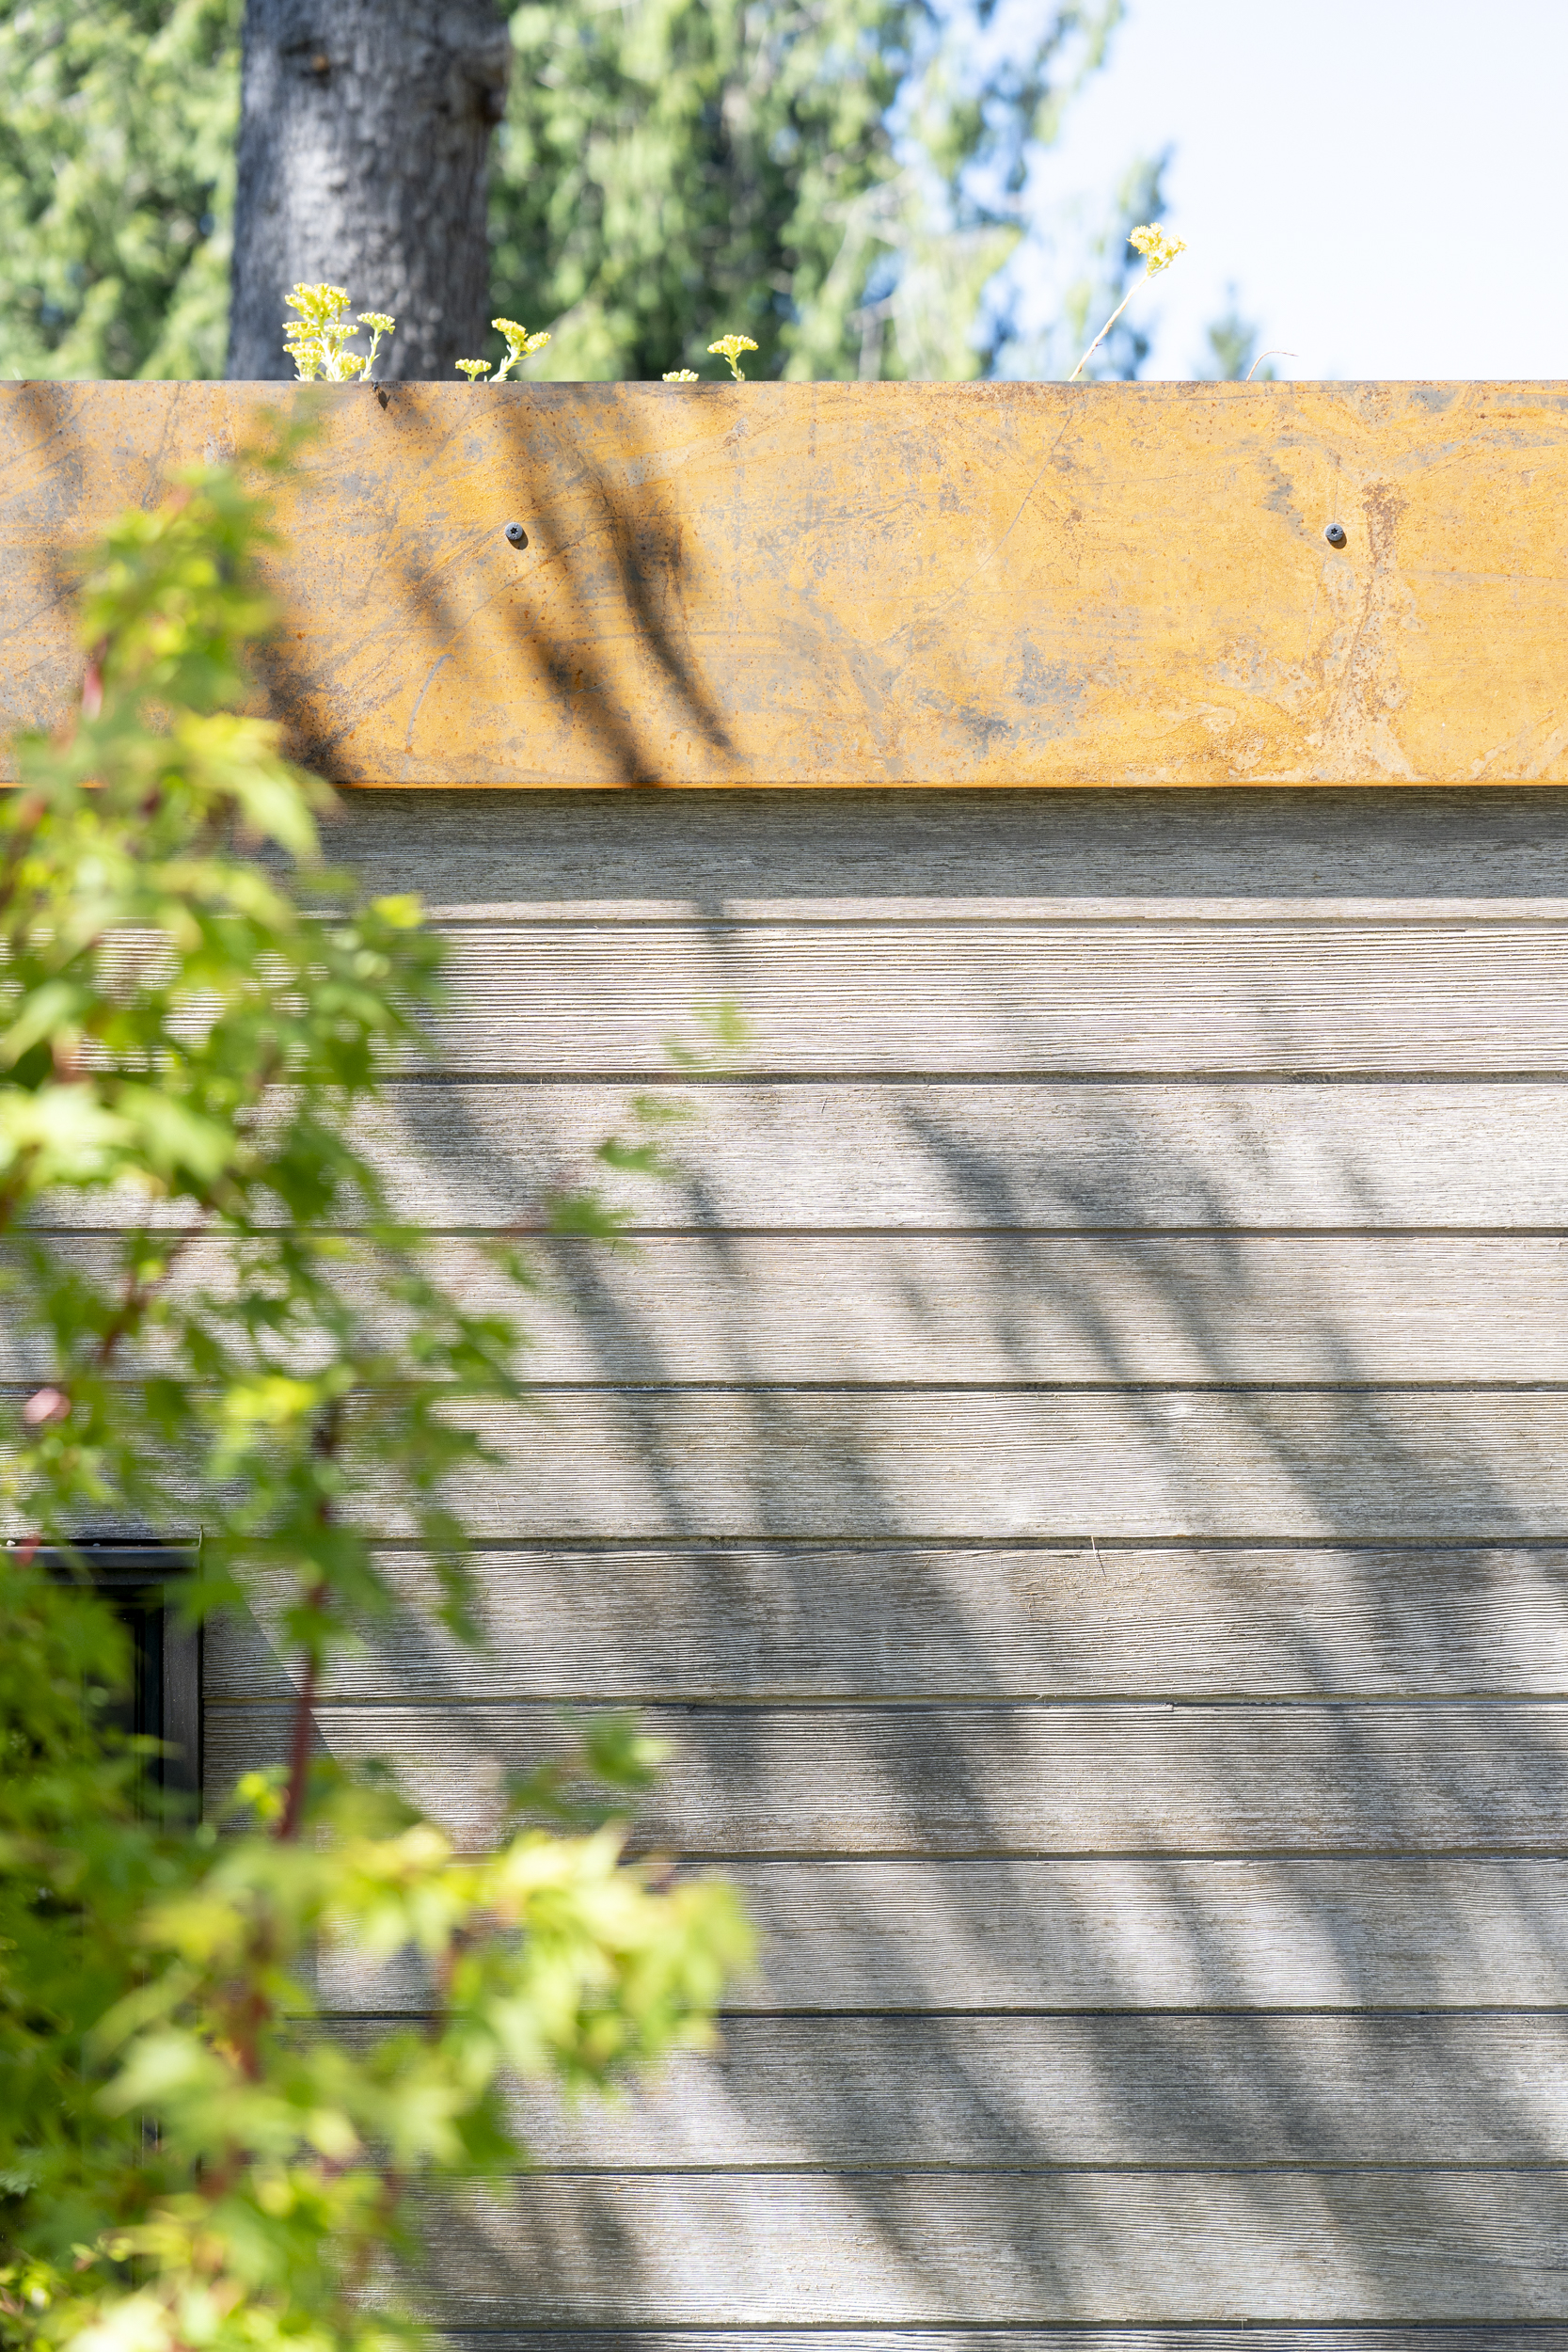
Instead of a bright, traditionally painted structure that demands attention, the builders wrapped the main volume of the home in 1×8 Charwood™ Midnight vertical shiplap siding.
Consequently, by using charred black timber, the architecture essentially acts as a visual muffler. The matte-black facade absorbs harsh light and beautifully mimics the deep, natural shadows that the surrounding forest casts. Rather than shouting, the house elegantly recedes into the tree line, allowing the quiet of the forest to take center stage.
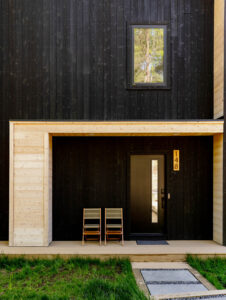
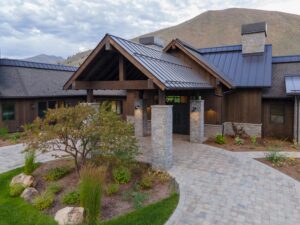
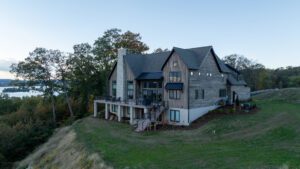
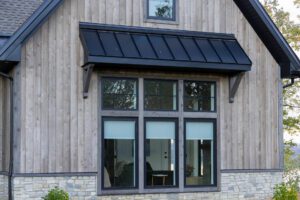
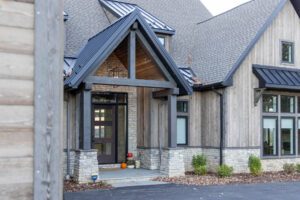
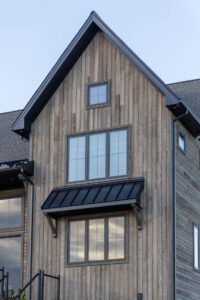
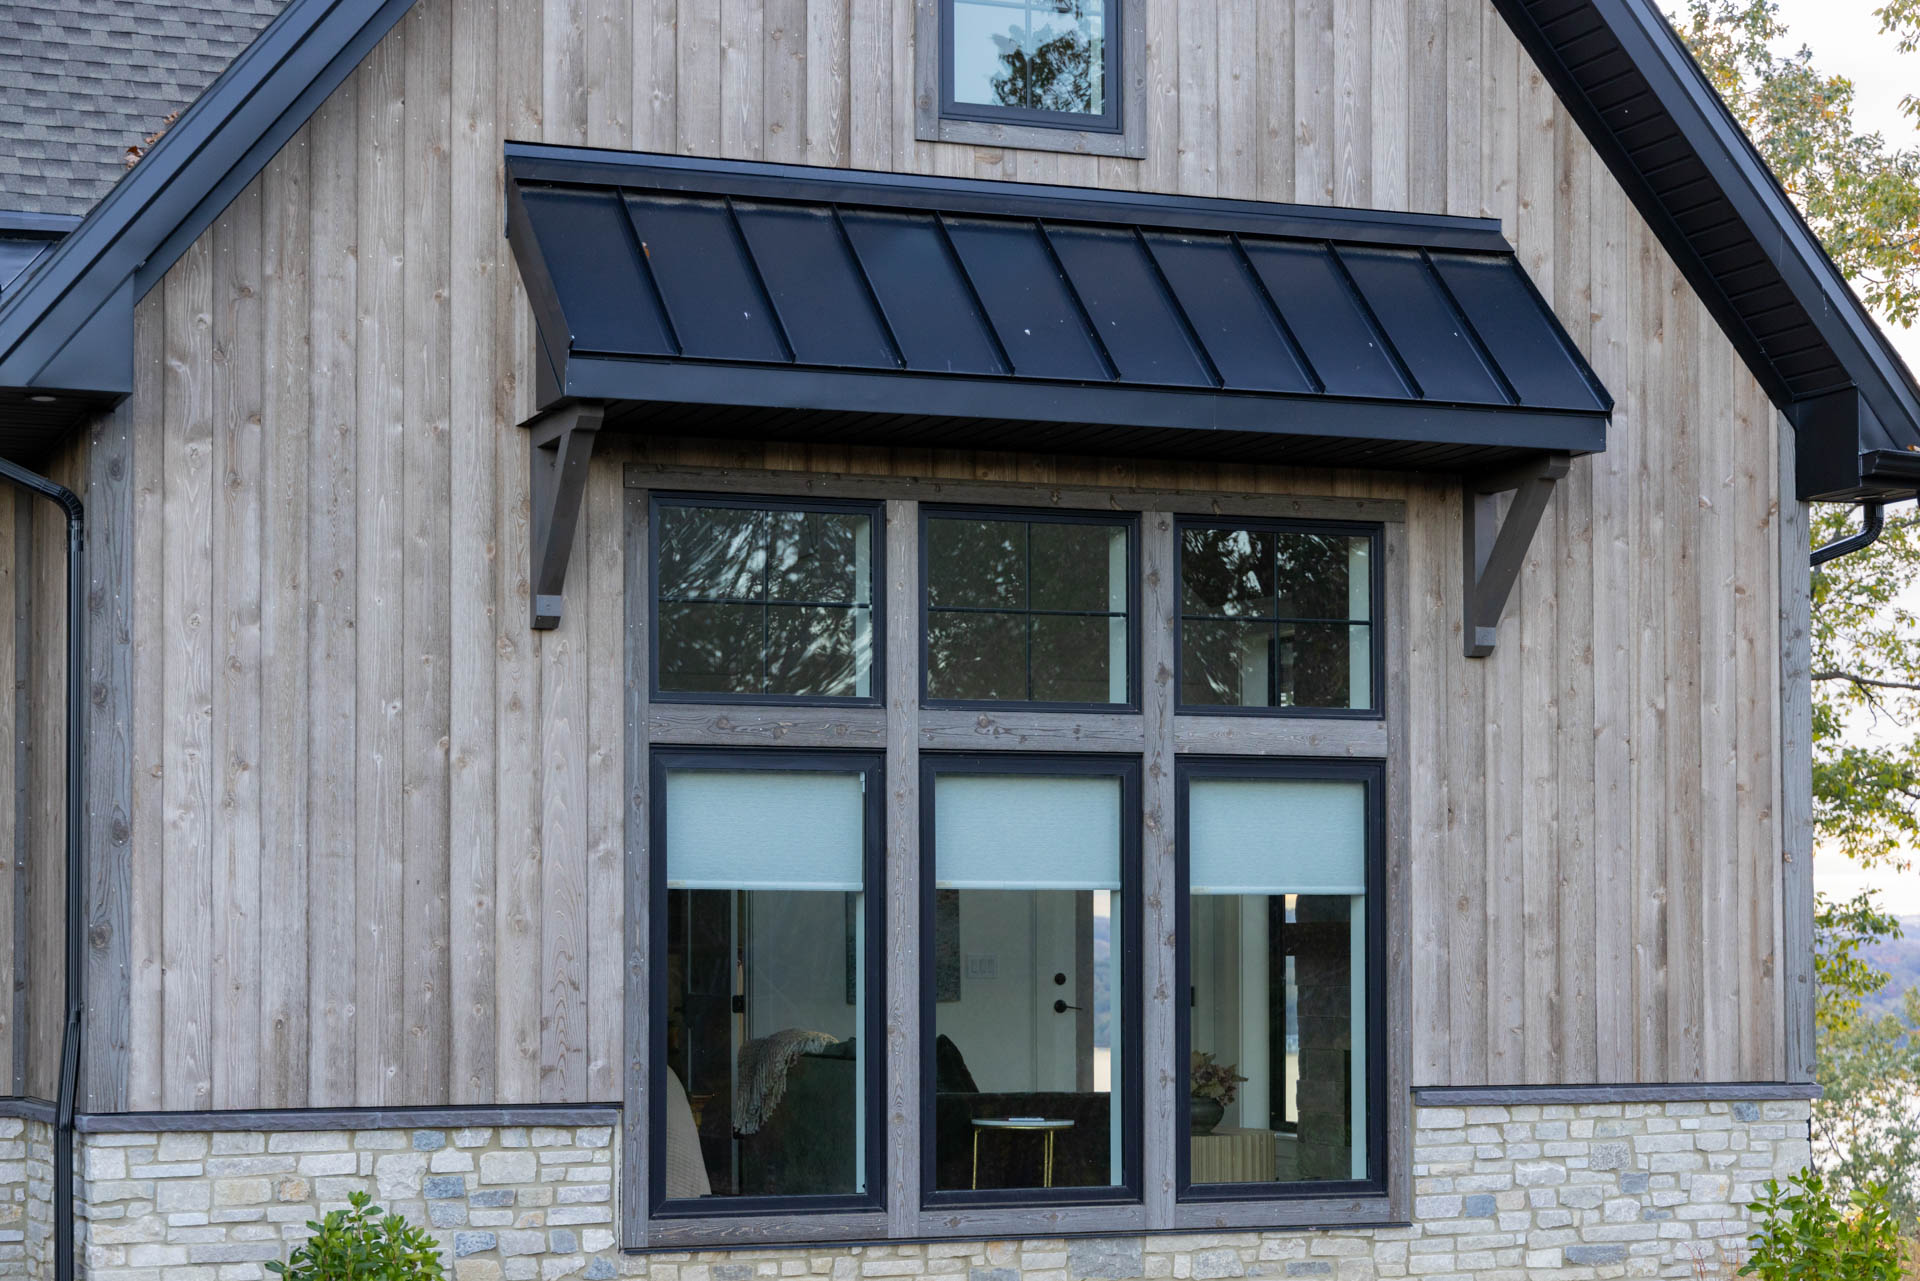
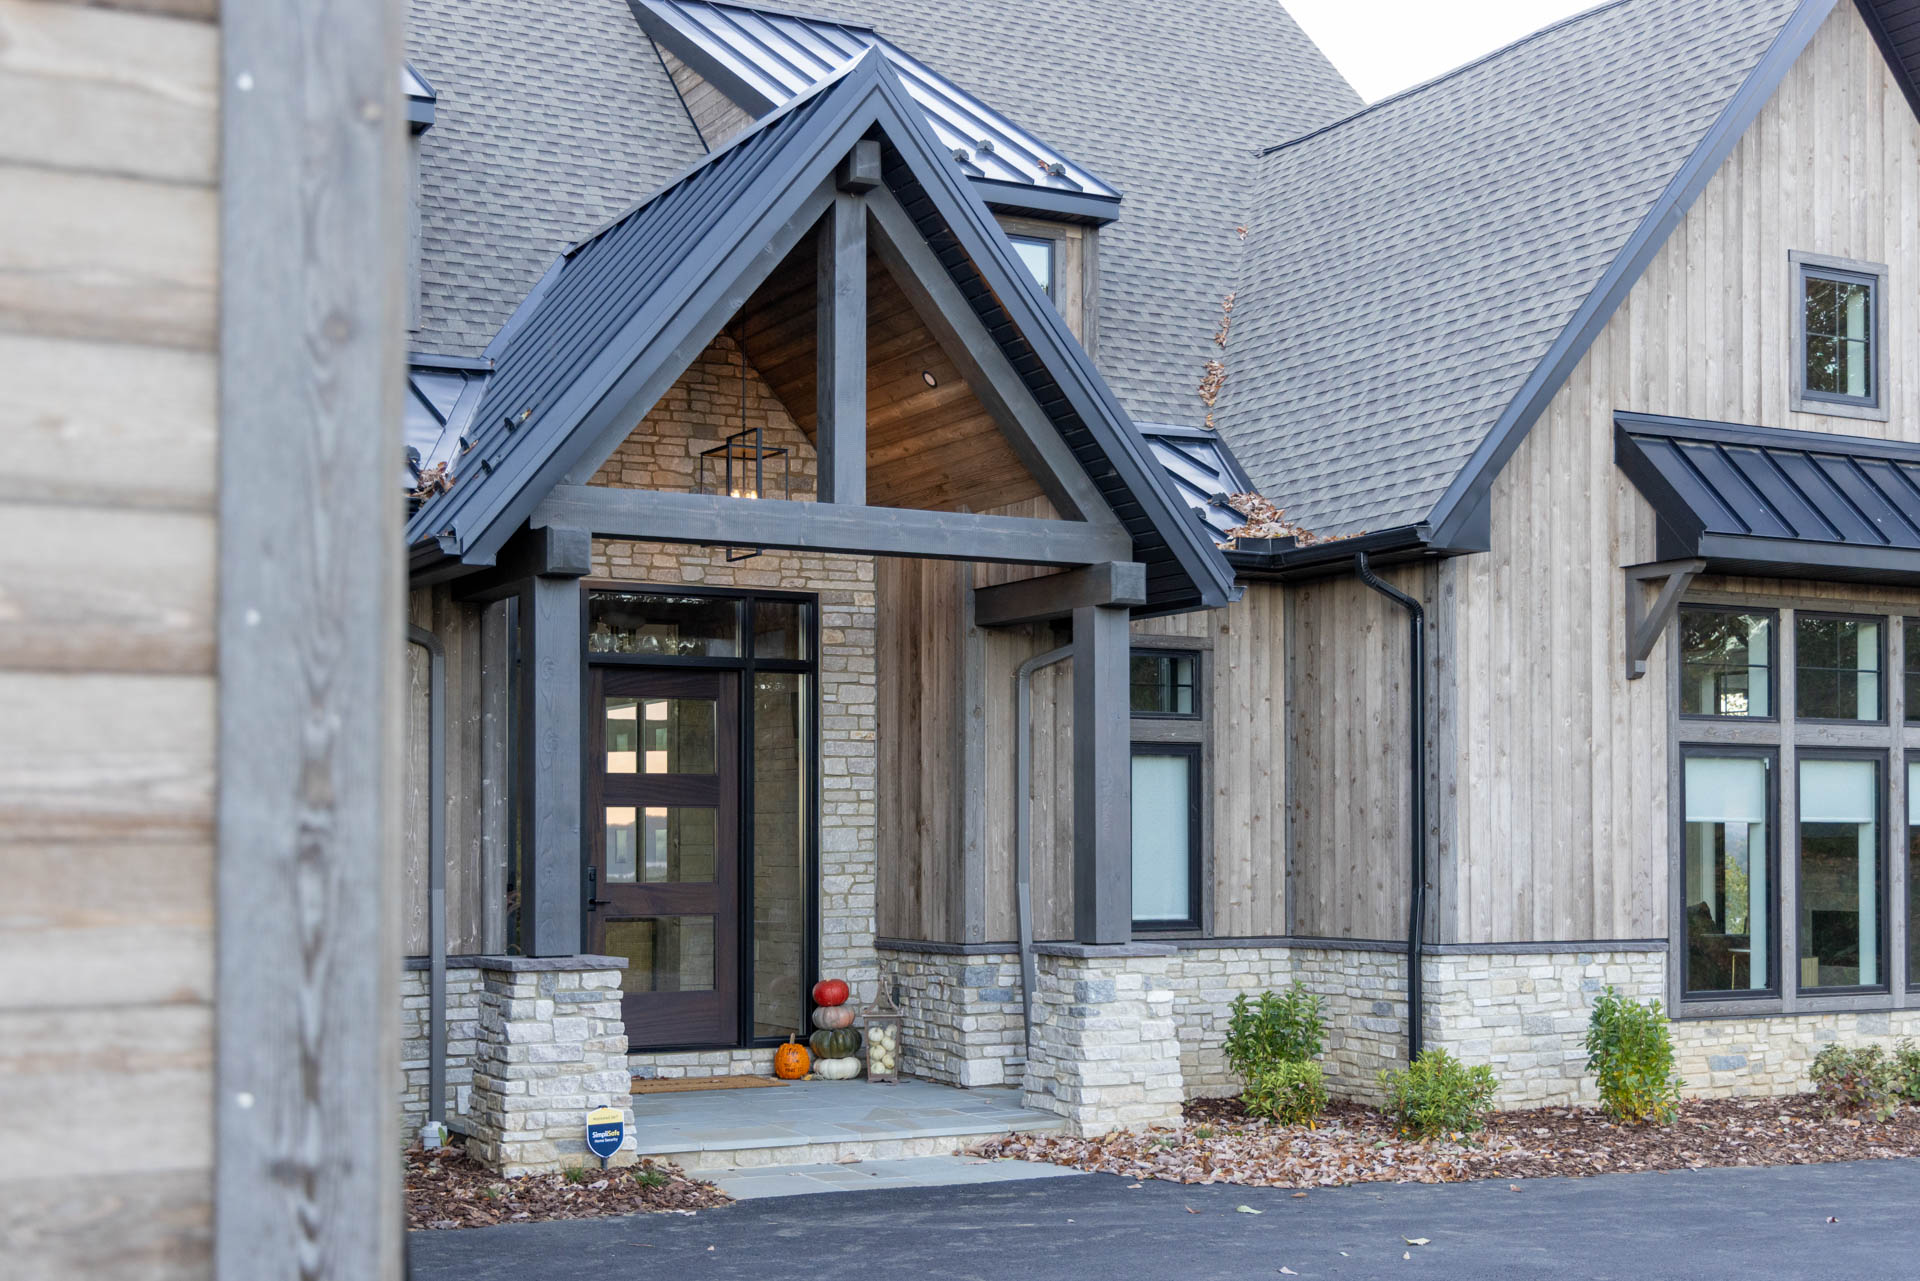
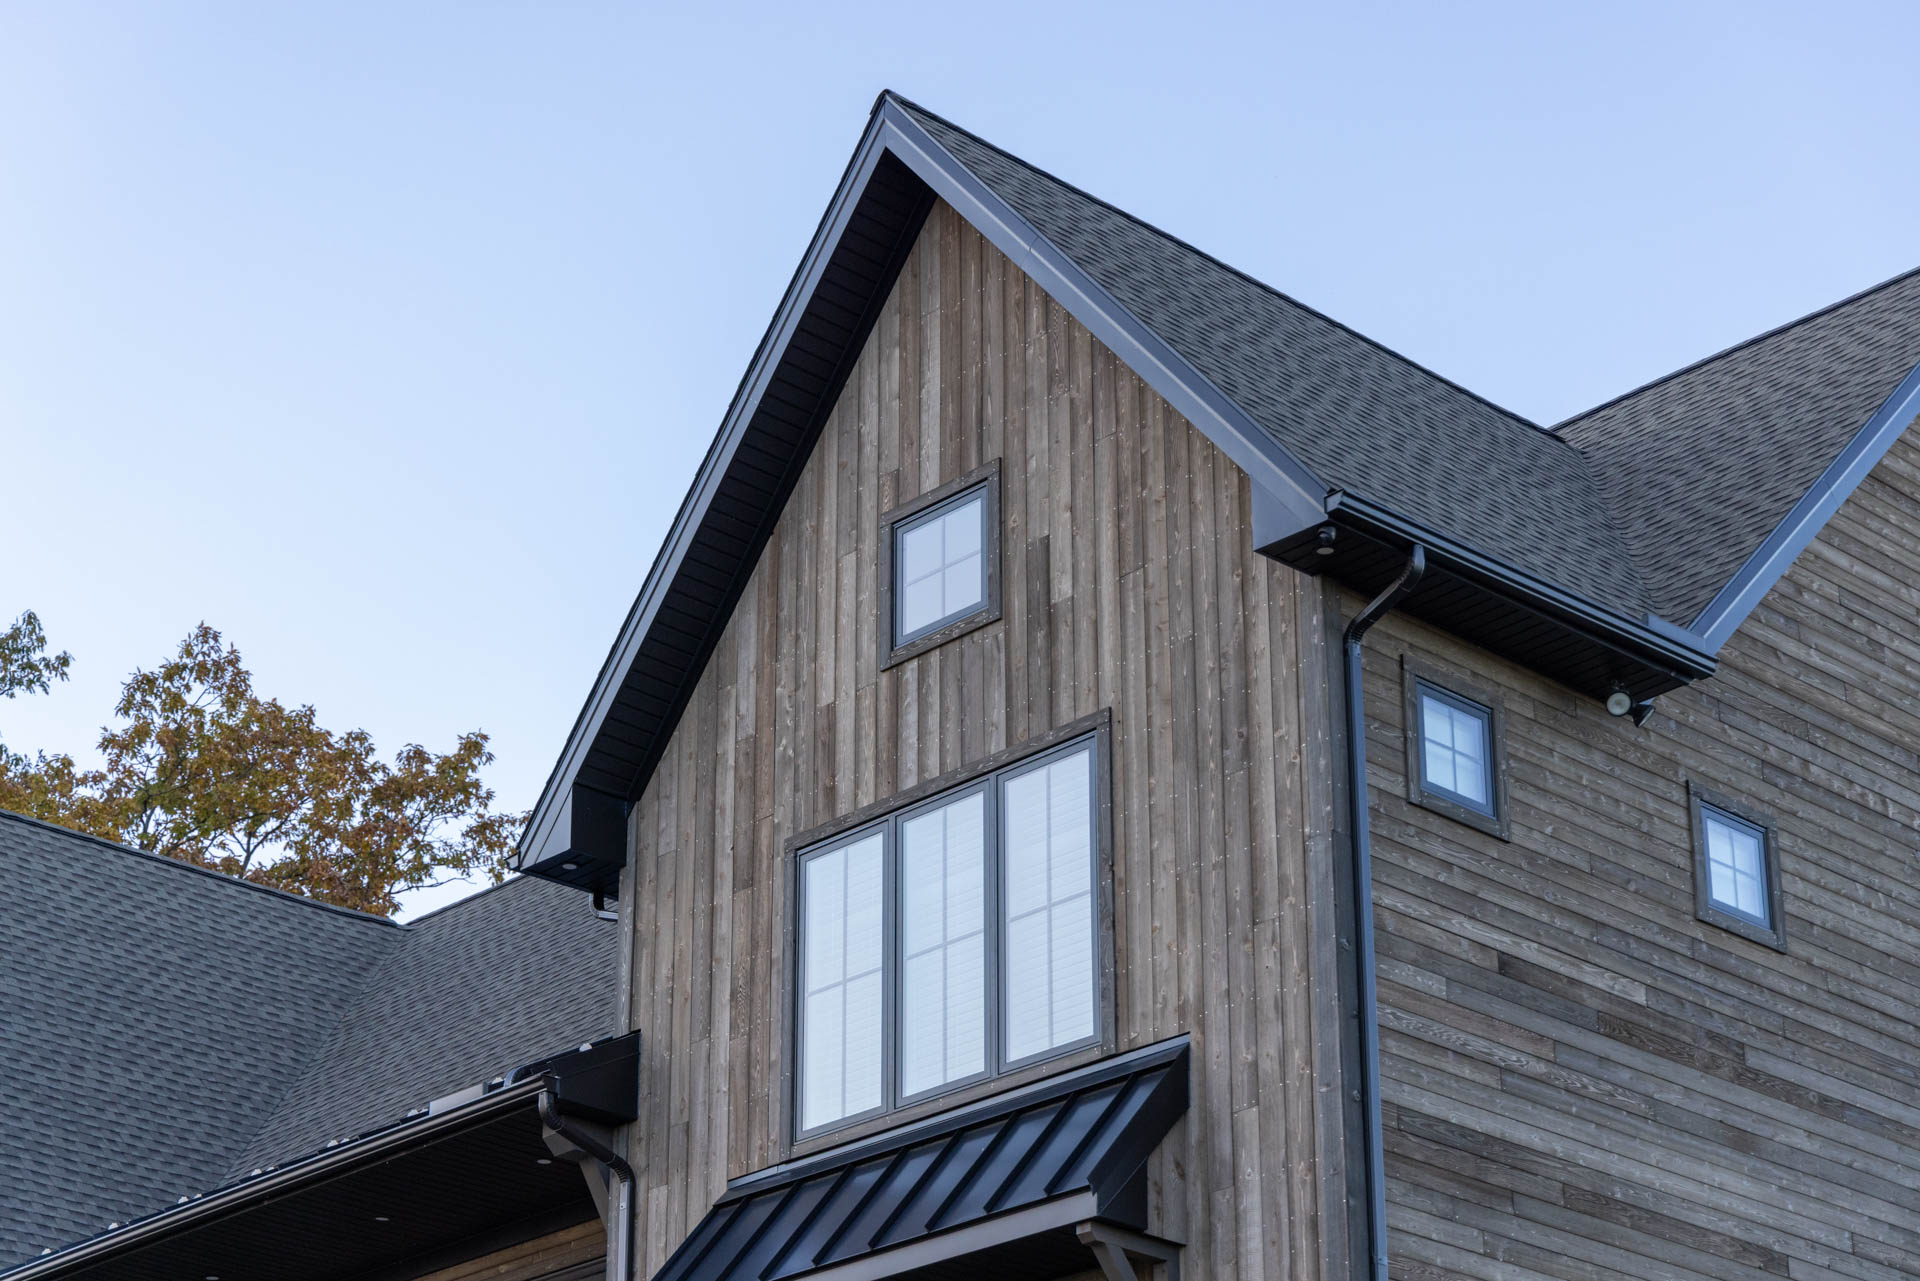
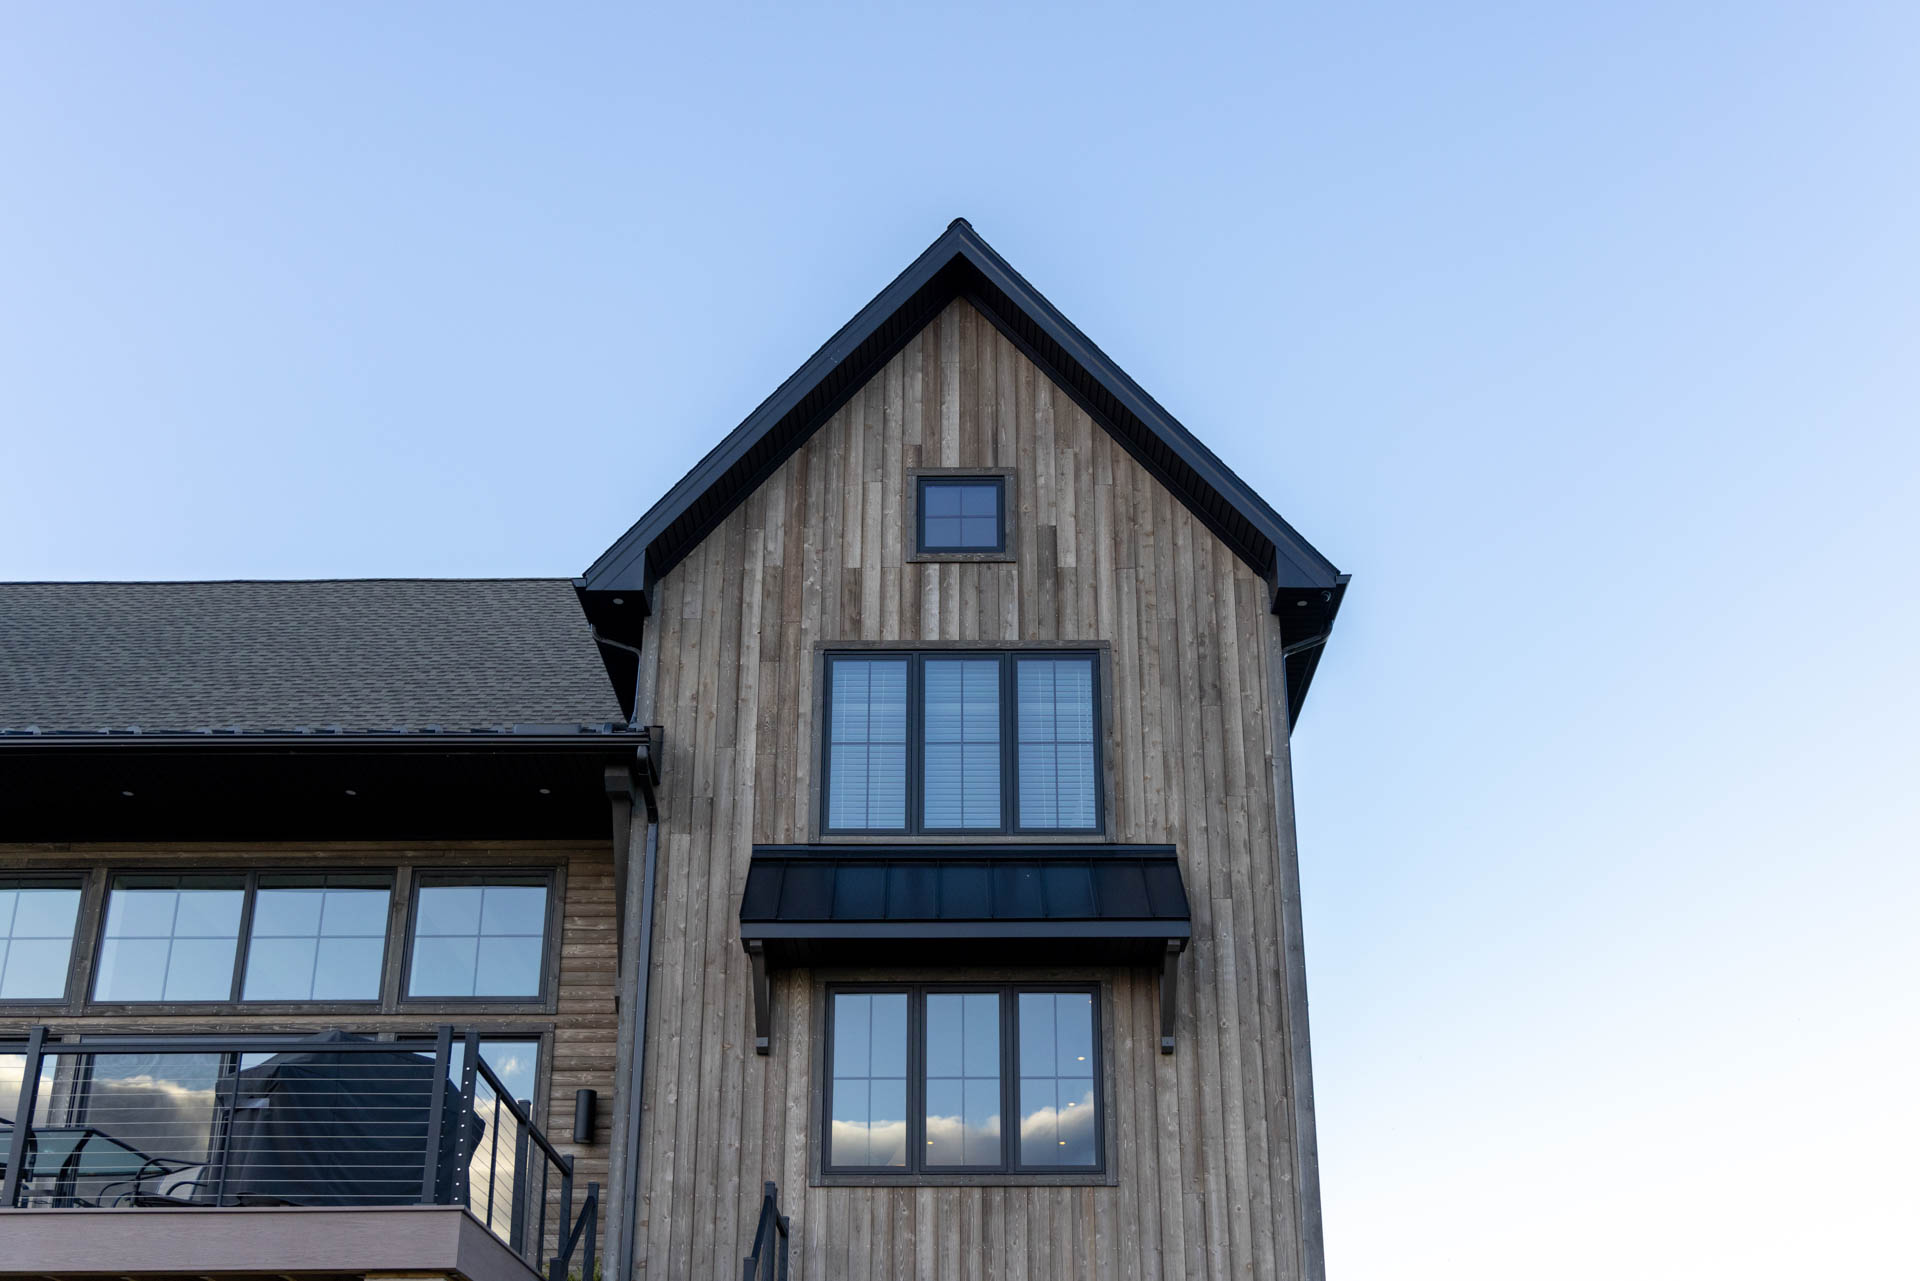
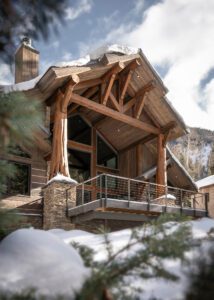
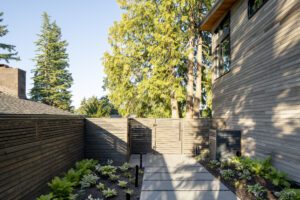
The Art of the Carve: A Study in Material Contrast
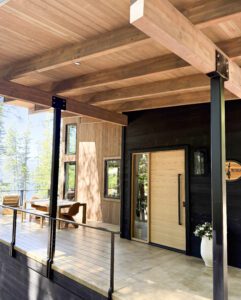
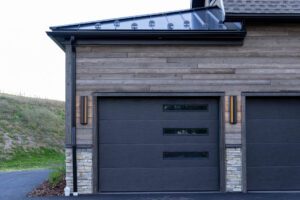
While the design team engineered the exterior envelope to blend into the shadows, the primary entryway reveals the true magic of this design. Specifically, to break up the massive, monolithic black volume, the builders utilized a striking “carve-out” technique to create a recessed porch.
Furthermore, this entryway serves as a warm, welcoming beacon, which a dramatic shift in both direction and color highlights:
The Siding: The vertical, charred timber of the main house gives way to horizontal 1×8 AquaFir™ Shiplap siding in a Smooth White finish.
The Soffits: Overhead, smooth 1×6 Tongue & Groove AquaFir™ Smooth White soffits line the porch ceiling.
Ultimately, this intentional juxtaposition of light and dark, vertical and horizontal, charred and smooth, creates an incredibly dynamic sensory experience. At night, the white timber acts as a natural reflector for the recessed lighting. This creates a warm, glowing “lantern effect” that safely guides guests inside, leaving a lasting impression on the home’s owners and visitors alike.
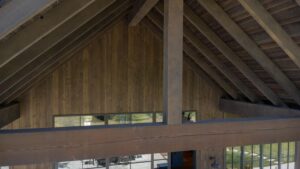
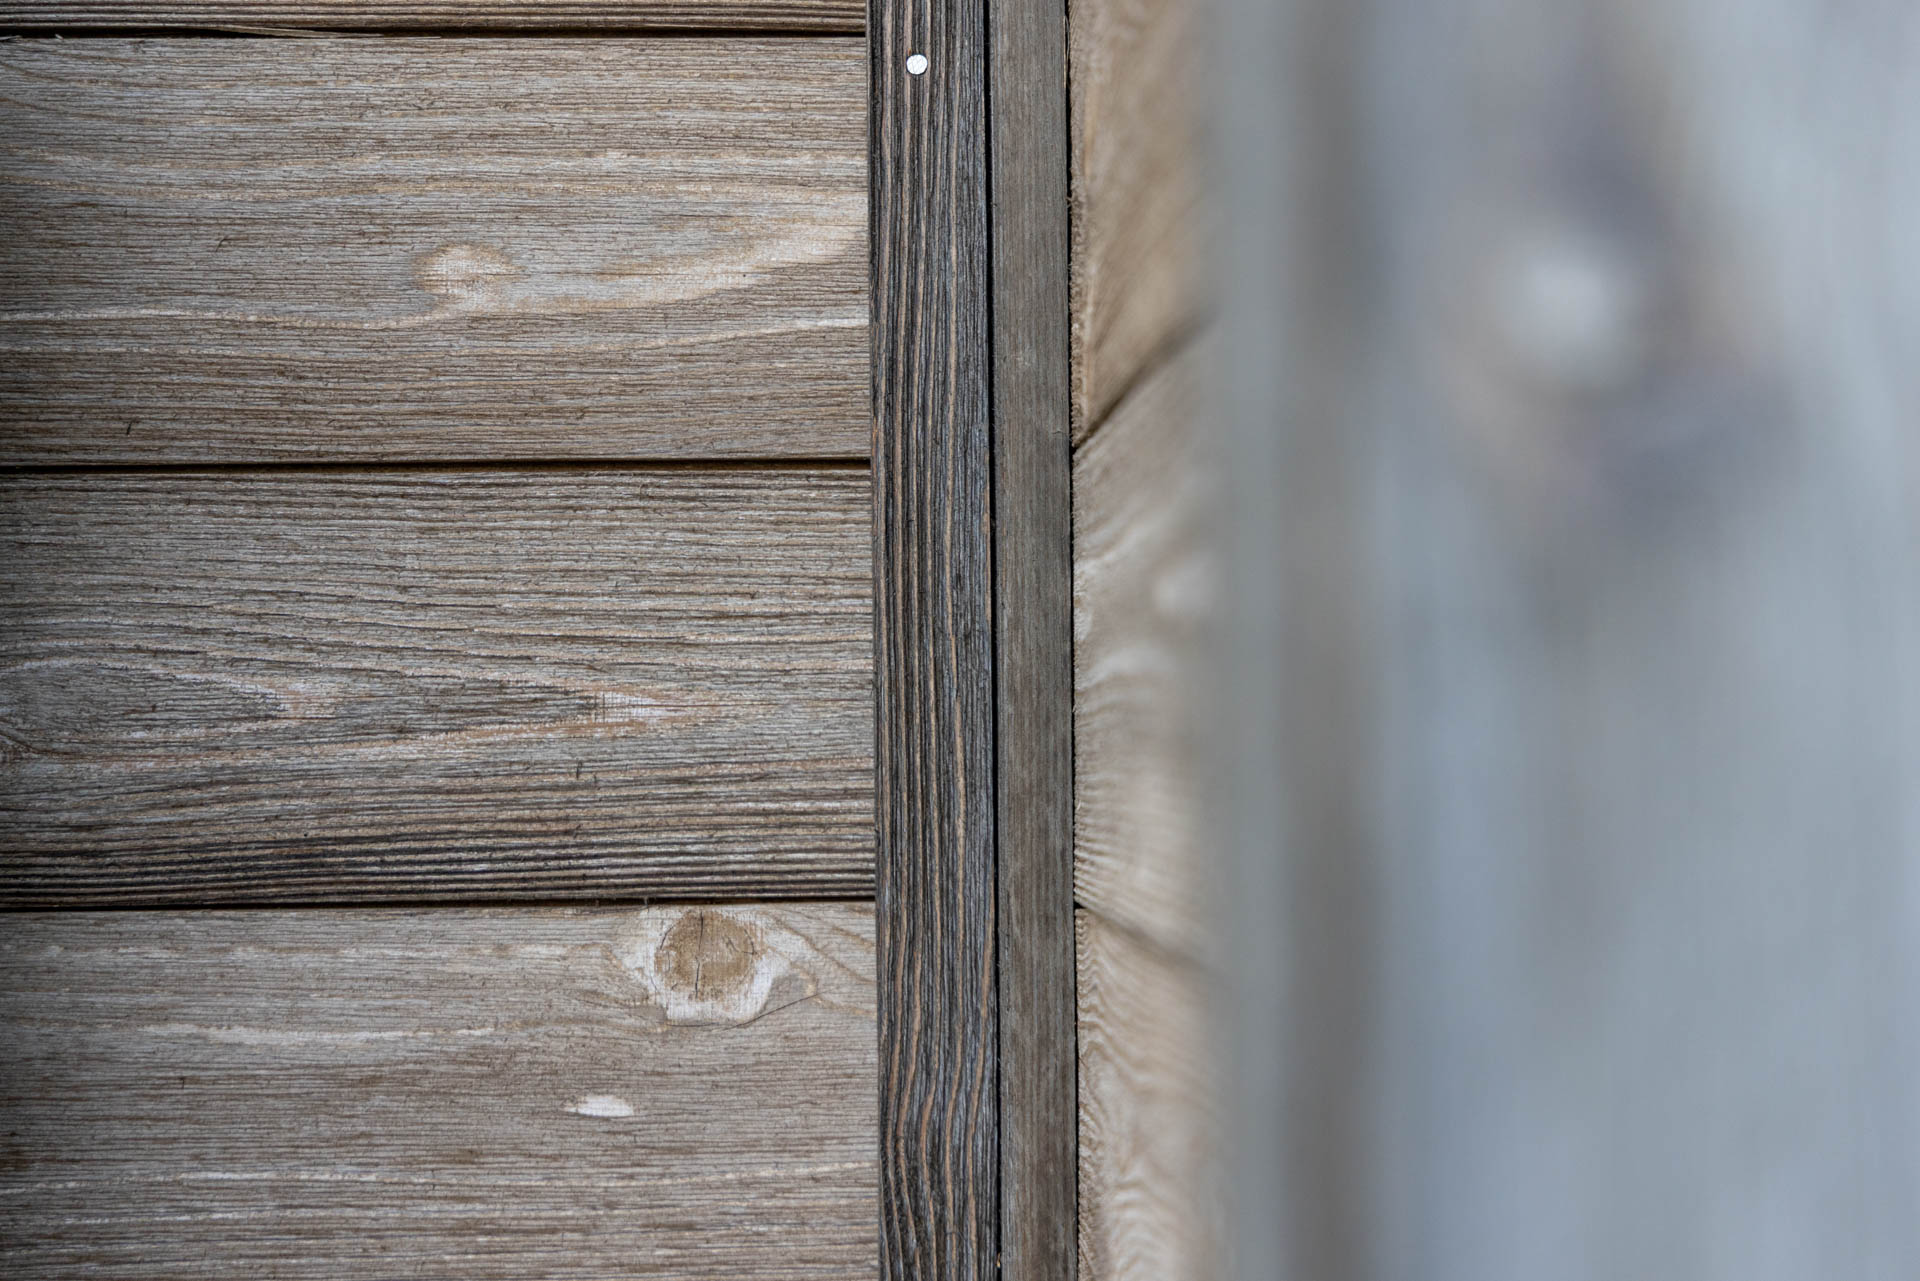
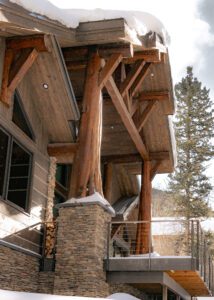
Builder’s Corner: High-Performance Rainscreen Engineering & Clean Trim Lines
A high-performance timber facade relies entirely on the quality of the building envelope beneath it. Therefore, during the early construction phases, Cary Smith Builder LLC engineered the cabin for maximum moisture protection. Specifically, they executed a textbook cross-batten rainscreen system over a high-performance weather barrier before installing any timber.
The Ultimate Rainscreen System
Because vertical shiplap requires a horizontal fastening surface, a traditional single layer of flat, horizontal wood furring strips can easily trap moisture and act as miniature dams. To combat this issue, the build utilized a high-performance, dual-layer system:
The Vertical Path: First, the crew fastened vertical furring strips directly to the studs over the Tyvek DrainWrap. This crucial step preserved an unobstructed vertical drainage path down the wall assembly.
The Cross-Ventilation: Next, they overlaid a perpendicular layer of horizontal furring strips. This action successfully created a cross-ventilated cavity that allows air to circulate and dry the siding evenly from behind, while providing rigid structural support for the vertical timber.
Integrated Trim Details
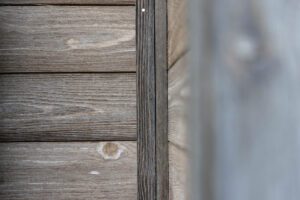
In addition, to maintain the cabin’s sharp geometric lines, the builder utilized a fully integrated trim package from Montana Timber Products. This intentional design choice beautifully carried the Charwood™ Midnight colorway across every structural junction:
Clean Window Framing: Premium 1×4 Square Edge Charwood™ Midnight trim wraps the windows, ensuring the glazing integrates seamlessly into the dark siding.
Frieze and Fascia Detailing: Robust 1×3 frieze boards alongside bold 1×10 (custom charred on both sides) and 1×6 Square Edge boards wrap the rooflines, effectively capping the structure with crisp, hard-edged borders.
THE RESULT
A Modern Mountain Hytte Built for Timeless Endurance
The Shenandoah Escape successfully demonstrates that modern, off-grid design does not have to feel cold or out of place in a rugged landscape. By pairing high-contrast finishes with thoughtful site integration, authentic Scandinavian hytte principles, and a high-performance prefinished timber envelope, the project team created a mountain retreat that will stand the test of time while beautifully honoring its natural woodland home.
At Montana Timber Products, we work alongside architects, builders, and homeowners to craft custom, prefinished timber packages that elevate residential design. Contact your regional sales representative today to request a sample or get a quote for your next build..
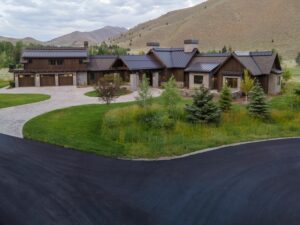
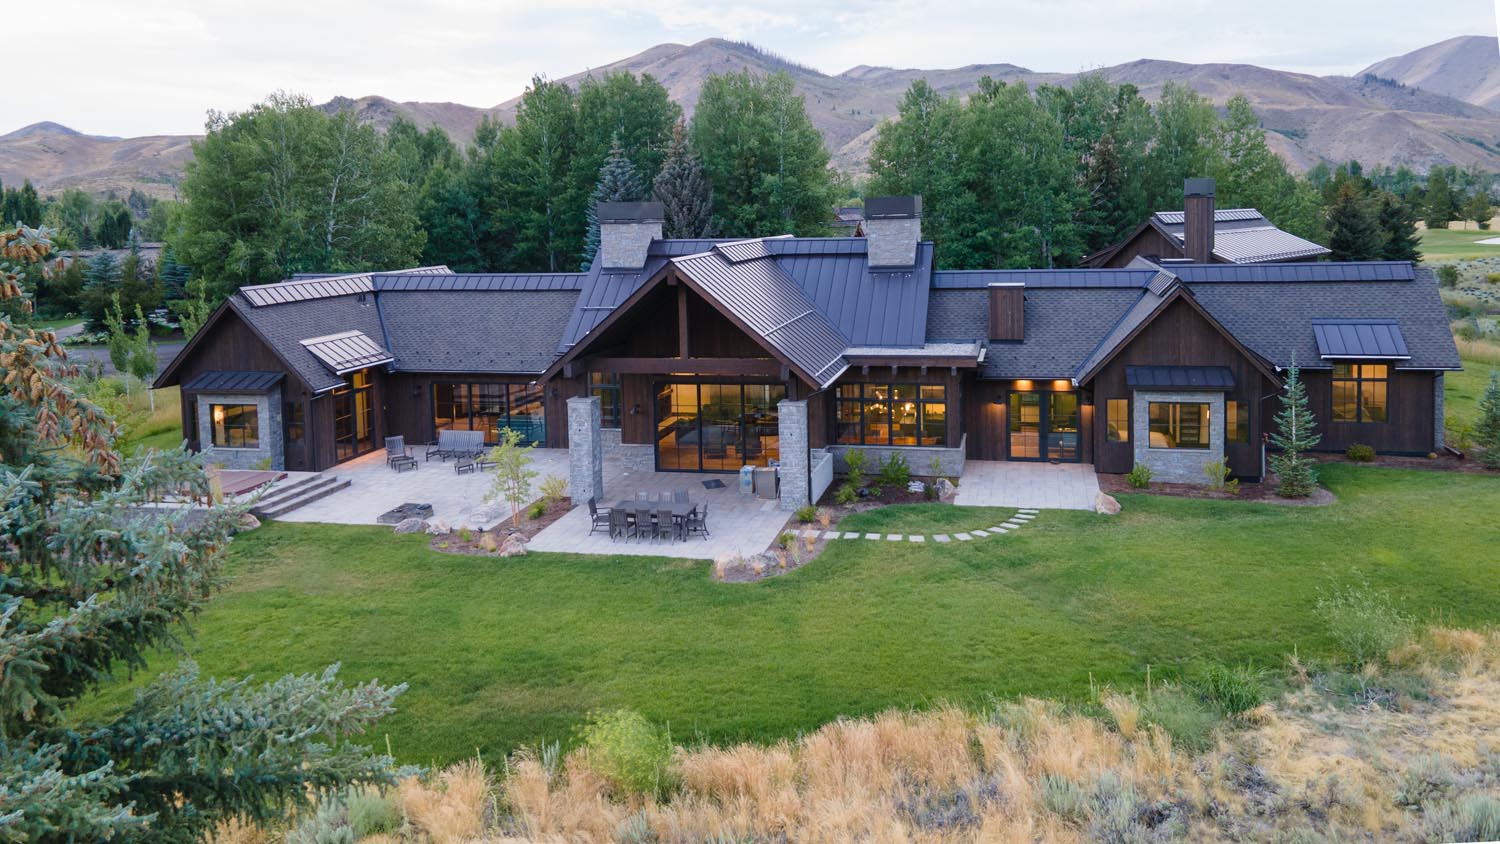
Crafting a Luxury Estate with an Expansive ranchwood™ Western Timber Package
Posted on: June 17, 2026
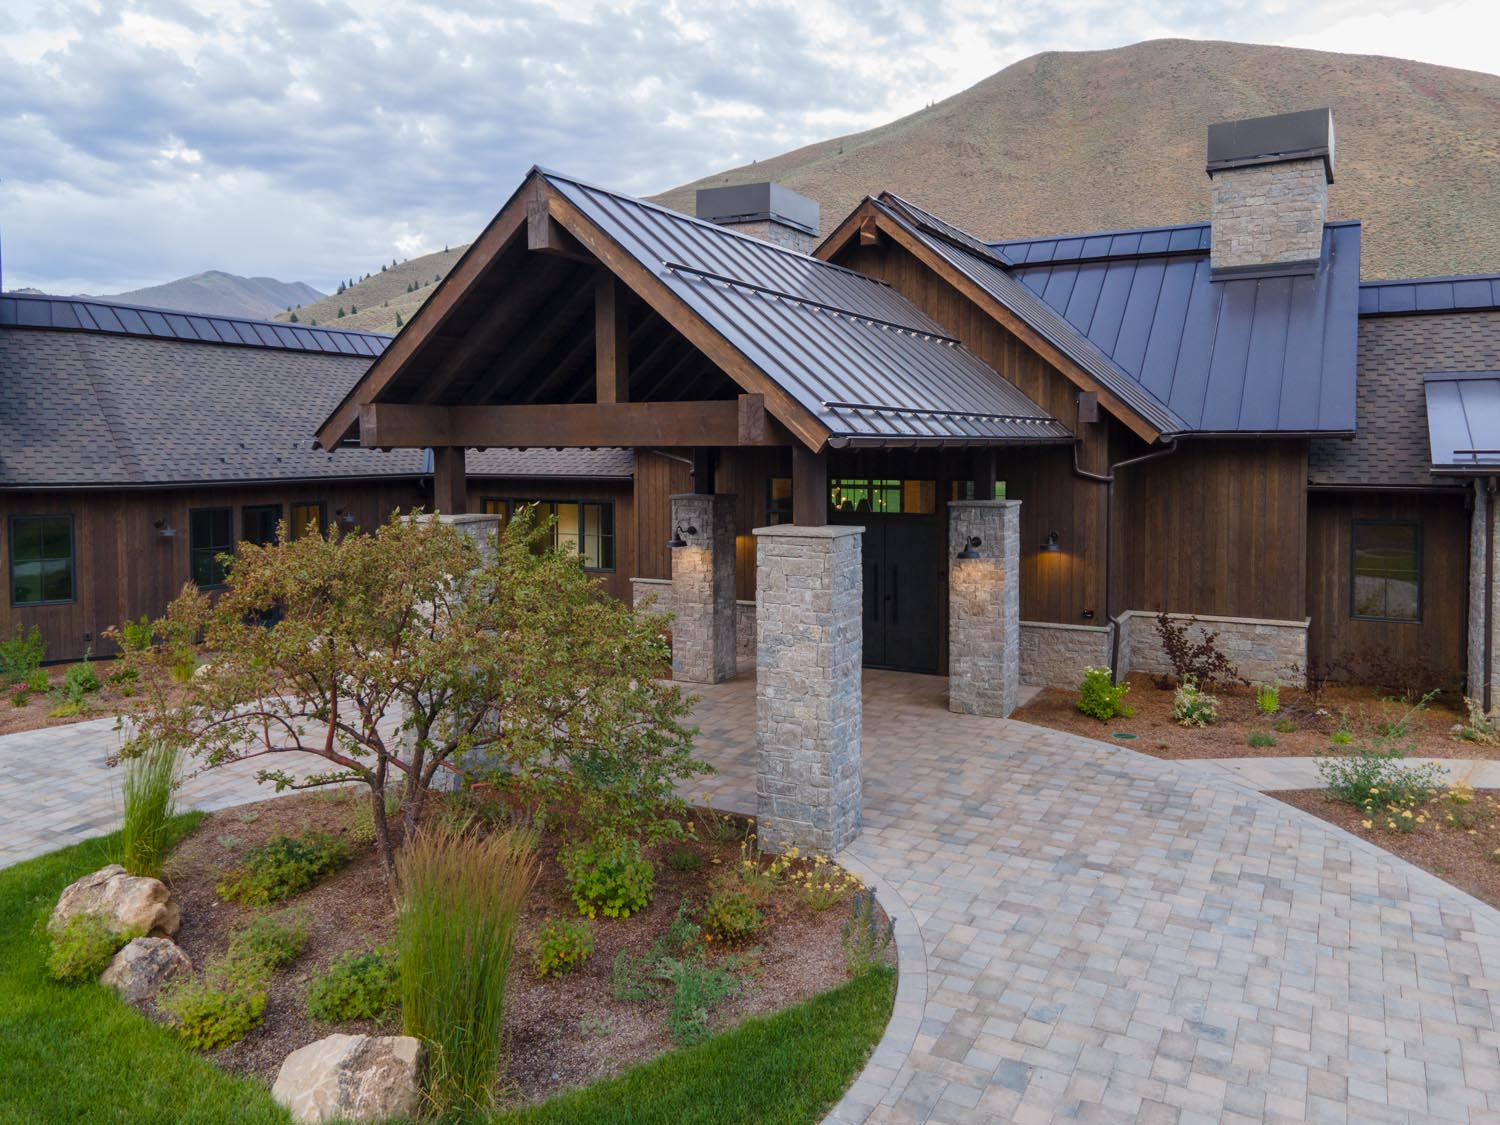
The Grand Entrance Featuring ranchwood™ Western Siding and Heavy Framing
Building a legacy mountain home requires more than just premium materials; it requires a unified architectural vision. Take a look inside this breathtaking luxury estate, featuring a massive, multi-phase ranchwood™ Western timber package that seamlessly connects the rugged exterior to the refined interior spaces.
The homeowner worked directly with their Montana Timber Products representative to curate a highly customized wood package that perfectly balances modern architectural lines with rugged, organic tradition. By utilizing this custom Douglas Fir across the exterior cladding, structural timbers, and interior accents, this custom build blurs the line between indoor luxury and outdoor majesty.
Lumber Grades: Douglas Fir #2 & Btr (Cladding & Trim), Douglas Fir #1 FOHC (Timbers)
Due to the immense scale of this project, materials were supplied across multiple phases, encompassing tens of thousands of board feet of custom Douglas Fir.
Key Applications & Dimensions Summary
Application
Dimensions
Profile
Texture
EXTERIOR CLADDING
Vertical Siding
1″ × 8″ (Random Lengths)
Ship Lap
Wire Brushed
Soffit
1″ × 6″ (Random Lengths)
T&G
Wire Brushed
Fascia & Boston Fascia
1″ × 4″, 1″ × 8″, & 1″ × 12″
Sq. Edge
Wire Brushed
Window/Door Trim & Mullions
1″ × 4″, 1″ × 6″, & 1″ × 10″
Sq. Edge
Wire Brushed
Window Sills
1.25″ × 4″ × 14′
Sq. Edge
Wire Brushed
Garage Door Jambs
2″ × 12″ × 10′
Sq. Edge
Wire Brushed
STRUCTURAL TIMBERS & DECKING
Roof Decking
2″ × 6″ (Random Lengths)
T&G
Wire Brushed
Portico Purlins & Beams
10″ × 18″ (Up to 24′ lengths)
Sq. Edge
Wire Brushed
Exposed Rafters
4″ × 6″ & 4″ × 8″
Sq. Edge
Wire Brushed
Gable & Ridge Posts
10″ × 10″
Sq. Edge
Wire Brushed
INTERIOR ACCENTS
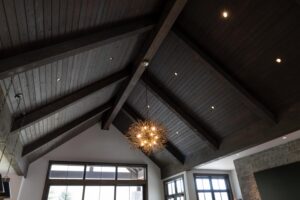
Interior Ceilings
1″ × 6″ (Random Lengths)
WP4
Wire Brused
Great Room Show Beams
10″ × 24″ × 40′
Sq. Edge
Band Sawn
Great Room Beams
10″ × 8″ × 16′
Sq. Edge
Wire Brushed
Den Beams
8″ × 12″ × 28′
Sq. Edge
Wire Brushed
Master Bedroom Beams
8″ × 12″ × 18′ & 6″ × 6″ × 14′
Sq. Edge
Wire Brushed
DESIGN HIGHLIGHTS
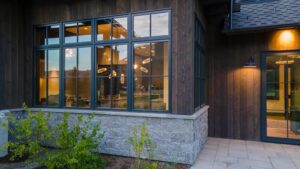
Grounding the Design: Stone Masonry Wainscoting
A critical element of this timber package is the strategic use of natural stone wainscoting. While it provides a beautiful visual anchor, its primary role is highly functional. Wrapping the lower exterior walls creates a vital dry separation. This heavy stone base lifts the custom Douglas Fir siding safely above the grade. It actively protects the wood from ground moisture, heavy snowpack, and rain splashback. Combining this protective masonry base with our factory-applied Seal-Once waterproofer ensures the wood will perform assuredly for years. Aesthetically, the cool tones of the stone also ground the massive structure. This smart design contrast makes the warm, linear grain of the prefinished ranchwood™ Western siding truly pop.
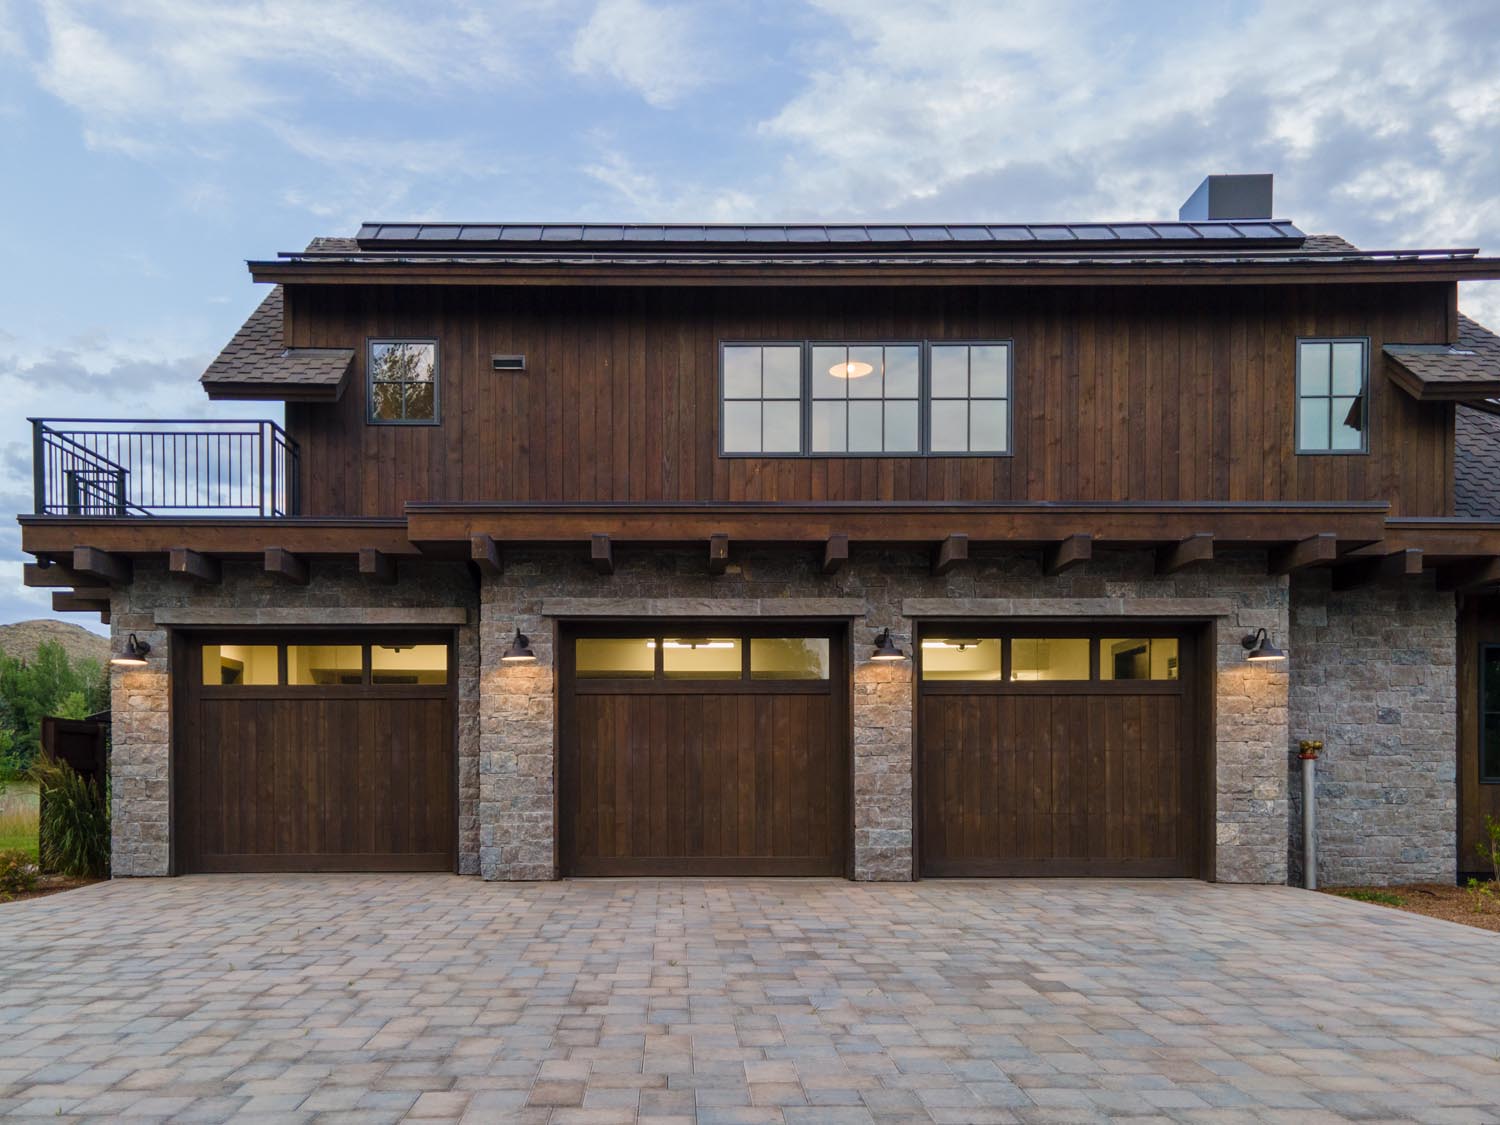
Massive Exterior Scale & Cohesion
The exterior of this custom estate is a masterclass in mountain-modern architecture. The facade features over 17,000 board feet of exterior finishes, anchored by more than 8,300 board feet of vertical 1″x8″ Douglas Fir shiplap siding. This wide-plank exterior profile was beautifully complemented by 4,514 board feet of wire-brushed 1″x6″ tongue-and-groove soffit, ensuring a seamless, high-end look from the exterior walls up through the dramatic rooflines.
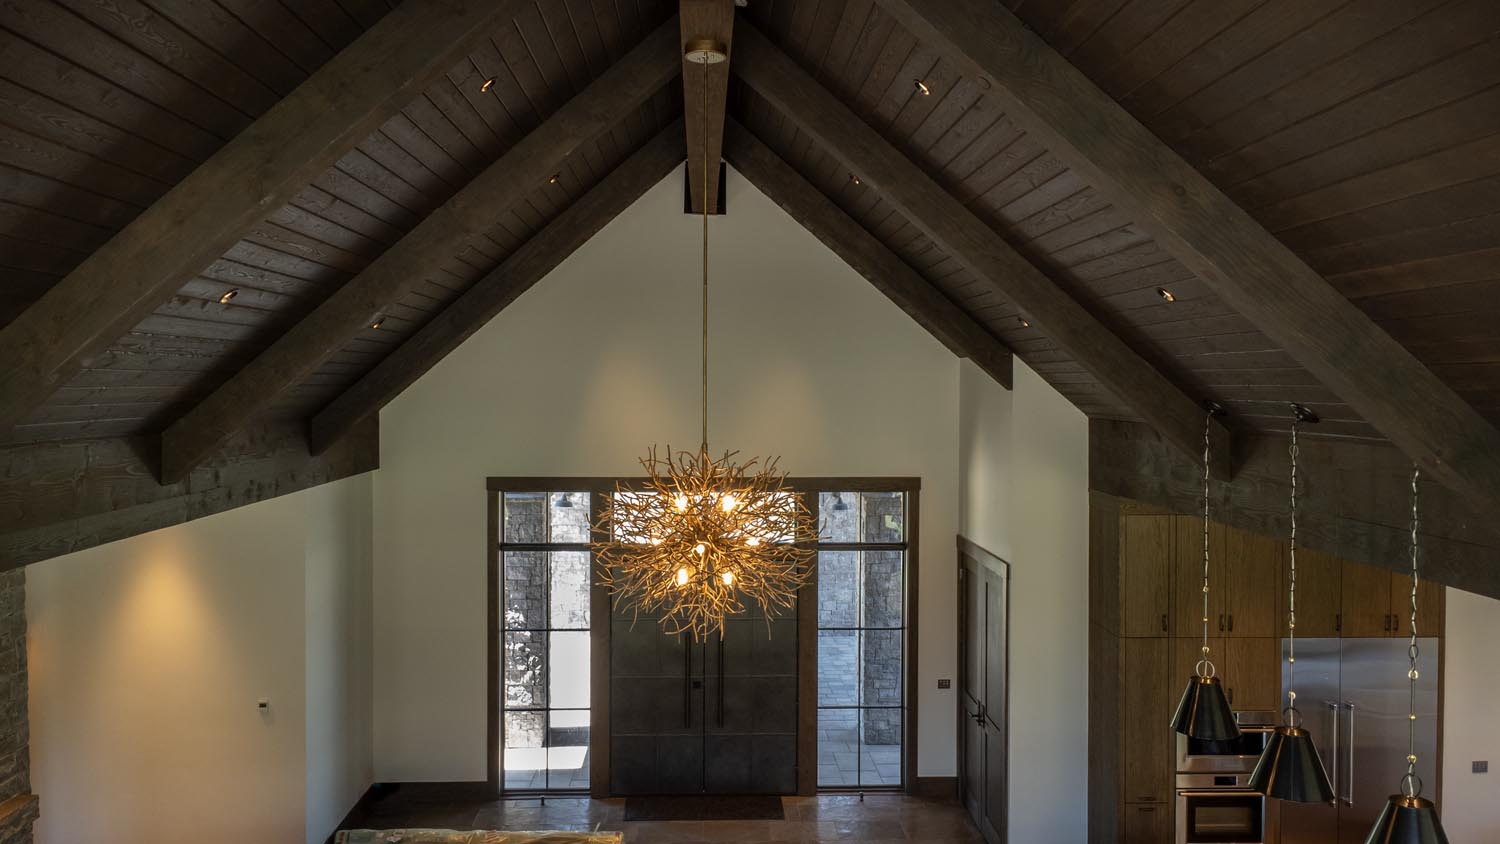
Grand Structural Elements
To create a truly grand entrance and striking outdoor living spaces, incredibly heavy structural timbers were utilized for the front entry and rear porticos. The design team specified massive 10″x18″ wire-brushed Douglas Fir beams and purlins—spanning up to 24 feet in length—to perfectly frame the home’s architecture. They were supported by beautiful 4″x8″ exposed rafters. Additionally, over 5,600 board feet of thick 2″x6″ structural Douglas Fir T&G decking was integrated into the build, providing both structural integrity and a stunning visual ceiling from below.
Bringing the Timber Indoors
A hallmark of great mountain architecture is carrying the exterior warmth directly into the living spaces. The homeowner achieved this by wrapping the interior ceilings in over 2,700 board feet of 1″x6″ Douglas Fir with a WP4 profile.
Custom heavy timber beams were also specified throughout the home’s key interior spaces. While rooms like the Den utilized impressive 8″x12″ beams reaching up to 28 feet long, the primary Great Room took the scale a step further. The order called for show-stopping 10″x24″ Douglas Fir beams spanning a remarkable 40 feet. These massive timbers feature a Band Sawn texture—rather than the standard wire-brushed finish used elsewhere—adding an extra layer of rustic, architectural contrast to the main gathering space.
Prefinished for the Mountain Climate
Building in extreme climates with fluctuating temperatures and heavy snow loads requires durable, high-performance materials. All dimensional siding and trim for this project was kiln-dried to a moisture content of 15% or less, while the heavy timbers were dried to under 19%.
Before arriving at the job site, every board with a textured face was factory-finished with two face coats and one back coat of Seal-Once, our non-toxic, low-VOC waterproofer.. This guaranteed that the custom wood package was protected from the harsh elements from the moment it was delivered, saving the installation team countless hours of on-site finishing and ensuring long-lasting performance.
THE RESULT
A Masterclass in Contemporary Mountain Architecture
Coordinating a custom lumber package of this magnitude requires incredible precision and communication. By working directly with Montana Timber Products to utilize prefinished ranchwood™ Douglas Fir across the home’s framing, wide-plank exterior cladding, and massive interior accents, the homeowner successfully brought their architectural vision to life. This property stands as a prime example of how traditional organic materials can be elevated to meet the exacting standards of contemporary luxury design.
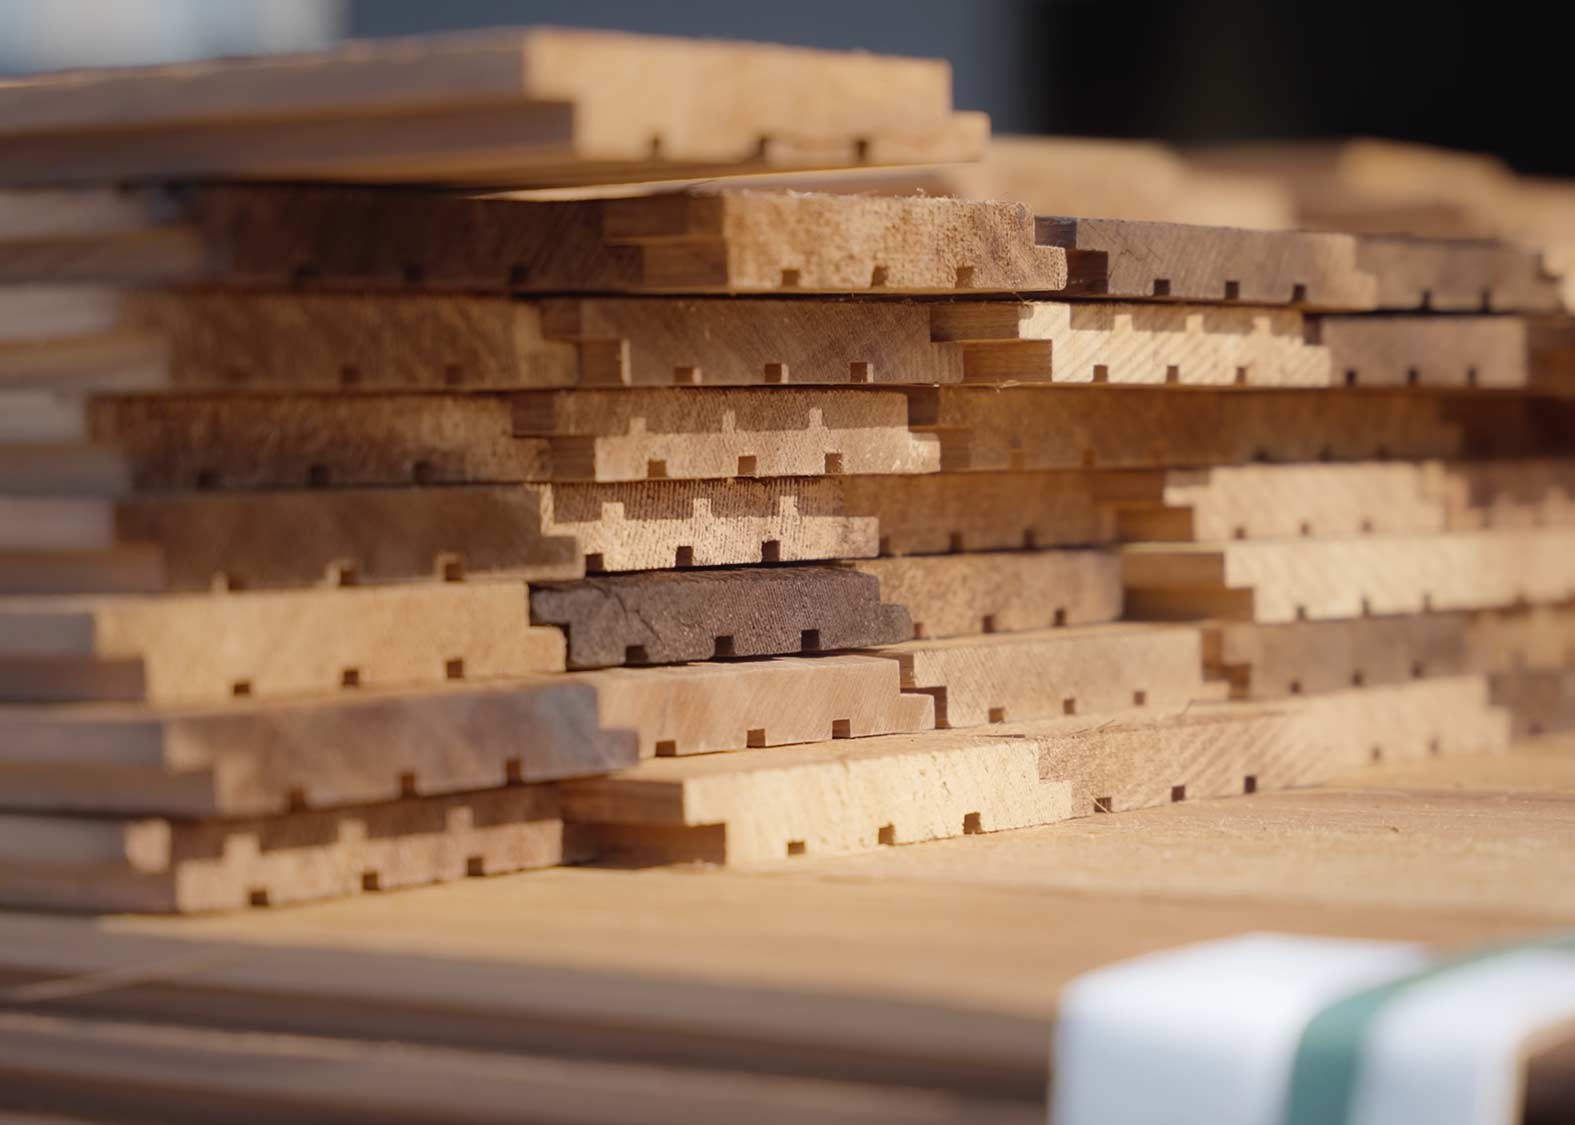
What Is a Board Foot? How Lumber is Measured & Quoted
Posted on: May 4, 2026
If you’ve ever reviewed a lumber quote and wondered why it’s sold in board feet instead of square feet or lineal feet, you’re not alone. Builders, architects, and homeowners ask us this all the time.
A board foot can feel old-fashioned at first, but it’s still the fairest way to measure lumber when products come in many different thicknesses, widths, lengths, and profiles.
For anyone designing, estimating, or buying wood products, the real value is simple: you want to know your required square footage, lineal footage, or piece count will be covered properly and the board footage was quoted fairly and accurately.
Key Takeaways: The Quick Summary
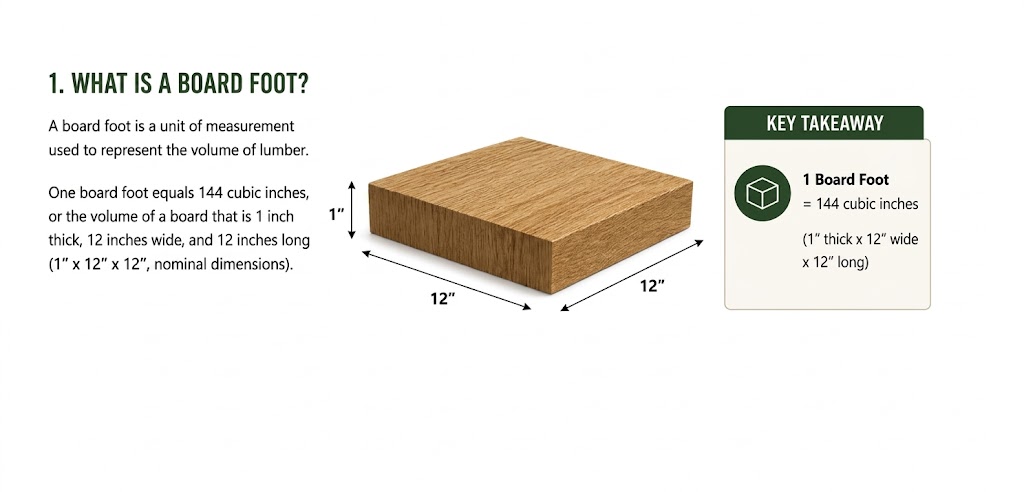
What is a Board Foot? It is a measurement of wood volume equaling exactly 144 cubic inches, rather than just length (lineal foot) or surface area (square foot).
Nominal vs. Actual Dimensions: Board footage is always calculated using the nominal (starting) dimensions of the wood, not the final milled size.
Face Loss Multiplier: Profiled products (like shiplap or tongue & groove) require more nominal material because coverage is reduced by laps, grooves, and reveals.
Overage: Additional material (typically ~15%) is included to account for cuts, waste, and real-world installation conditions
The MTP Difference: You don’t need to do the math. Just provide your required square or lineal footage, and Montana Timber Products will calculate the exact board footage, yield, and overage to ensure your project is fully covered.
How to Calculate a Board Foot?
A board foot is a unit of measurement used to represent the volume of lumber. One board foot equals exactly 144 cubic inches. The easiest way to visualize this is the volume of a board that is 1 inch thick, 12 inches wide, and 12 inches long (1″ x 12″ x 12″, nominal dimensions).
The Most Important Distinction: Nominal vs. Actual Dimensions
This is one of the most misunderstood parts of lumber estimating. Board footage is calculated using nominal dimensions, not finished dimensions.
Nominal dimensions refer to the board’s size before it is milled into its final profile. For example:
A 2×6 is priced and measured as 2″ x 6″ nominal.
Its finished actual size may be closer to 1.5″ x 5.5″.
That finished size matters for specifications and installation, but board footage is always based on the original nominal starting size.
Rule of thumb:
Board foot formulas, wholesale lumber pricing, and material takeoffs all rely on nominal dimensions.
Why Board Feet Is Still Relevant Today?
Board feet became the standard because lumber comes in many sizes and forms. A single unit of volume allows mills, suppliers, builders, and owners to speak the same language.
Modern projects often include a mix of:
Profiled siding
Timber components
Decking
Trim boards
These products vary in thickness, width, length, profile yield, species, and grade. A board foot gives everyone a common baseline: how much nominal wood is actually in the product. That makes it the equalizer across a vast offering of dimensions and profiles.
Why Do We Sell in Board Feet Instead of Lineal Feet?
Lineal footage only measures length (1 lineal foot = 12 inches of length). It completely ignores width and thickness.
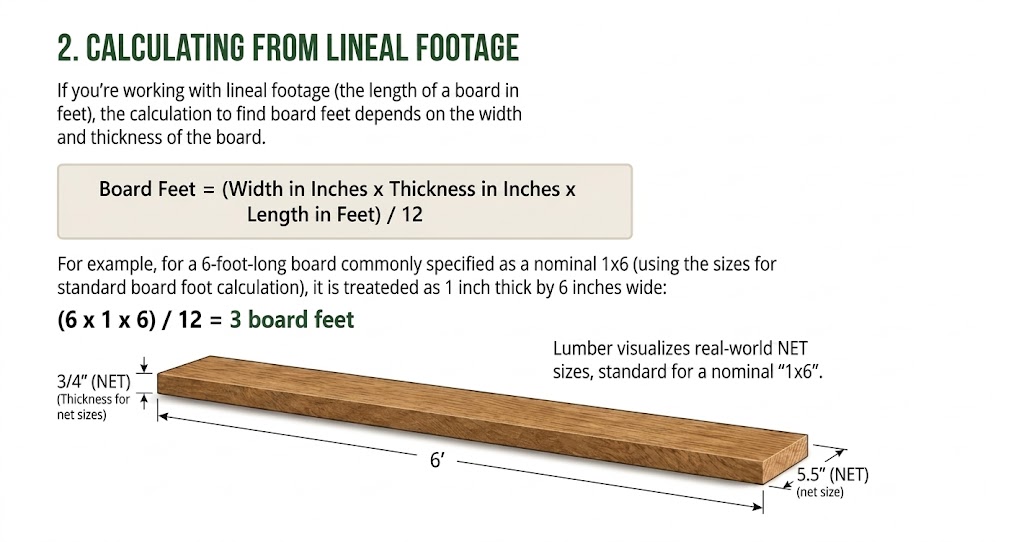
Calculating Board Feet from Lineal Footage
If you’re working with lineal footage (the length of a board in feet), the calculation to find board feet depends on the width and thickness of the board.
The Formula:
Board Feet = (Width in Inches × Thickness in Inches × Length in Feet) ÷ 12
For example, for a 6-foot-long board commonly specified as a nominal 1×6, it is treated as 1 inch thick by 6 inches wide:(6 × 1 × 6) ÷ 12 = 3 board feet.(Note: The actual net size of this board would standardly be 3/4″ thick by 5.5″ wide, but board foot calculations always use the nominal sizes).
Why Not Square Footage?
Square footage only measures surface coverage: Length × Width. That works perfectly for flooring, roofing, drywall, or paint coverage, but it does not account for changes in thickness.
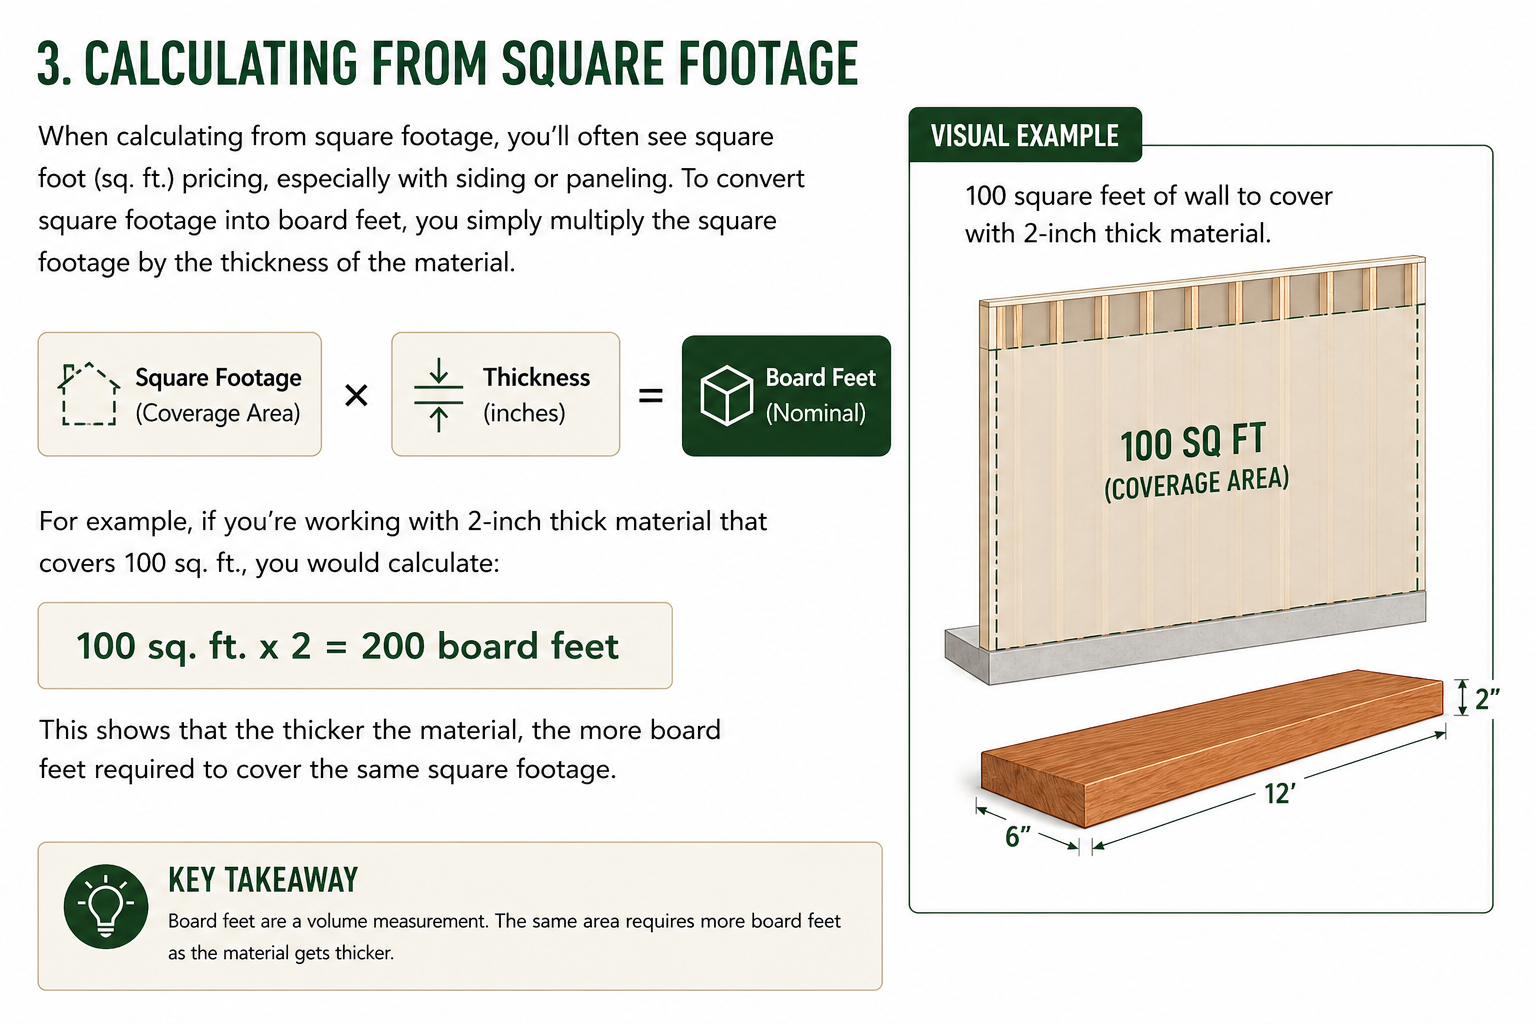
Calculating Board Feet from Square Footage
When calculating from square footage, you’ll often see square foot (sq. ft.) pricing, especially with siding or paneling. To convert square footage into board feet, you simply multiply the square footage by the nominal thickness of the material.
For example, if you’re working with 2-inch thick material that covers 100 sq. ft., you would calculate: 100 sq. ft. × 2 = 200 board feet
This shows that the thicker the material, the more board feet required to cover the same square footage.
How Profiled Products Affect Board Footage
For rough-sawn, square-edge material, square footage can convert fairly directly using nominal thickness. But for profiled products like shiplap, channel rustic, tex gap, or tongue & groove, additional calculation is required.
That’s because the visible face of the installed board is often smaller than the board’s nominal starting size.
The Face Loss Multiplier
A face loss multiplier adjusts for the difference between the board’s nominal width and the board’s net visible face after profiling and installation.
Example: 1×6 Shiplap If a 1×6 profile has a 4.75″ net face:
6.00 ÷ 4.75 = 1.26 Multiplier
That means more nominal board footage is required to cover the finished wall area.
The Formula:
Board Feet = Net Square Feet × Nominal Thickness × Face Loss Multiplier (This ensures enough material is supplied to cover the project properly without falling short).
Most customers think in square feet, lineal feet, or piece counts. Our job is to convert those quantities into the correct board footage required for the project and show both the usable quantity (SF/LF) and calculated BF on your quote.
We also account for important real-world factors such as profile loss, yield, and overage so the quoted quantity is built to complete the job.
Example:
If a project requires 500 BF and includes 15% overage, the quoted quantity would be 575 BF.
You don’t need to master board foot formulas. You just need confidence that:
Your project quantities are properly covered.
The board footage was calculated fairly and accurately.
Profile loss, yield, and overage were considered.
You can compare quotes with confidence.
You understand exactly what the quote represents.
A Better Way to Read Your Quote
When you receive a proposal from Montana Timber Products, look for four things:
The usable quantity — square feet, lineal feet, or pieces.
The product selected — species/grade and profile.
The calculated board footage — the lumber volume required to supply it.
The assumptions included — yield and overage.
That gives you full visibility into exactly how the number was built.
Need Help Estimating Your Project?
At Montana Timber Products, we help homeowners, contractors, and design professionals turn plans into accurate material packages every day.
Whether you have square footage, lineal footage, blueprints, or just an idea—we can help translate it into the right lumber order. We also provide takeoff and quotation support as a courtesy so you can validate scope, pricing, and quantities with confidence.
Contact us today for takeoff support, pricing, or product guidance.
How does our thermally modified wood perform? We wanted proof.
When selecting exterior siding, cladding, or architectural accents, species selection plays a critical role in overall project performance. Factors such as grain pattern, aesthetic character, durability, and long-term dimensional stability all influence how a material performs in exterior environments. For certain wood species, thermal modification is a process that can enhance key performance characteristics—including resistance to moisture, biological decay, and dimensional movement—without the use of chemical preservatives.
To provide transparent, data-backed insight into how thermally modified wood performs, Montana Timber Product’s samples of thermally modified Southern Yellow Pine and Western Hemlock were evaluated through independent laboratory testing by the LSU AgCenter Wood Durability Laboratory.
The results (Report #WDL-2025-03b) demonstrates how the thermal modification process enhances the baseline characteristics of these specific species without the use of chemical preservatives.
Here is a breakdown of the data, verified by ASTM and AWPA standards.
PILLAR ONE
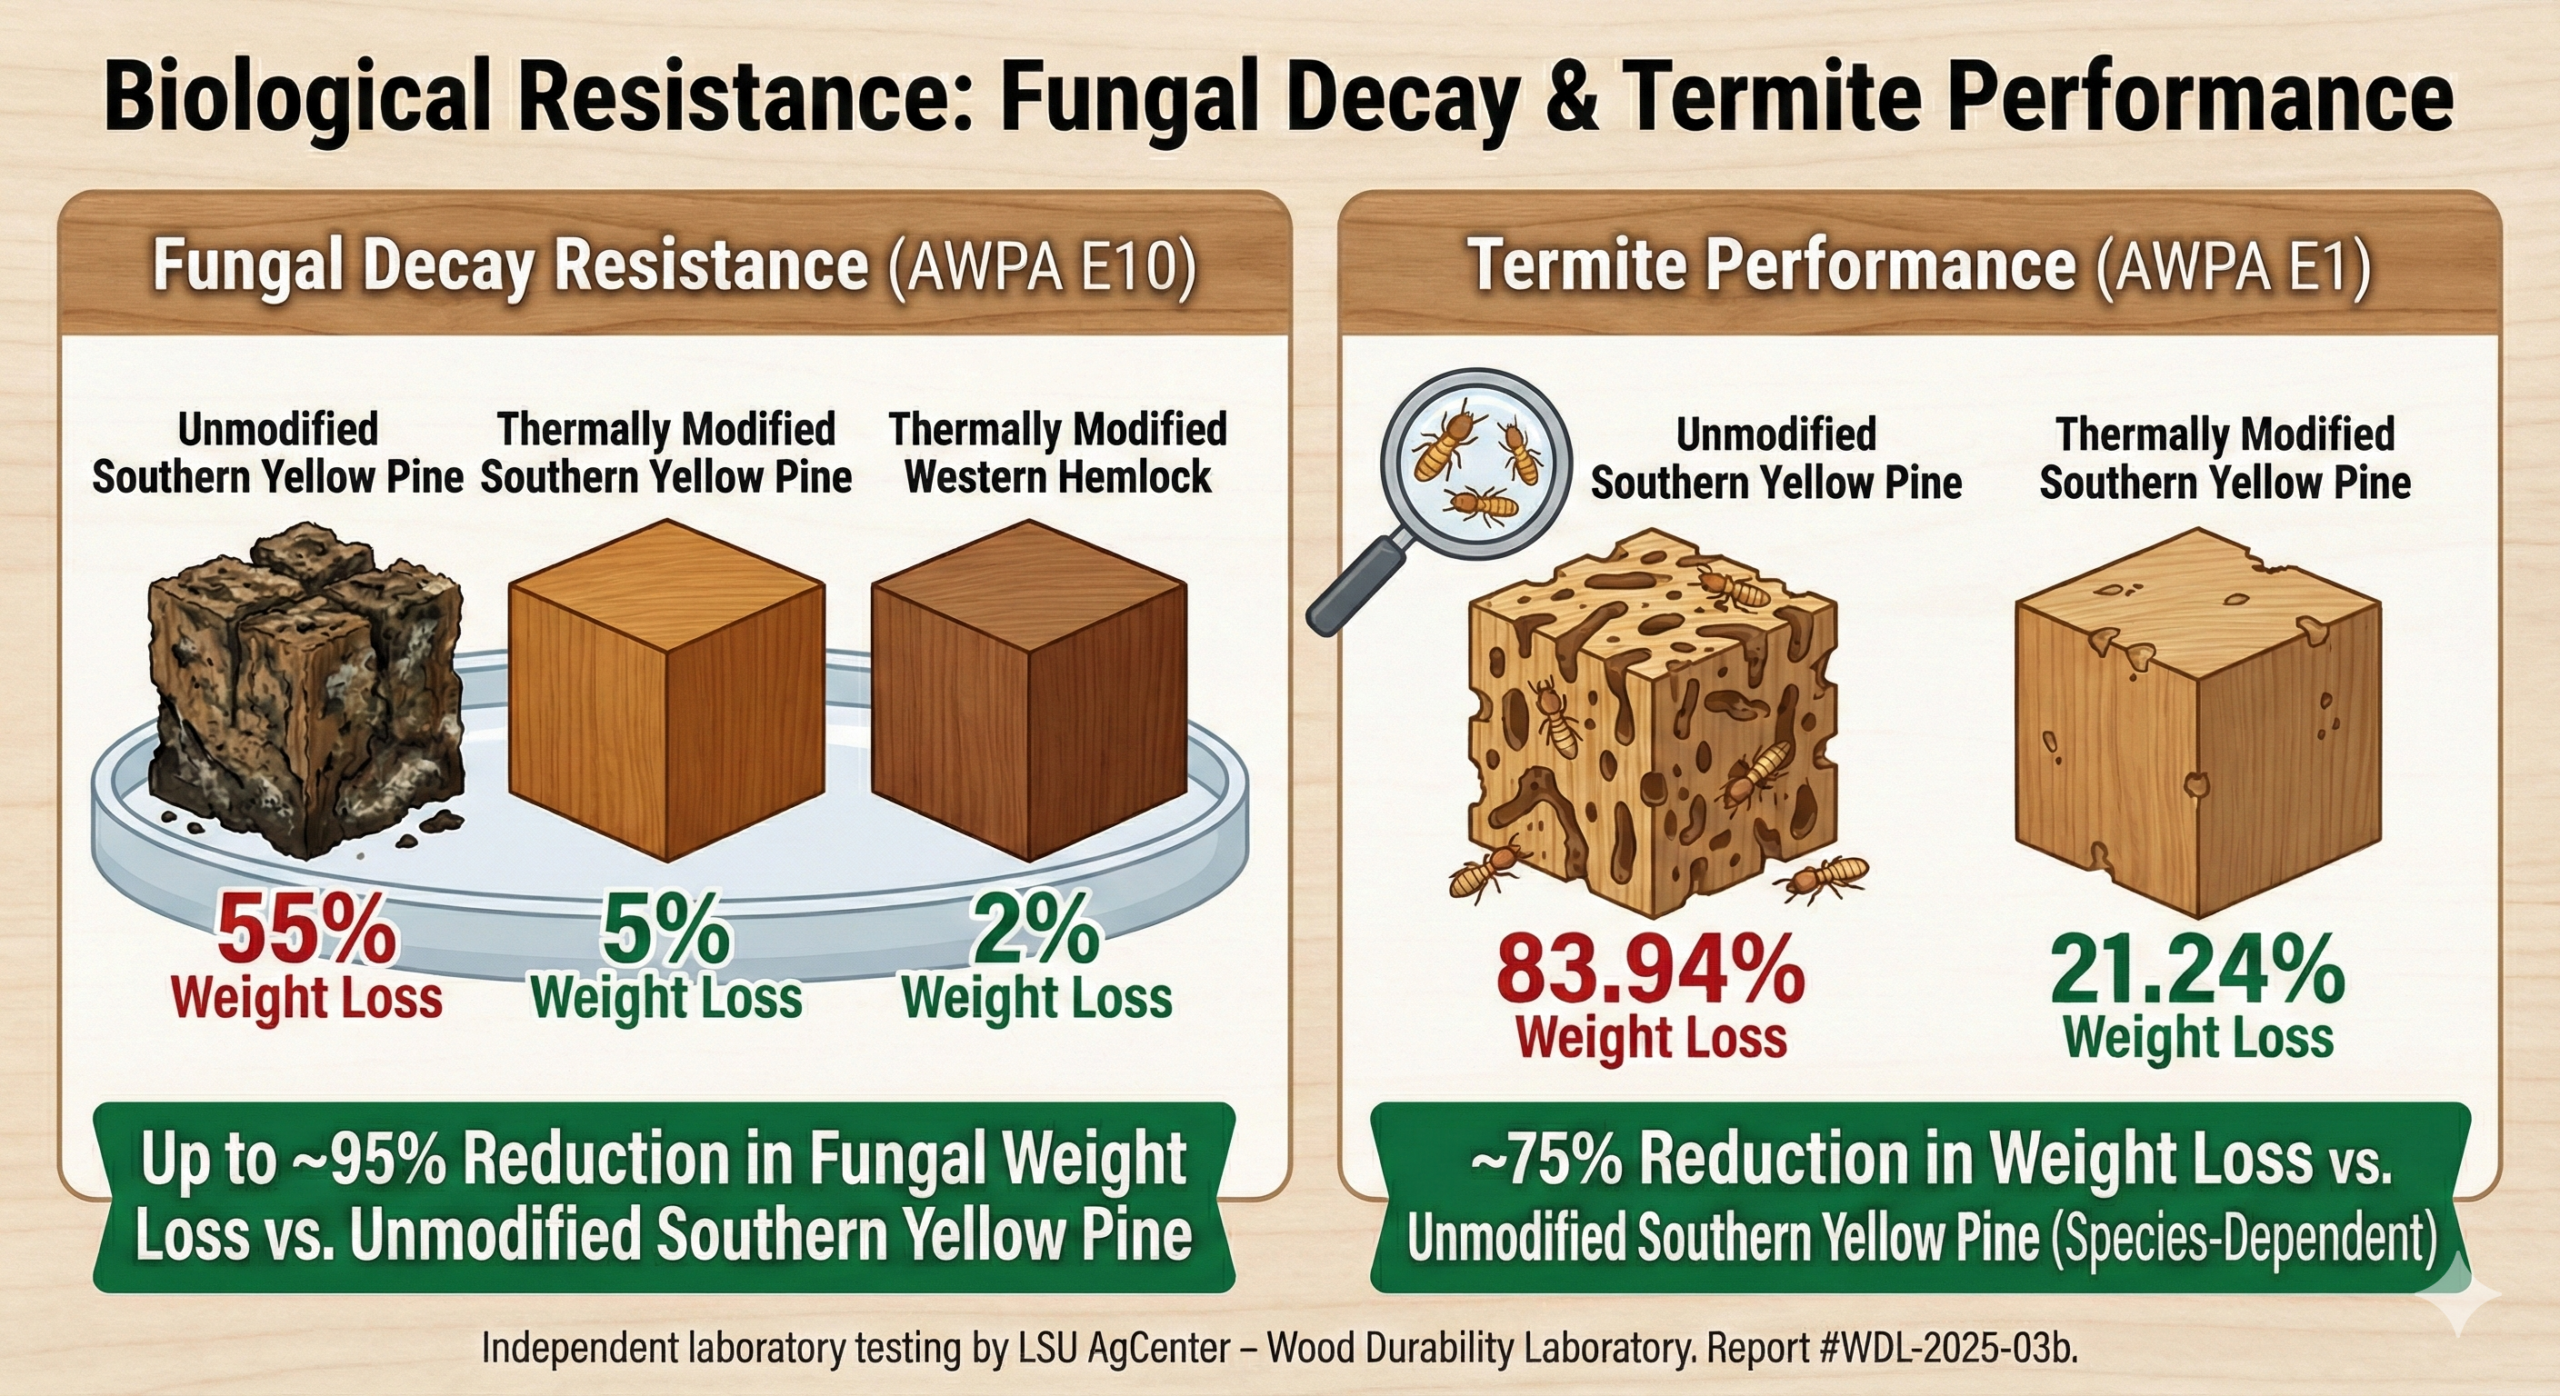
Rot and Insect Resistance – Testing Thermally Modified Pine & Hemlock
Fungi and insects are common considerations for any exterior wood application. The LSU AgCenter testing utilized standardized methods to evaluate how the thermal modification process alters the wood’s performance in these areas.
Fungi require moisture and wood sugars to thrive. The thermal modification process alters these natural sugars, making the wood less susceptible to rot.
During the 12-week fungal decay test, the unmodified pine samples experienced a 55% weight loss. In contrast, the thermally modified samples demonstrated minimal weight loss.
The Data:
Unmodified Southern Yellow Pine: 55% weight loss
Thermally Modified Southern Yellow Pine: 5% weight loss
Thermally Modified Western Hemlock: 2% weight loss
The Takeaway: Thermal modification achieved up to a ~95% reduction in fungal decay compared to unmodified Southern Yellow Pine, providing enhanced resistance to brown and white rot fungi.
Termite Resistance of Thermally Modified Southern Yellow Pine (AWPA E1)
Because thermal modification alters the nutritional content of the wood, it can affect termite feeding behavior. In laboratory “no-choice” tests, the modified wood showed improved resistance, particularly in Southern Yellow Pine.
Unmodified Southern Yellow Pine: 83.94% weight loss
Thermally Modified Southern Yellow Pine: 21.24% weight loss
The Takeaway: The thermal modification process resulted in a ~75% reduction in weight loss for Southern Yellow Pine compared to its unmodified counterpart. (Note: Performance in termite exposure is species-dependent; modified Western Hemlock performs at standard levels, making it best suited for elevated, vertical cladding applications where ground contact is avoided).
PILLAR TWO
Moisture & Dimensional Stability of Thermally Modified Siding
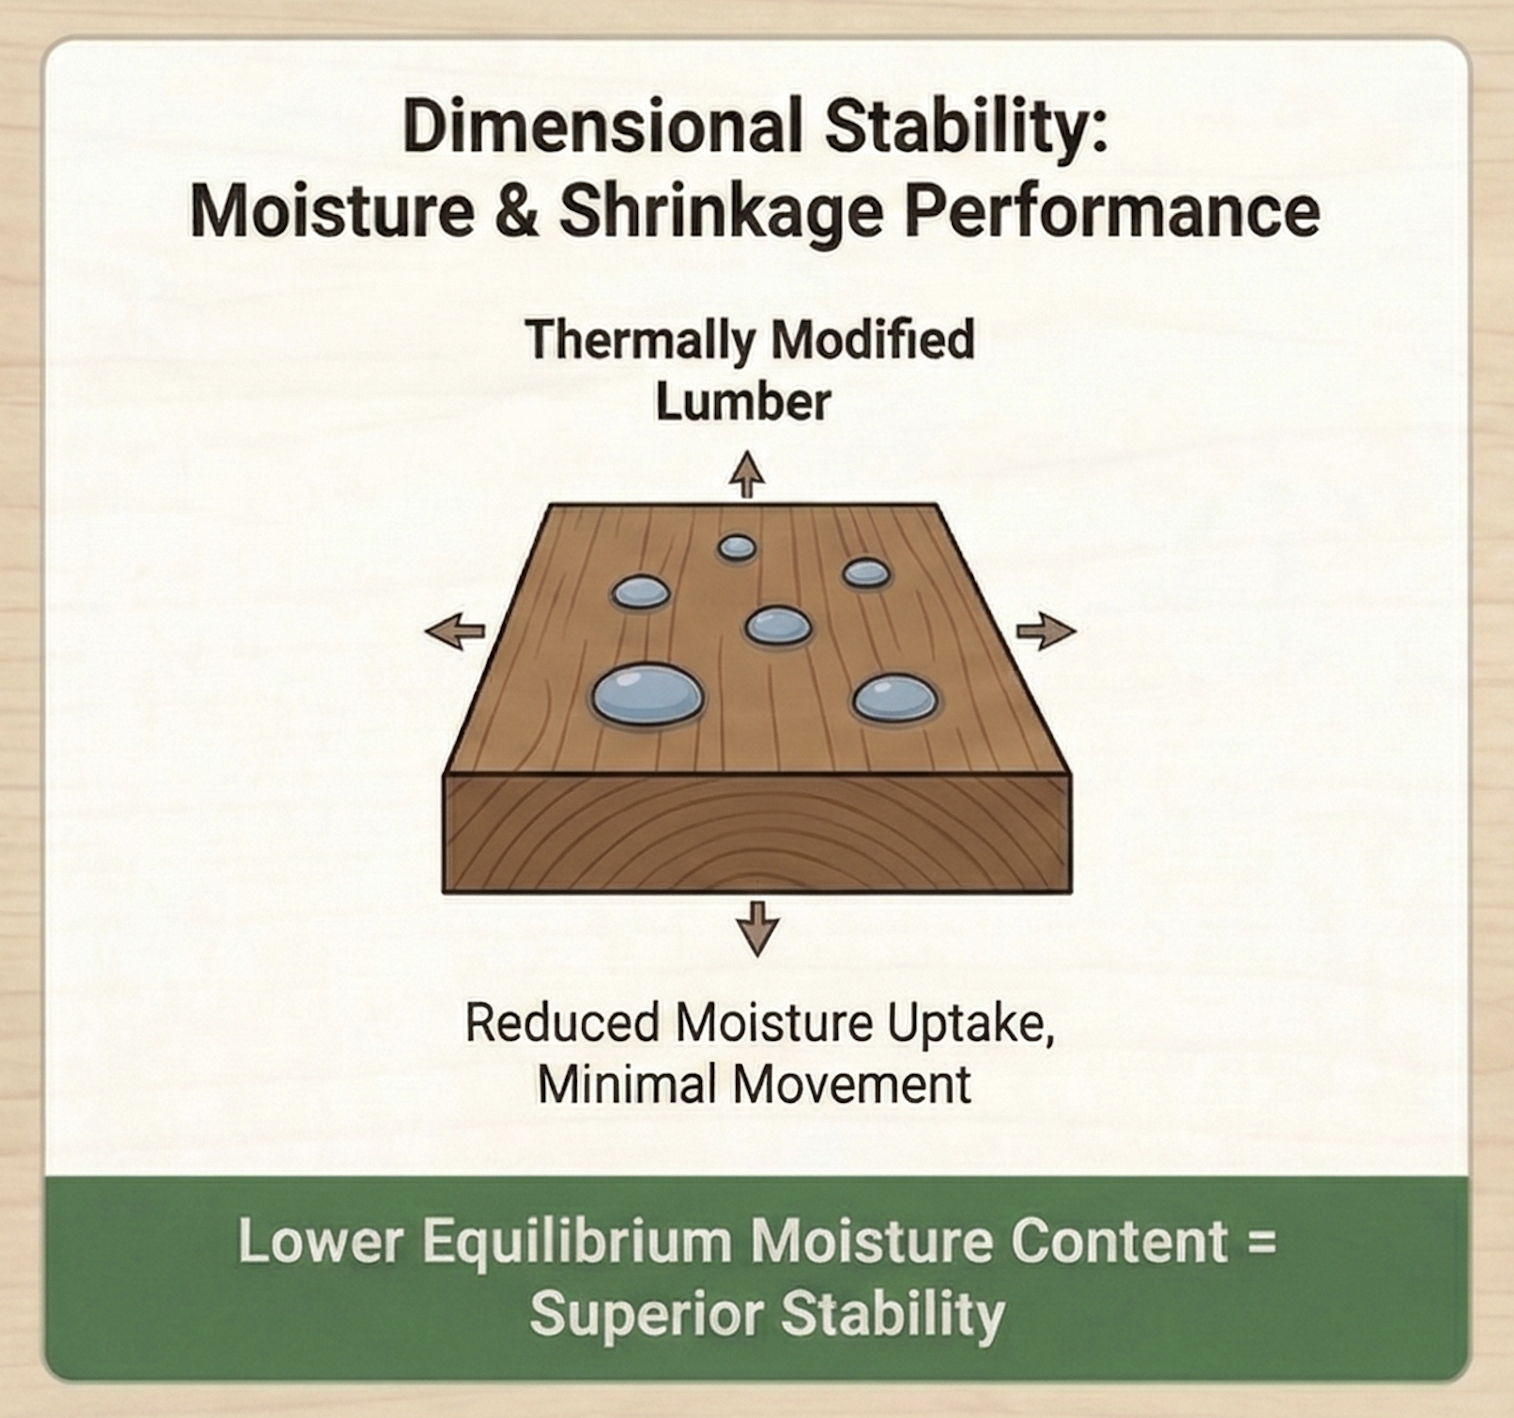
True exterior performance goes beyond rot and insect resistance. To ensure long-term success, the wood must also remain stable and strong through years of shifting weather and seasonal moisture.
Dimensional Stability: Reducing Moisture Uptake and Shrinkage
Wood naturally absorbs and releases moisture depending on the environment. The thermal modification process lowers the equilibrium moisture content of SYP and Hemlock, meaning these specific species take on less water than they would in their unmodified state.
The Takeaway: The test data indicates reduced radial and tangential shrinkage for these modified species. This lower equilibrium moisture content helps the wood maintain its shape and minimizes seasonal movement once installed.
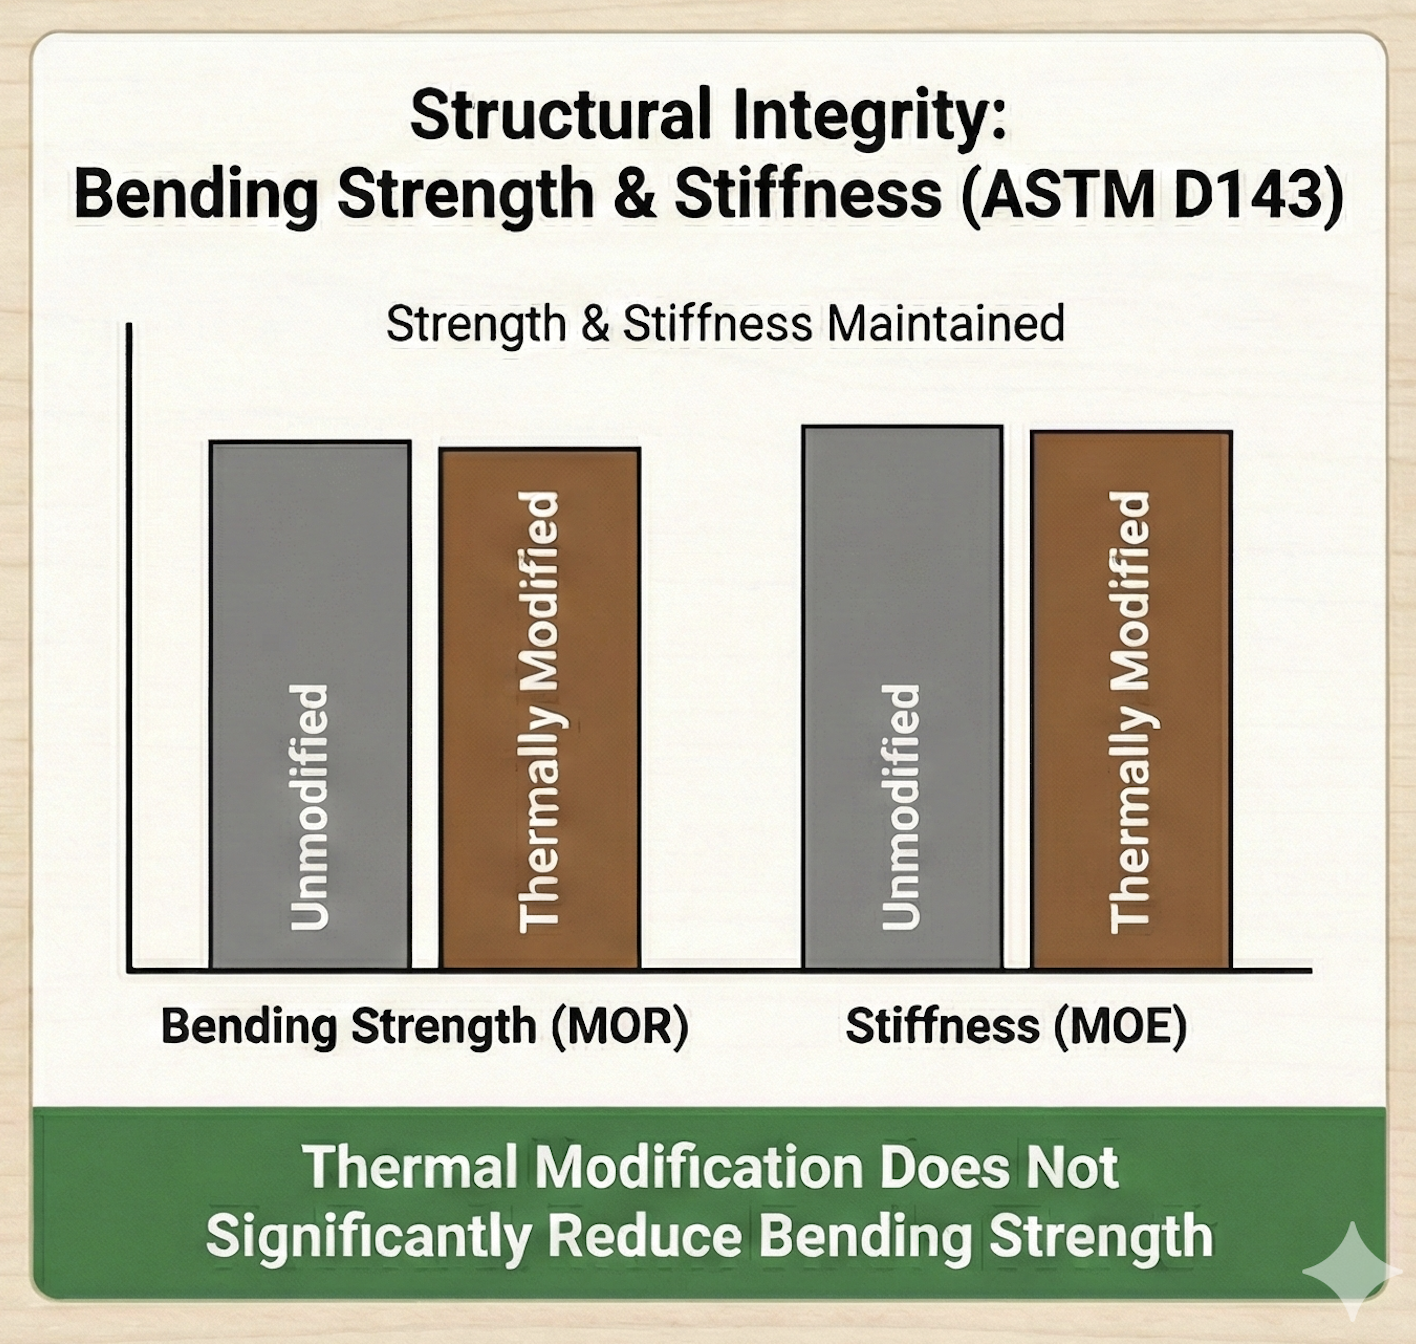
A common question regarding modified wood is how the heating process impacts its structural strength. Testing for Bending Strength (MOR) and Stiffness (MOE) showed that the thermally modified wood performs comparably to unmodified SYP and Hemlock.
The Takeaway: Thermal modification did not significantly reduce the wood’s bending modulus or strength. It maintains the necessary structural integrity required for standard exterior cladding and siding applications.
The independent LSU AgCenter testing results confirm that thermally modified Southern Yellow Pine and Western Hemlock provide a reliable, high-performance alternative to chemically treated lumber.
By choosing these modified species for your next project, you are selecting a natural product that offers:
Enhanced resistance to fungal decay compared to unmodified SYP/Hemlock.
Improved termite resistance in Southern Yellow Pine.
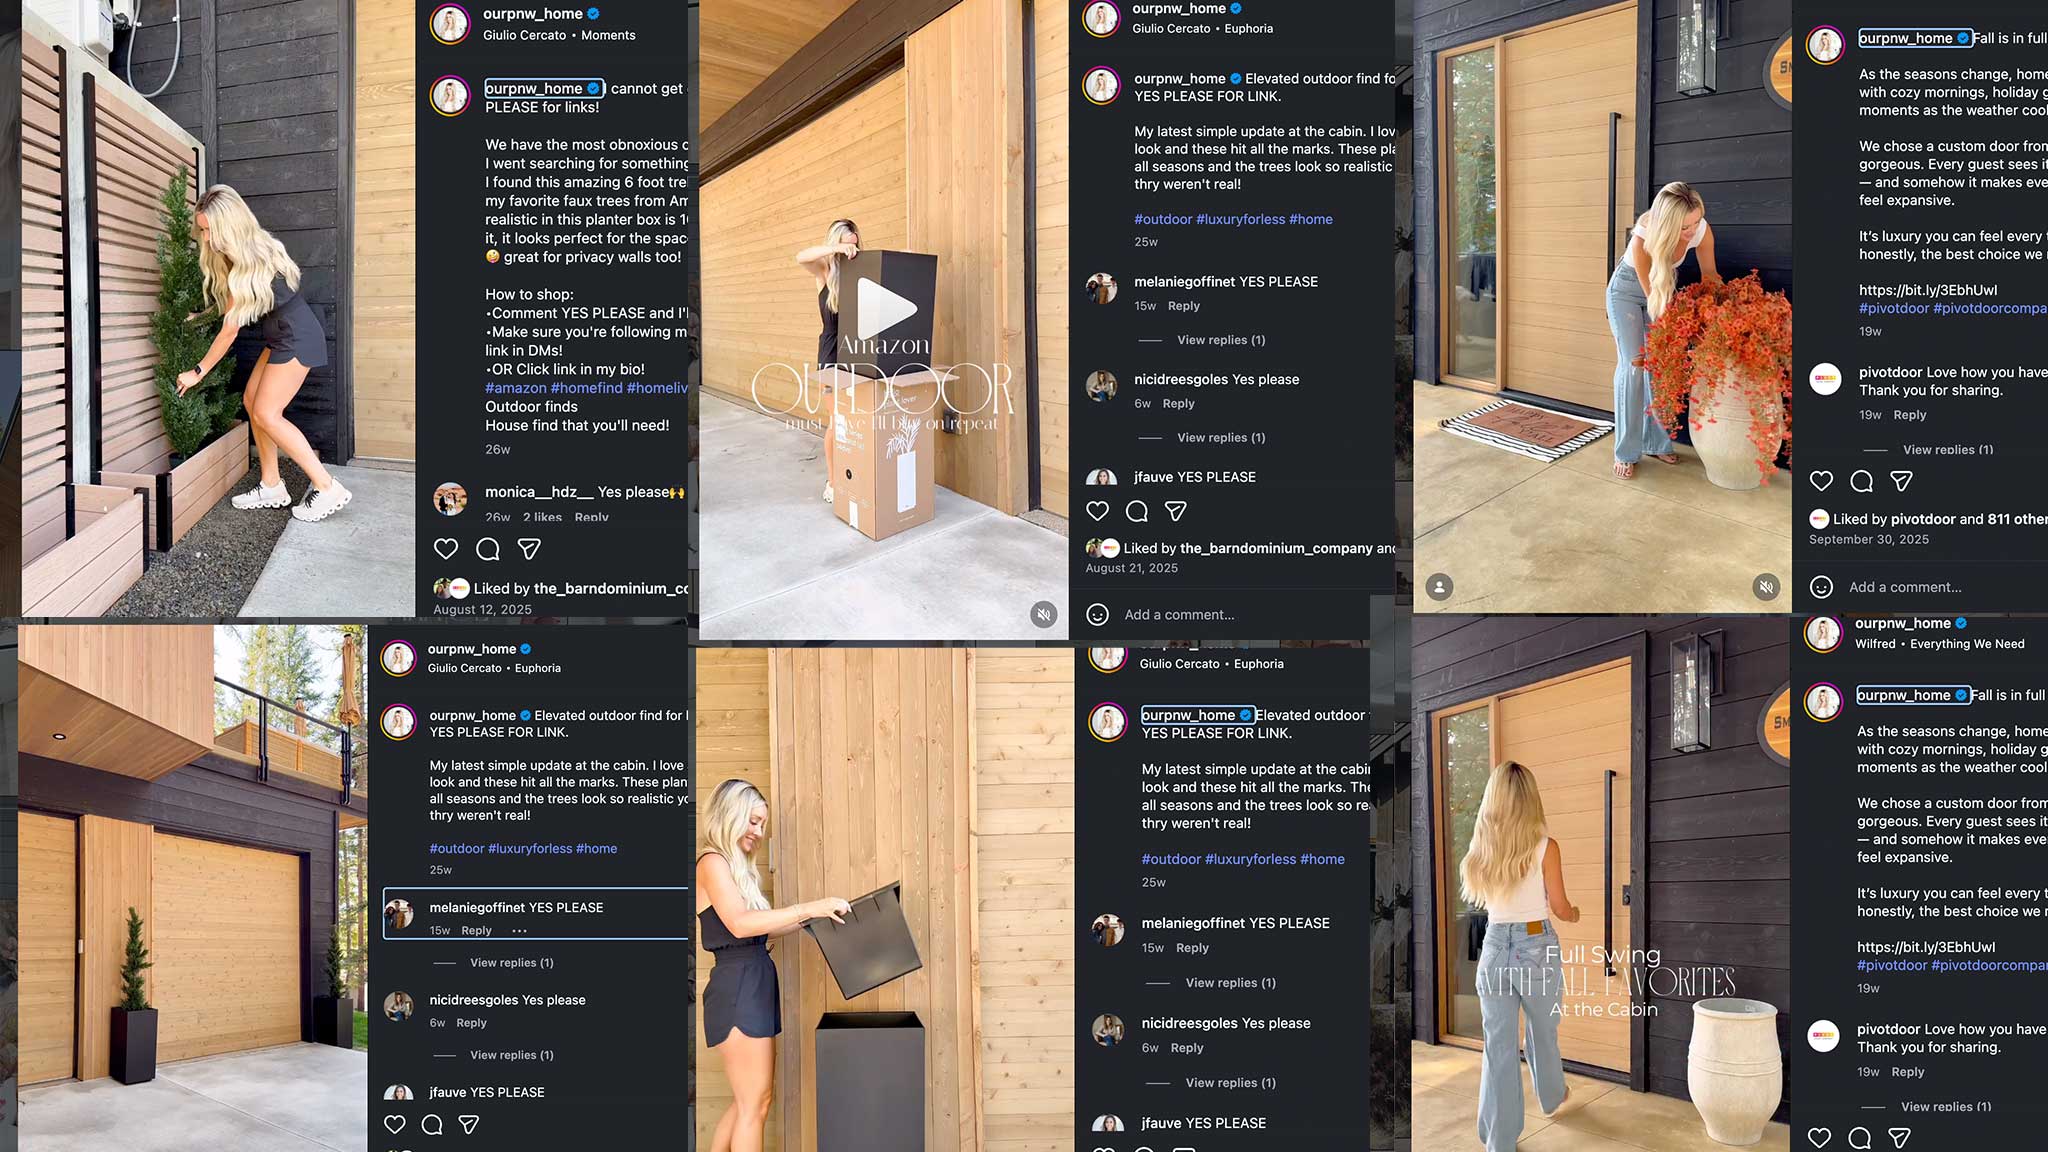
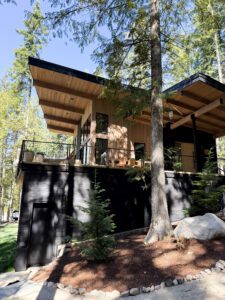
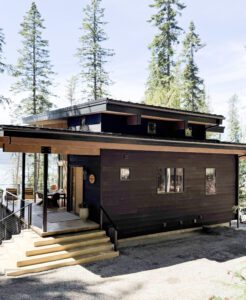
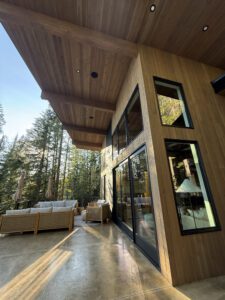
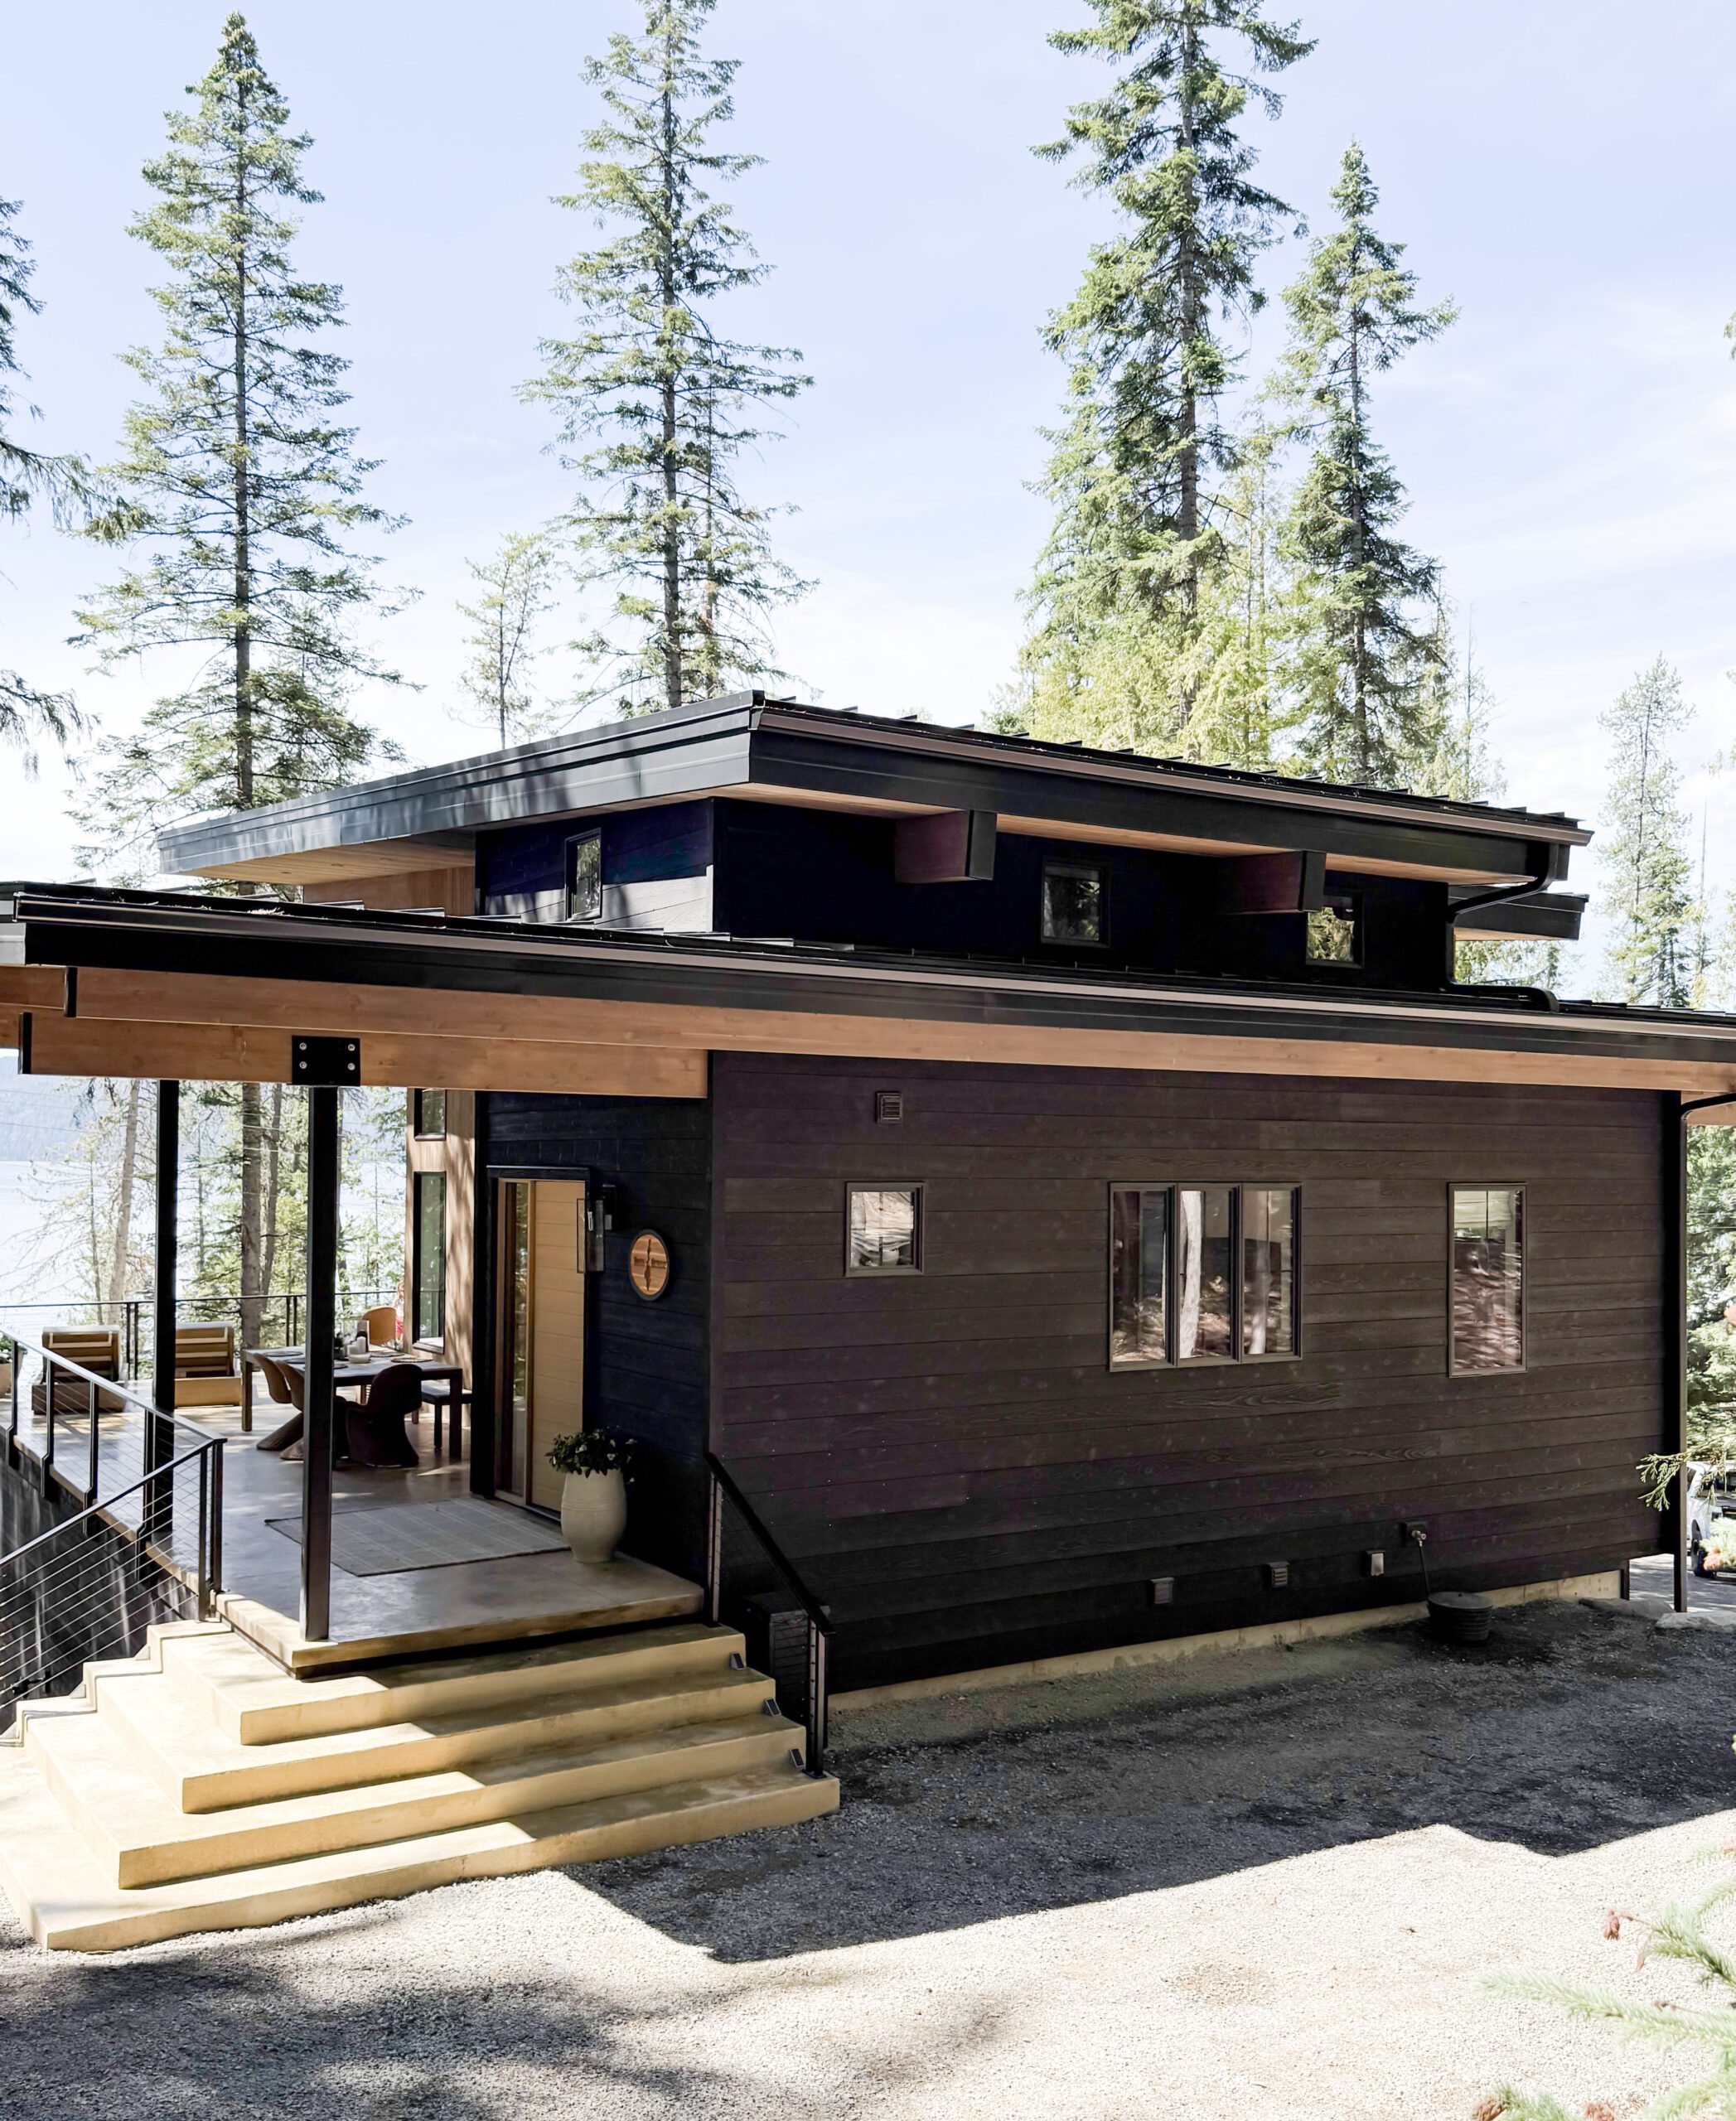
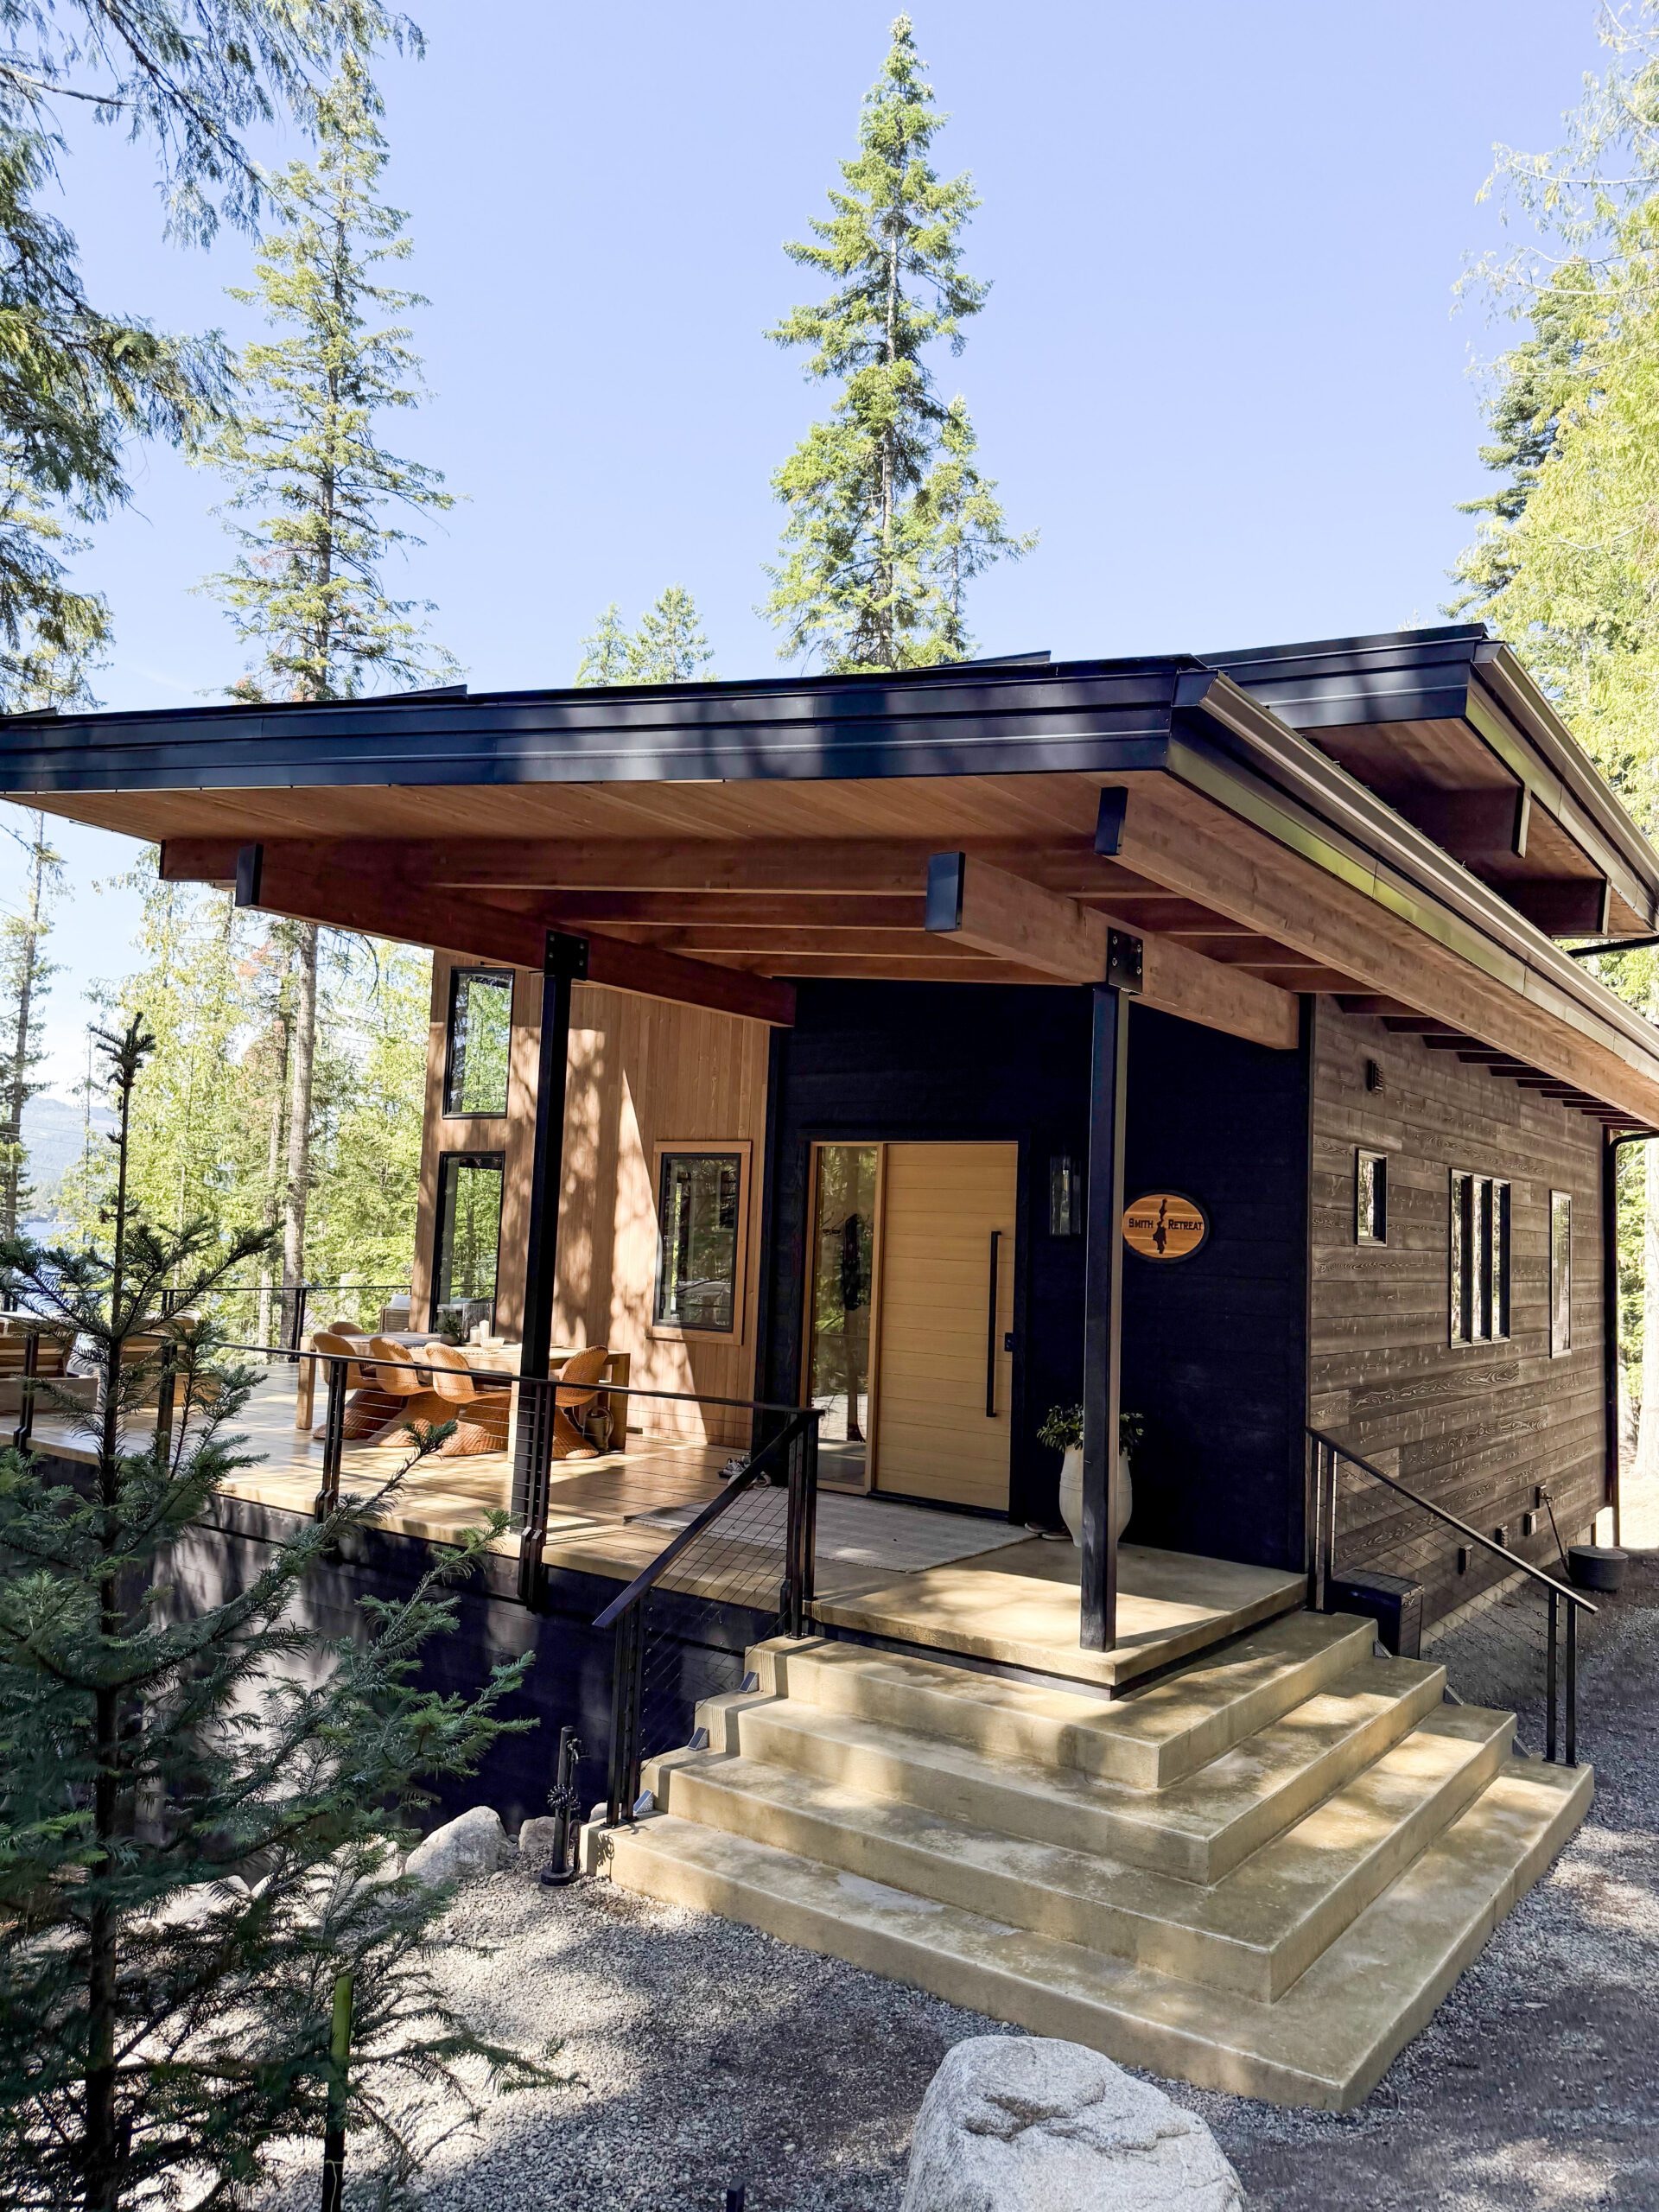
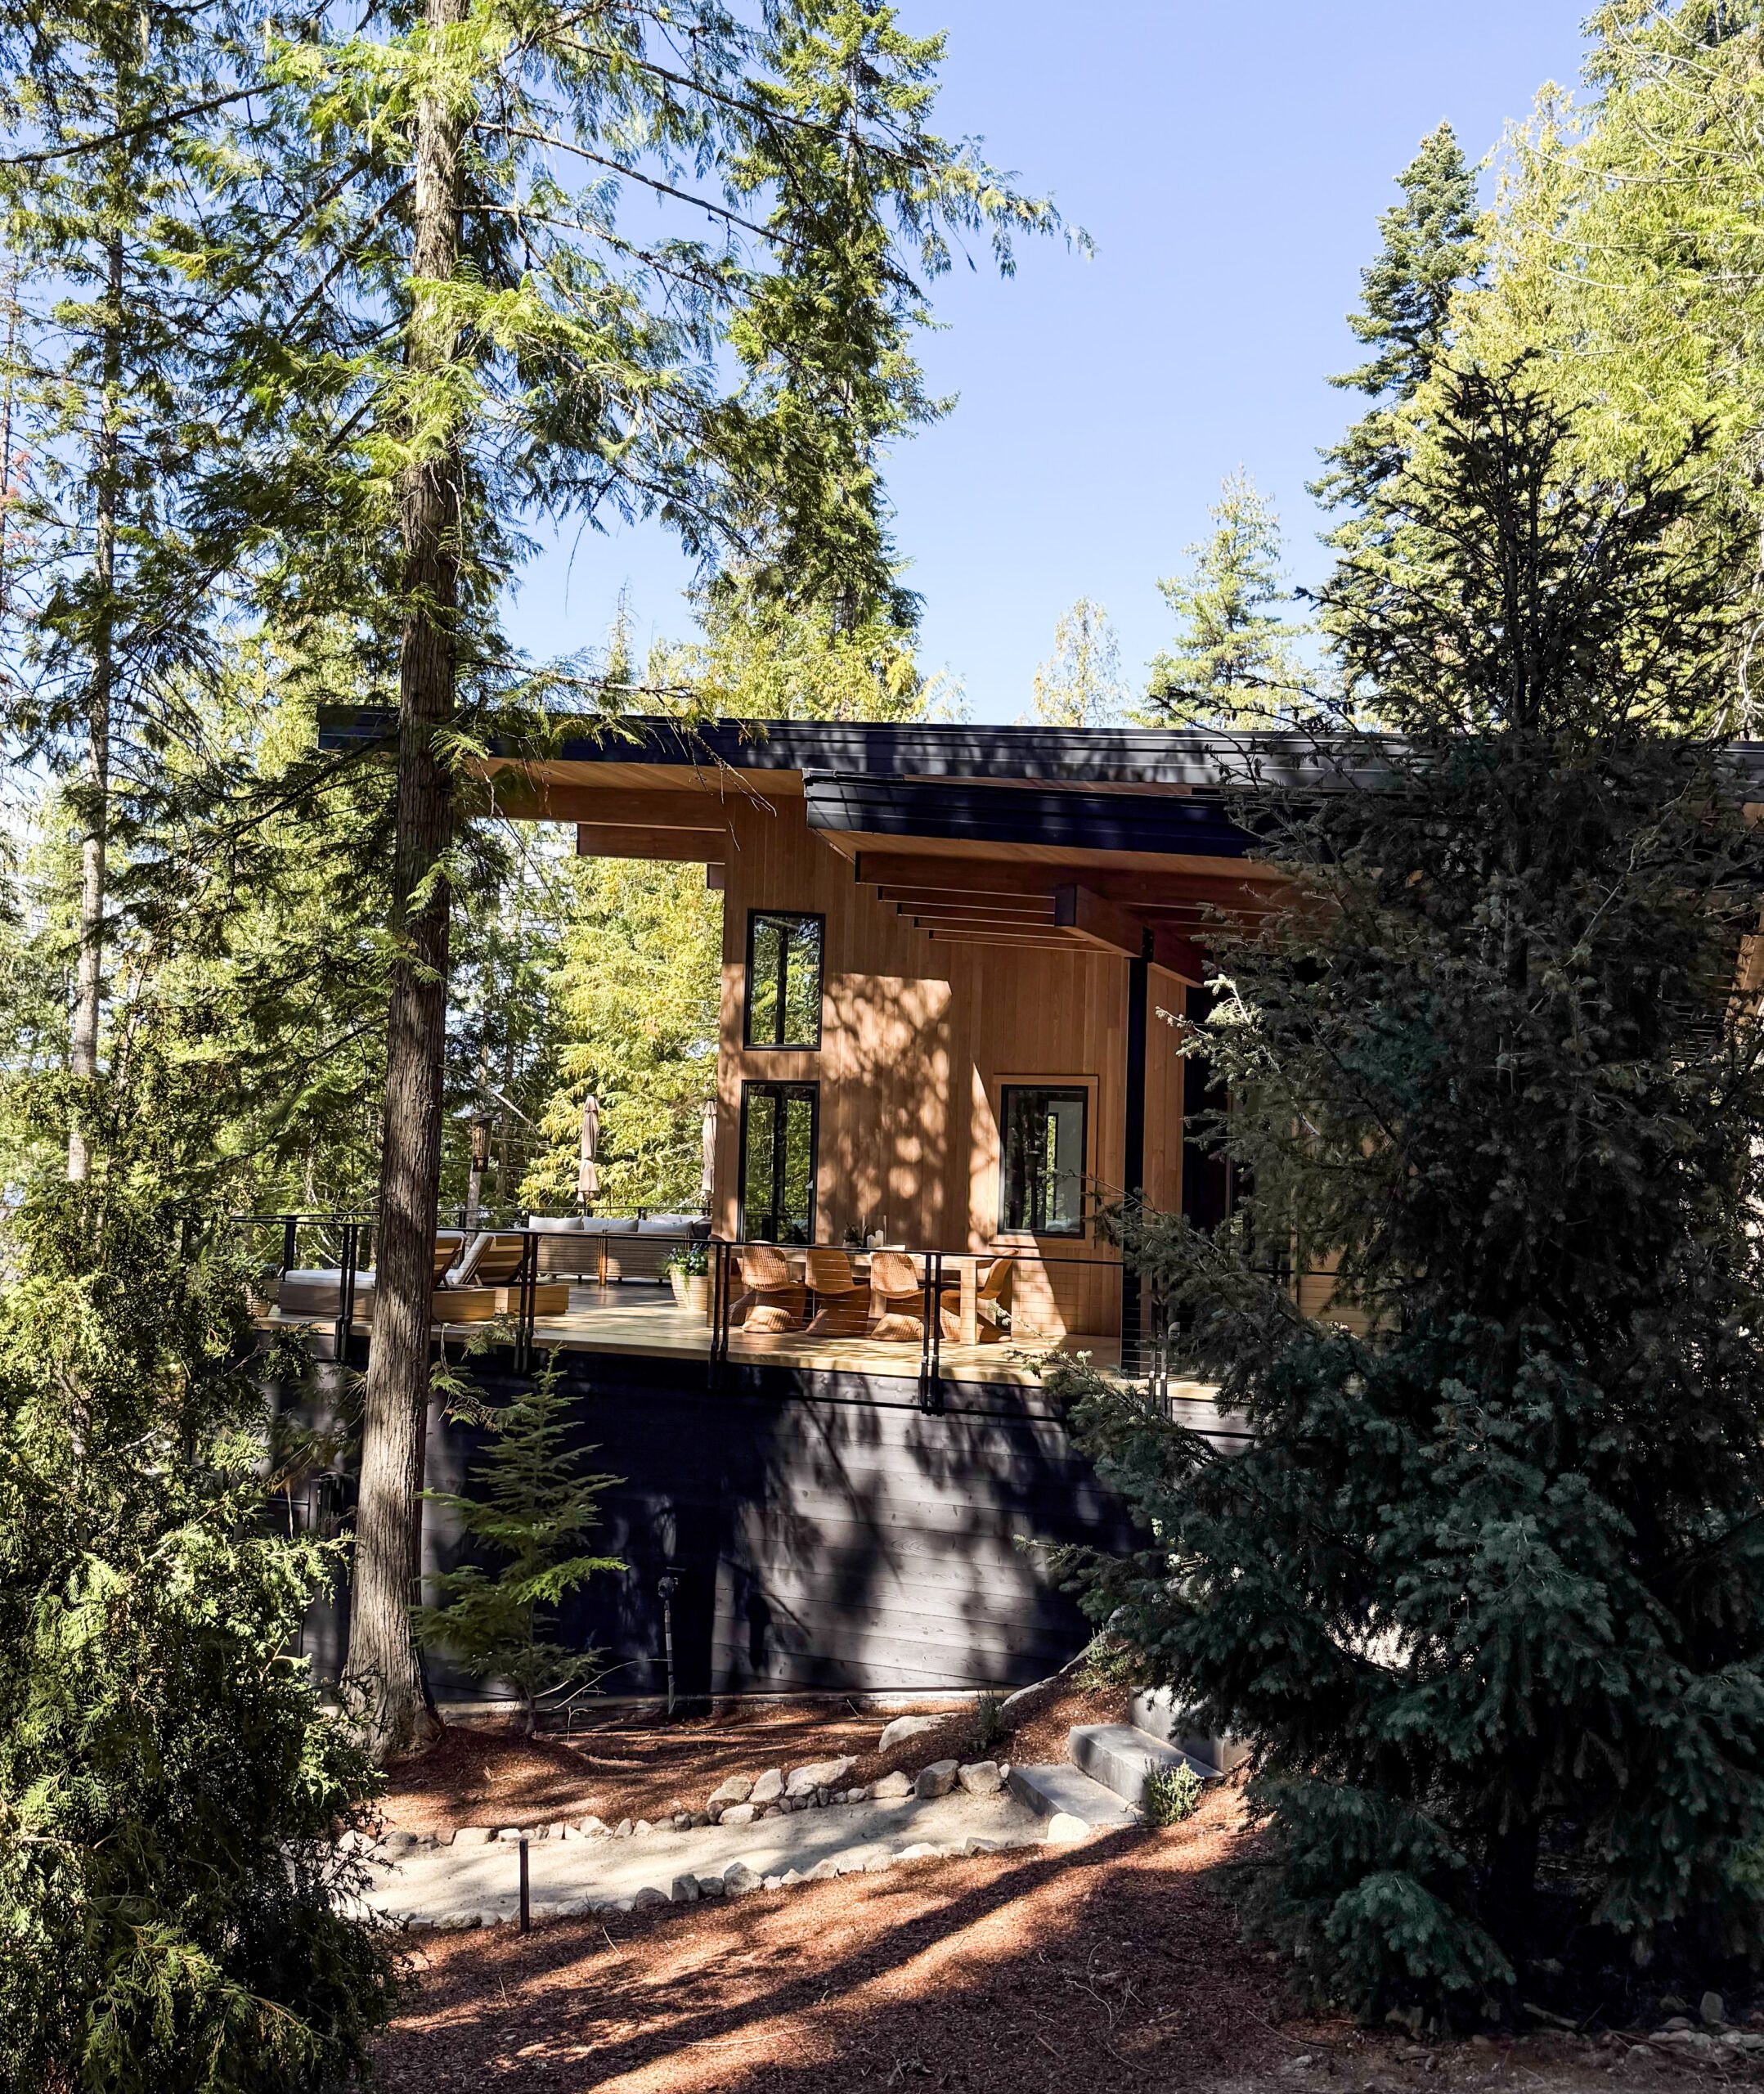
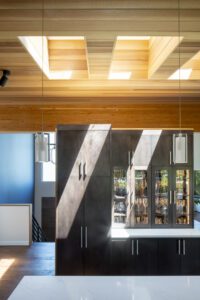
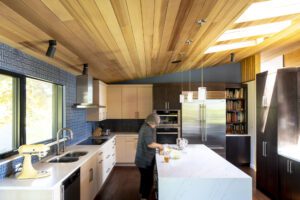
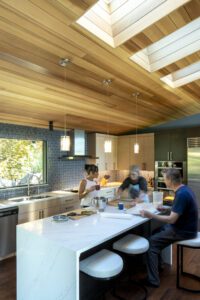
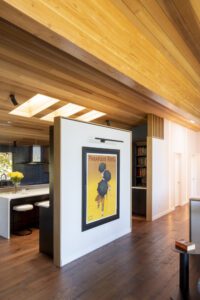
From Concept to Cabin: “Our PNW Home” x MTP – A Modern Minimalist Lake Cabin
Posted on: February 19, 2026
Cozy Minimalism Designed with ranchwood™ and Charwood™
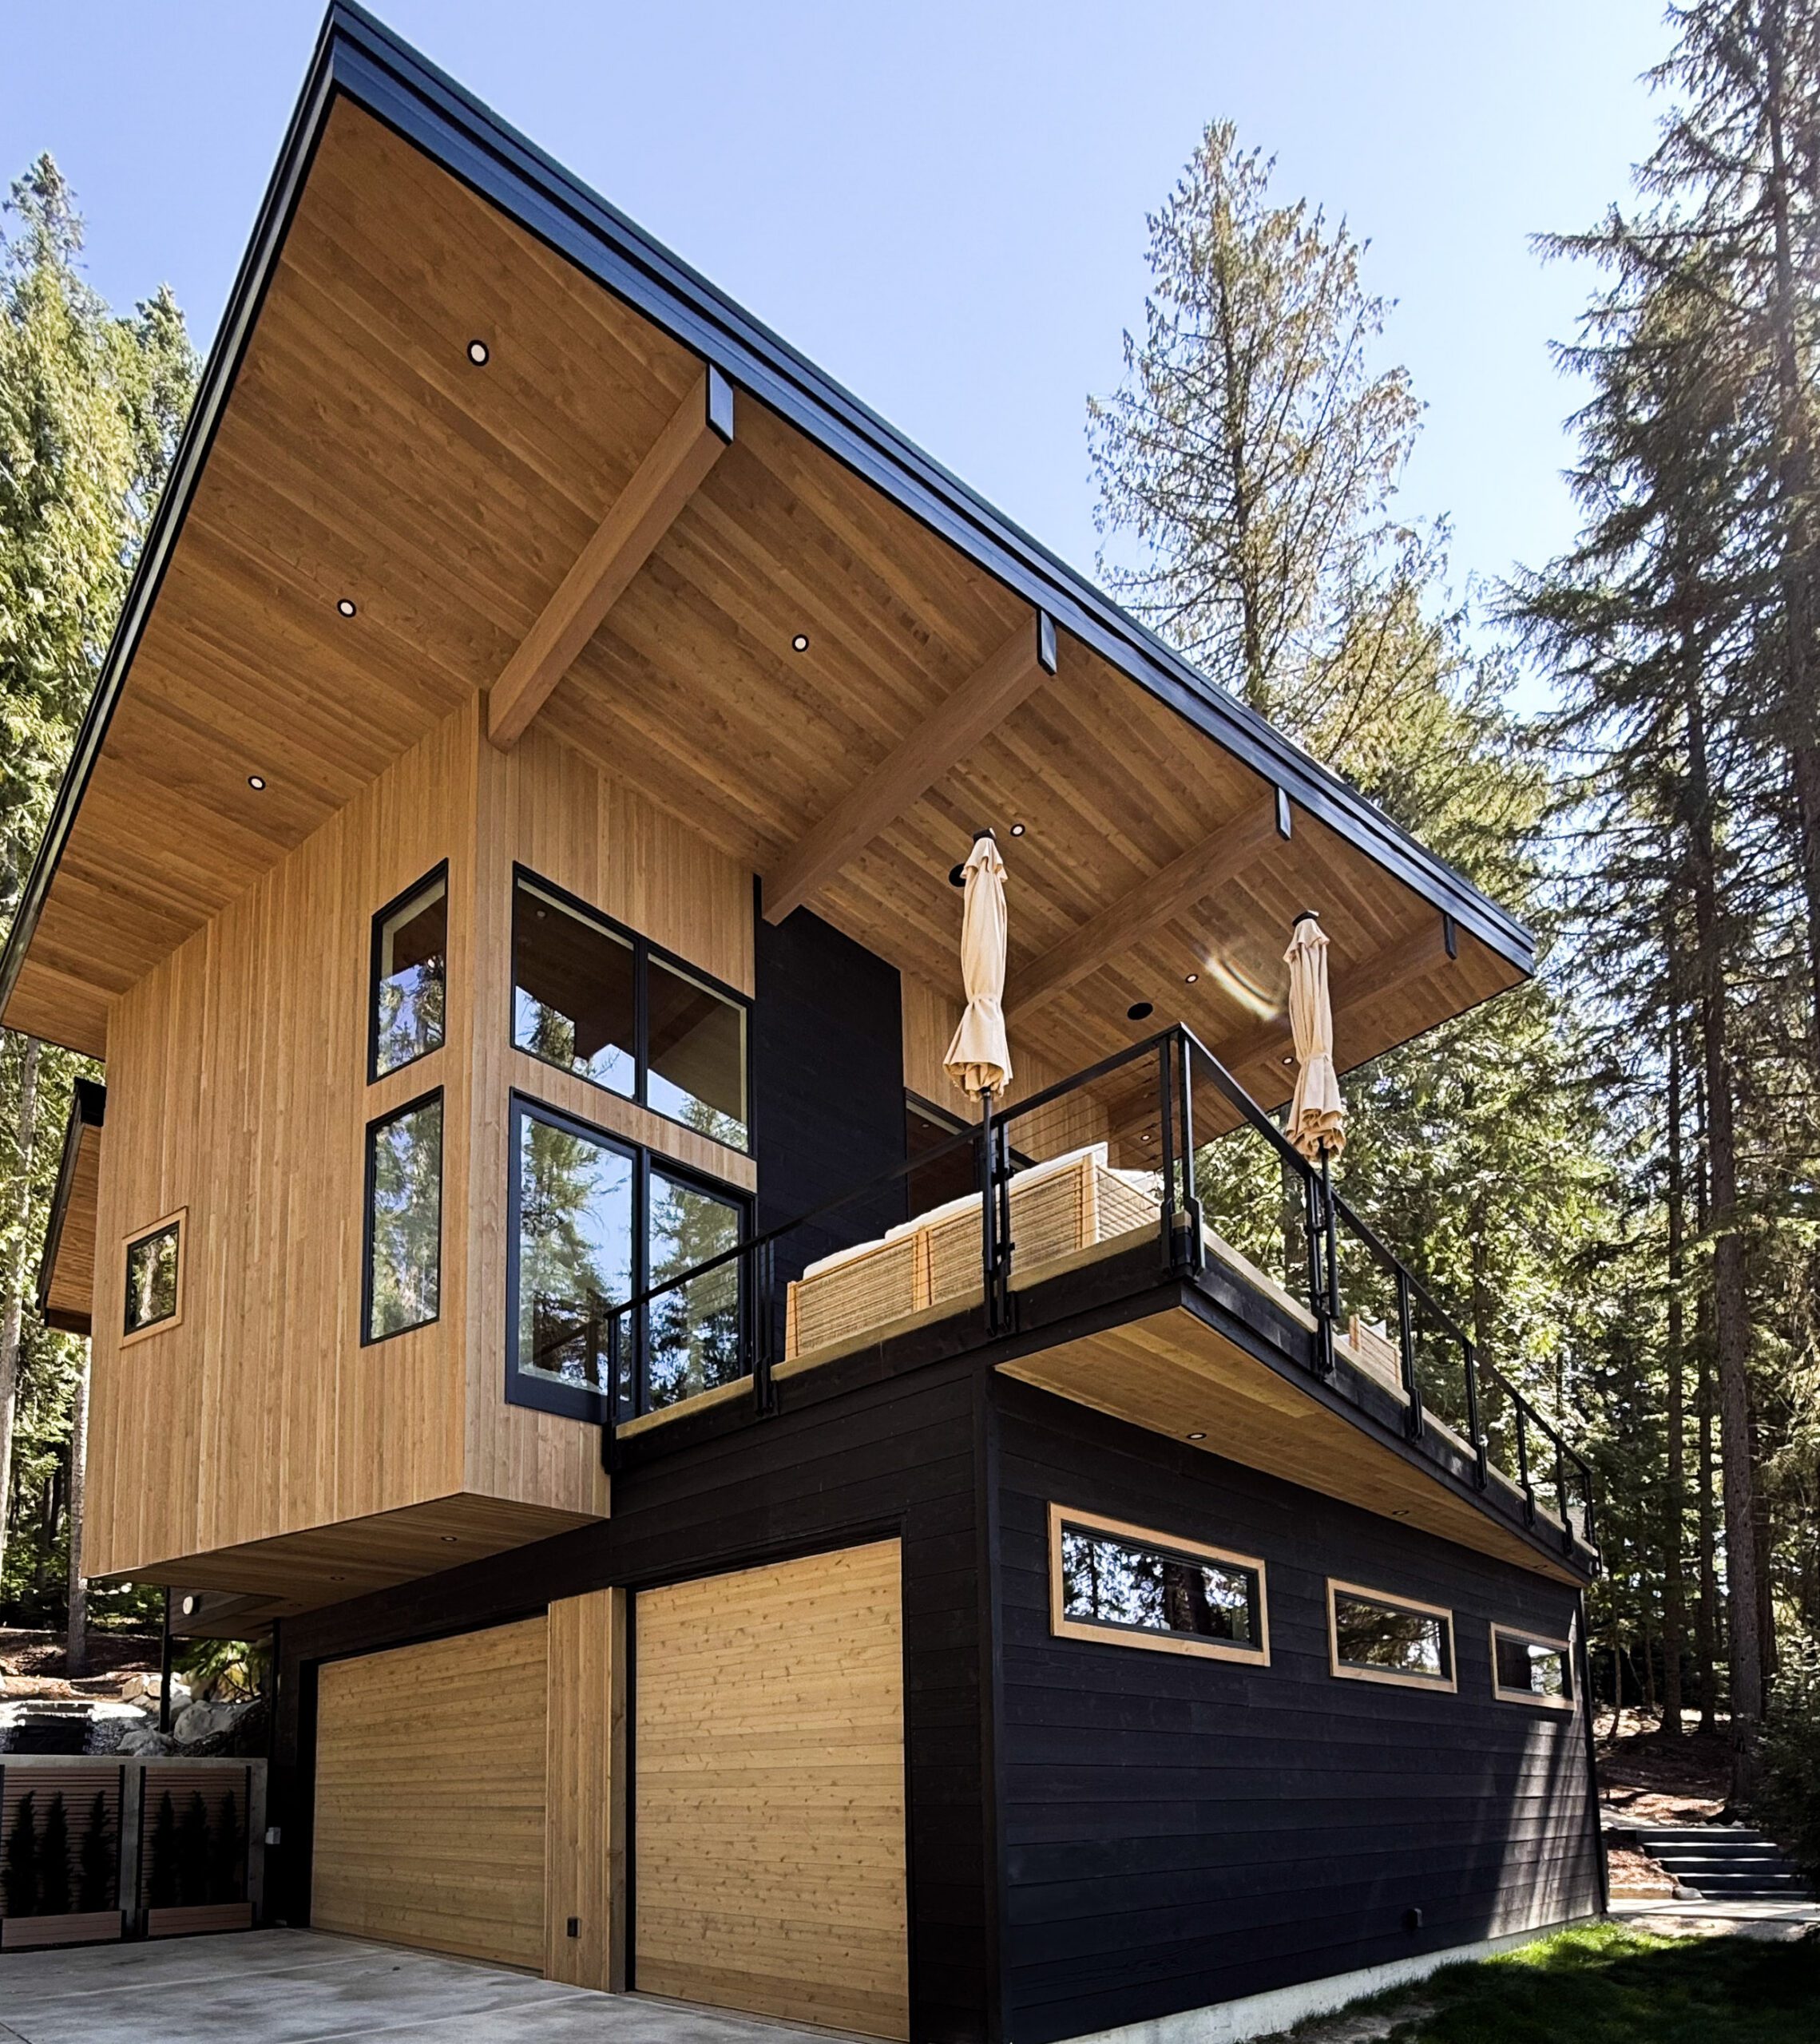
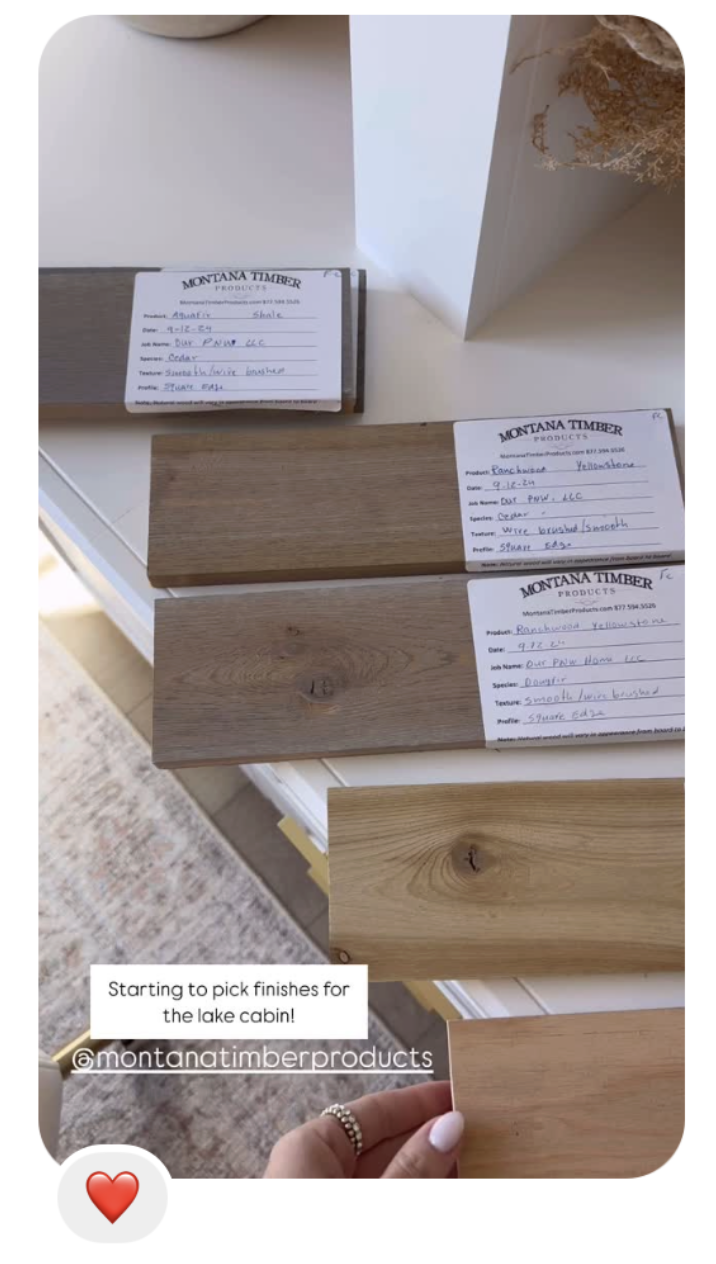
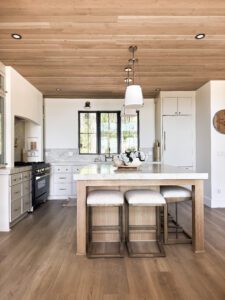
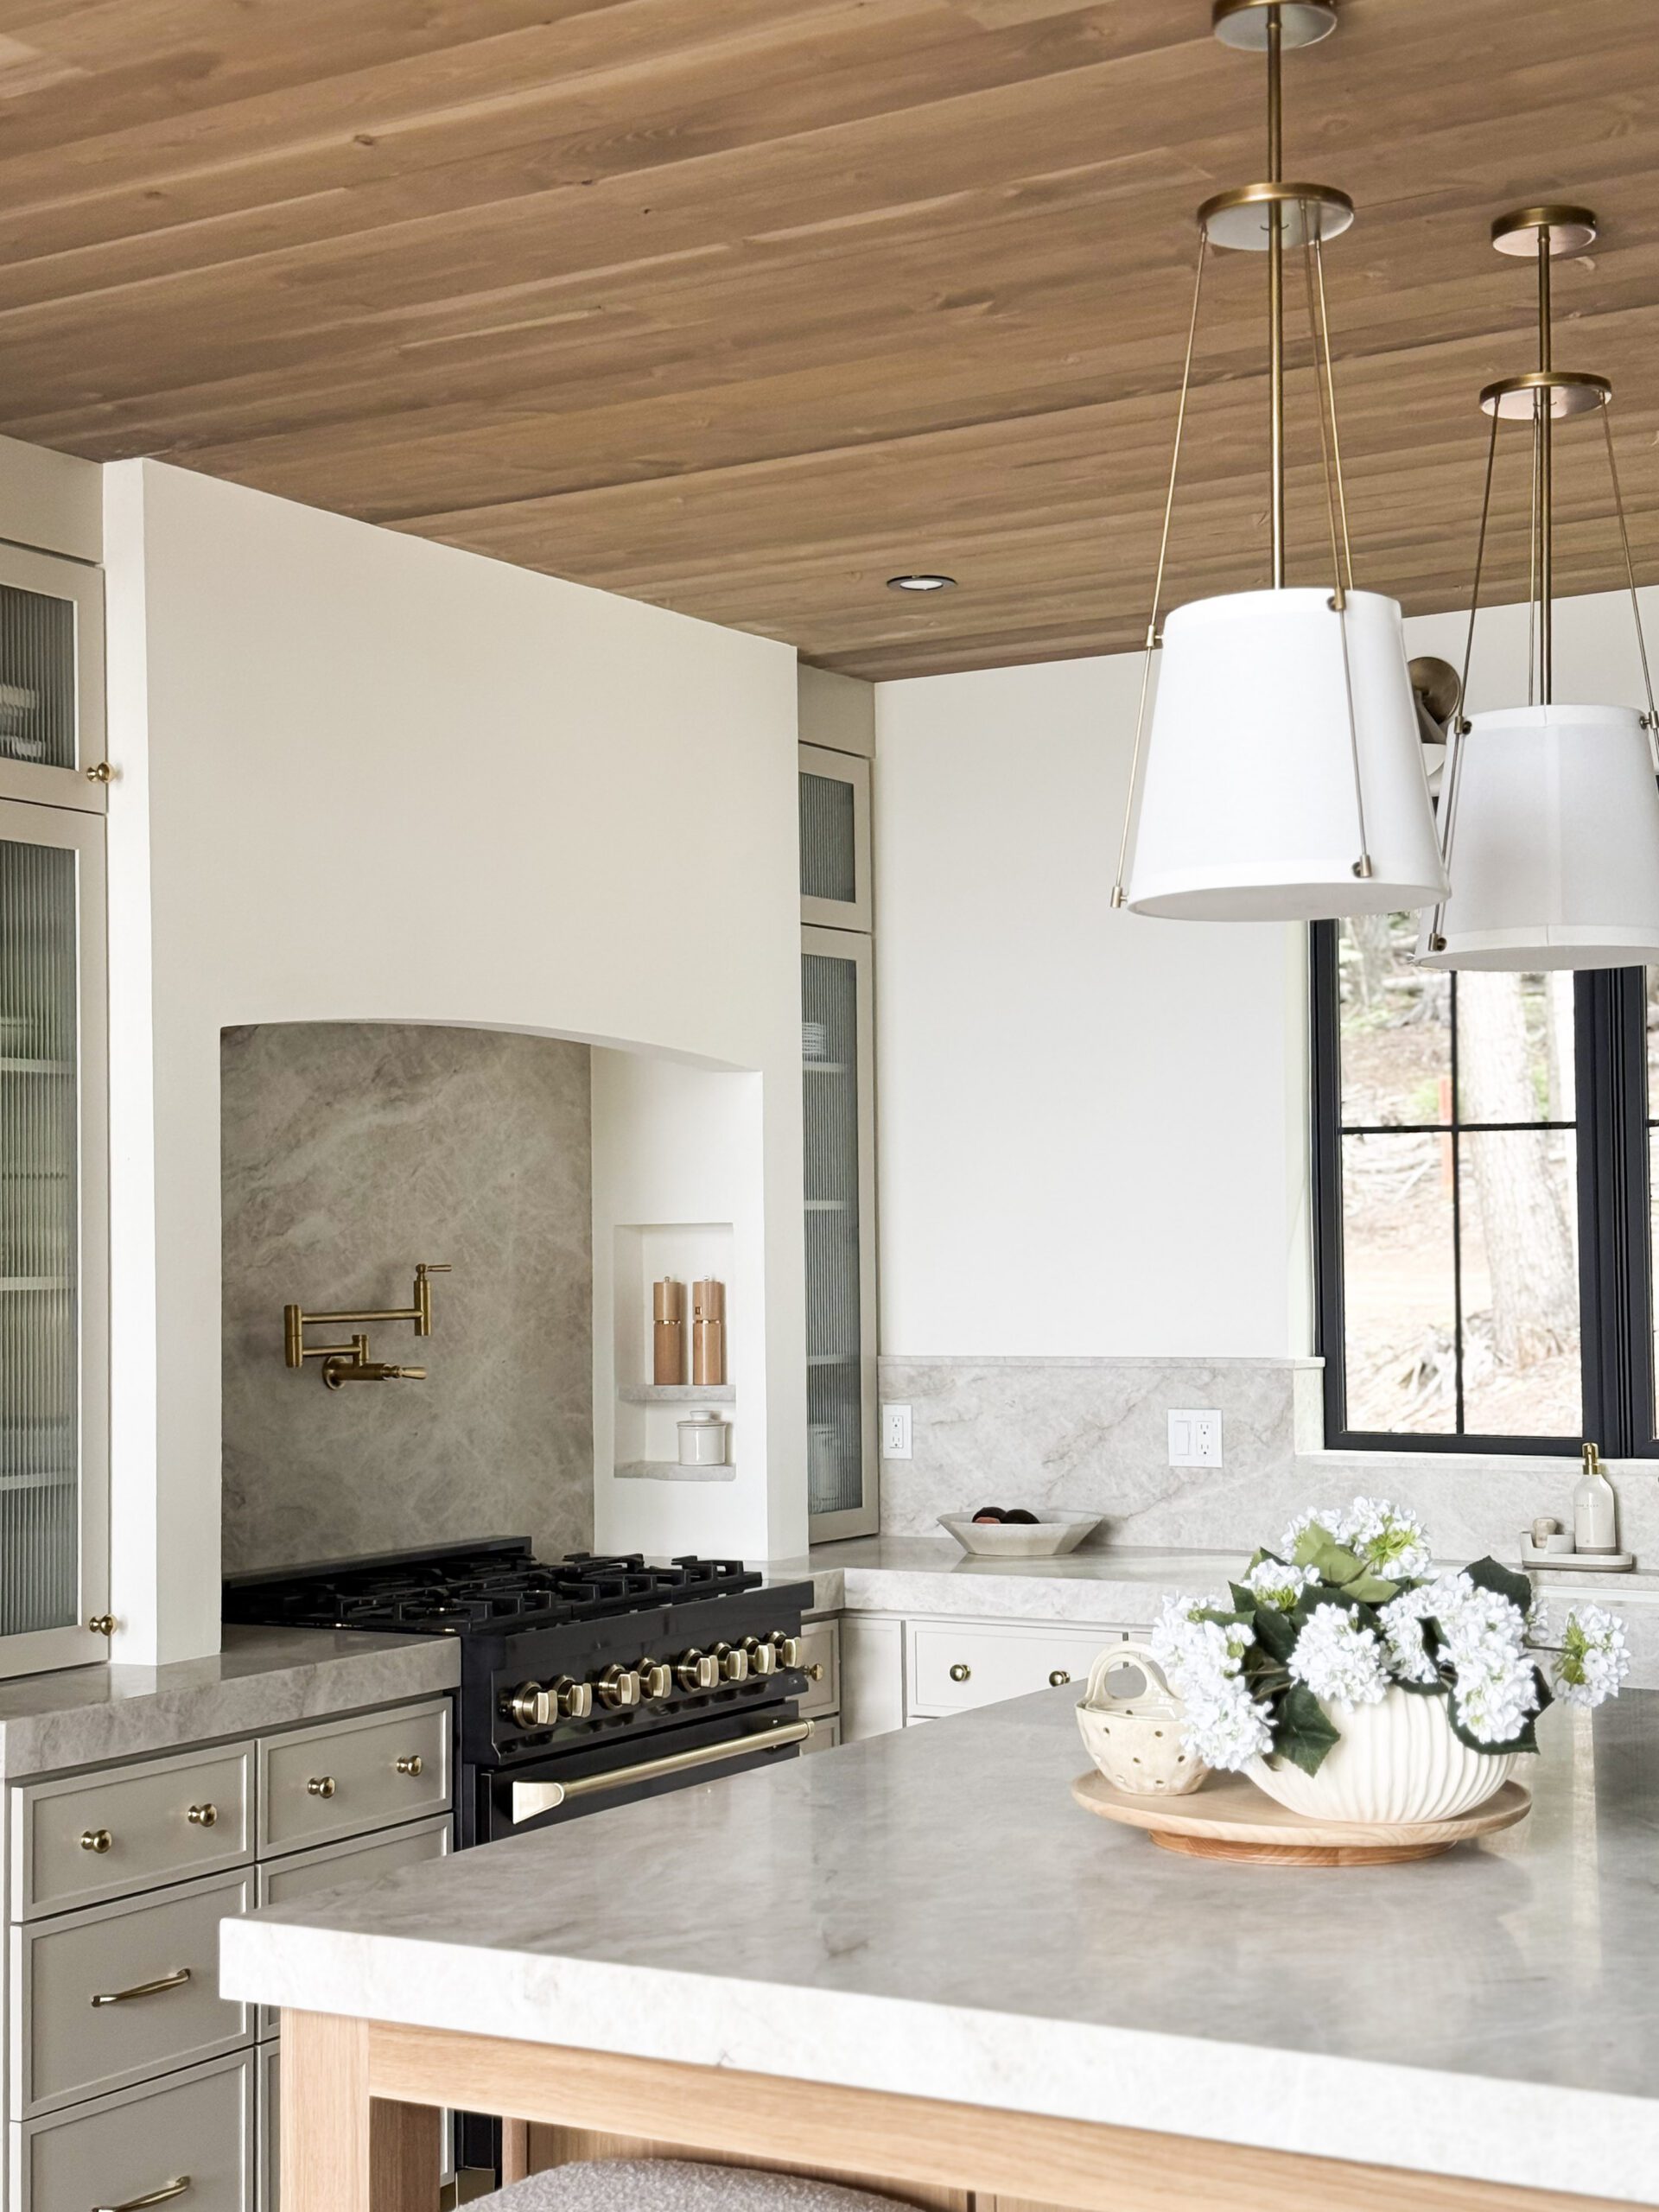
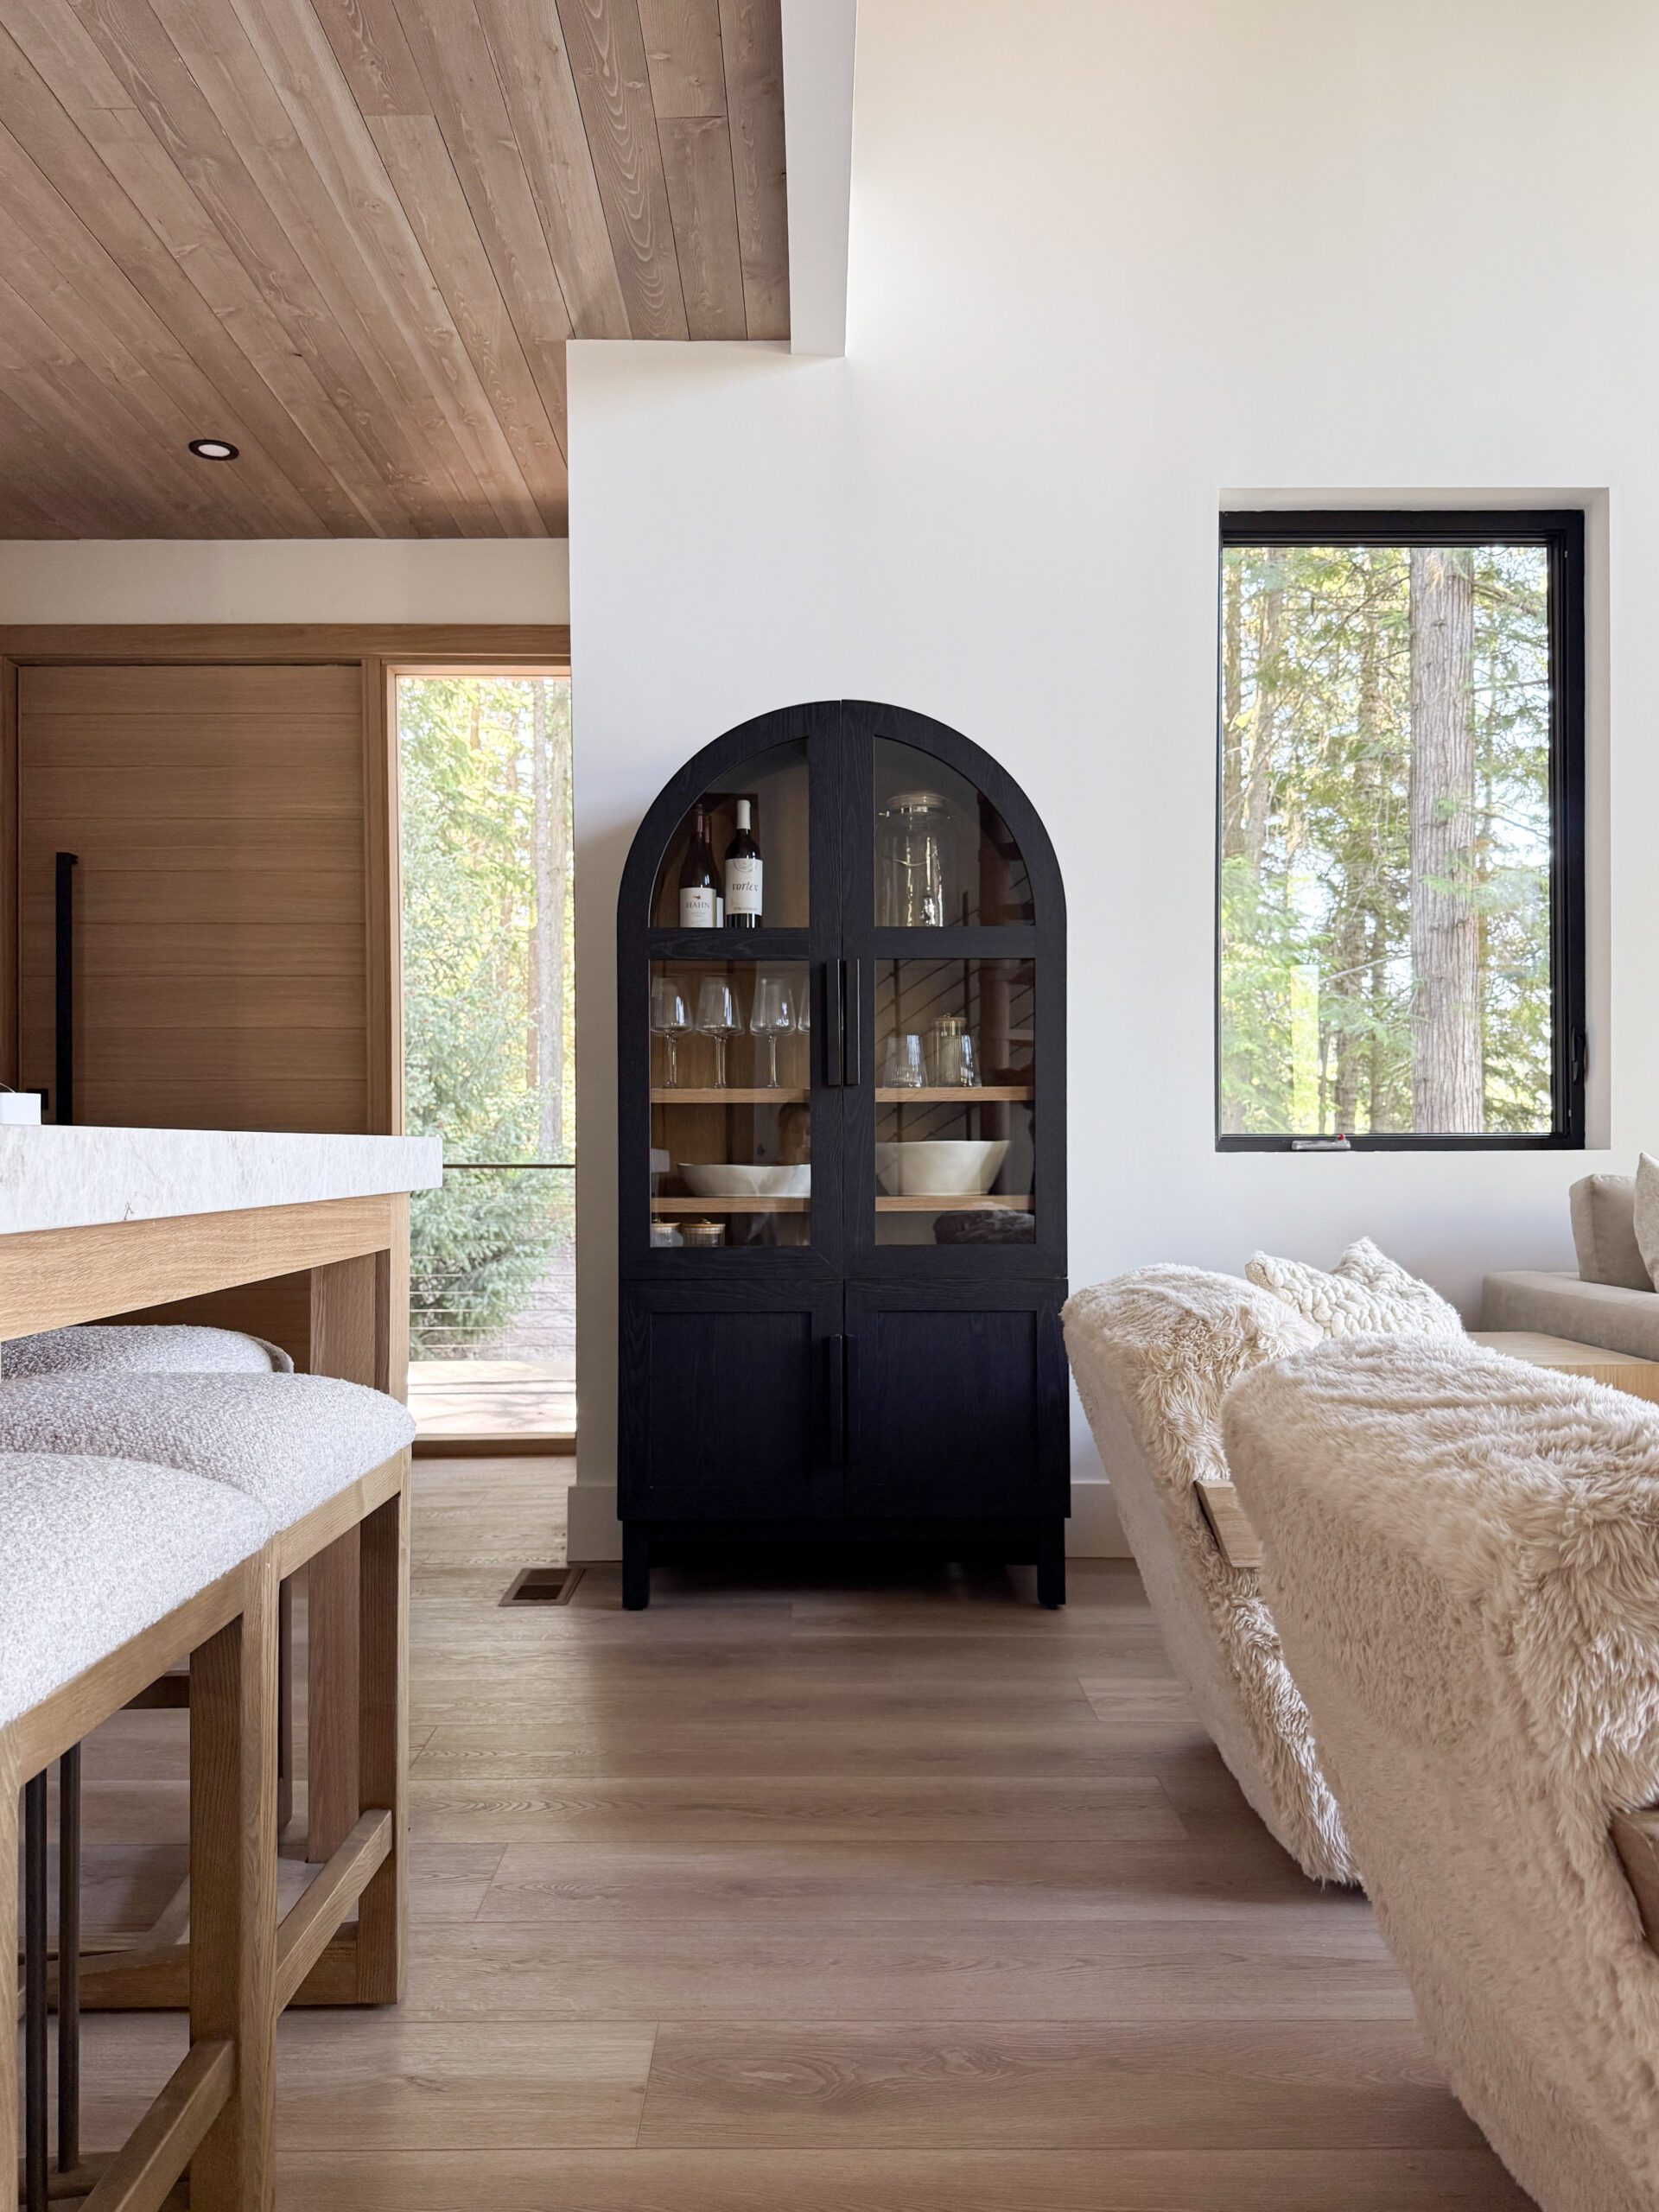
If you follow Jordyn Smith, the creator behind the popular Amazon shopping and lifestyle brand Our PNW Home, you already know her signature aesthetic. Follow her instagram, it’s a masterclass in cozy, minimalist design of beiges, creams, and whites paired with light natural woods and the occasional black accent. When it came time to translate this clean, inviting look to her family’s new lake cabin in Coolin, Idaho, Jordyn partnered with the NW architecture firm SOK Design Studio to create a custom retreat that perfectly aligned with her vision.
We had the joy of watching her material decision-making process unfold on Instagram, and we couldn’t be more thrilled with the results. By selecting our ranchwood™ Yellowstone to capture that warm, natural wood essence and contrasting it with Charwood™ Midnight for her signature dark accents, Jordyn created a beautiful PNW sanctuary. Today, the build serves as both a family getaway and the ideal textural backdrop for her brand’s daily lifestyle and product highlights.
The Material Palette: ranchwood™ Yellowstone and Charwood™ Midnight
To bring the “Our PNW Home” aesthetic to life, the project utilized a mix of Douglas Fir and Western Red Cedar (WRC) across a variety of profiles.
Application
Dimensions & Species
Profile
Product & Color
Vertical Siding
1″ × 6″ RL Doug Fir (#2 & Btr)
Ship Lap
ranchwood™ Yellowstone
Horizontal Siding
1″ × 10″ RL Doug Fir (#2 & Btr)
Ship Lap
Charwood™ Midnight
Soffits & Ceilings
1″ × 6″ RL Doug Fir (#2 & Btr)
T&G
ranchwood™ Yellowstone
Garage Doors
1″ × 6″ WRC (STK)
T&G
ranchwood™ Yellowstone
Window/Door Trim
2″ × 4″ RL Doug Fir (#2 & Btr)
Sq. Edge
ranchwood™ Yellowstone
Fascia Board
2″ × 8″ RL Doug Fir (#2 & Btr)
Sq. Edge
Charwood™ Midnight
DESIGN HIGHLIGHTS
Exterior Architecture Grounded in Midnight, Floating in Yellowstone
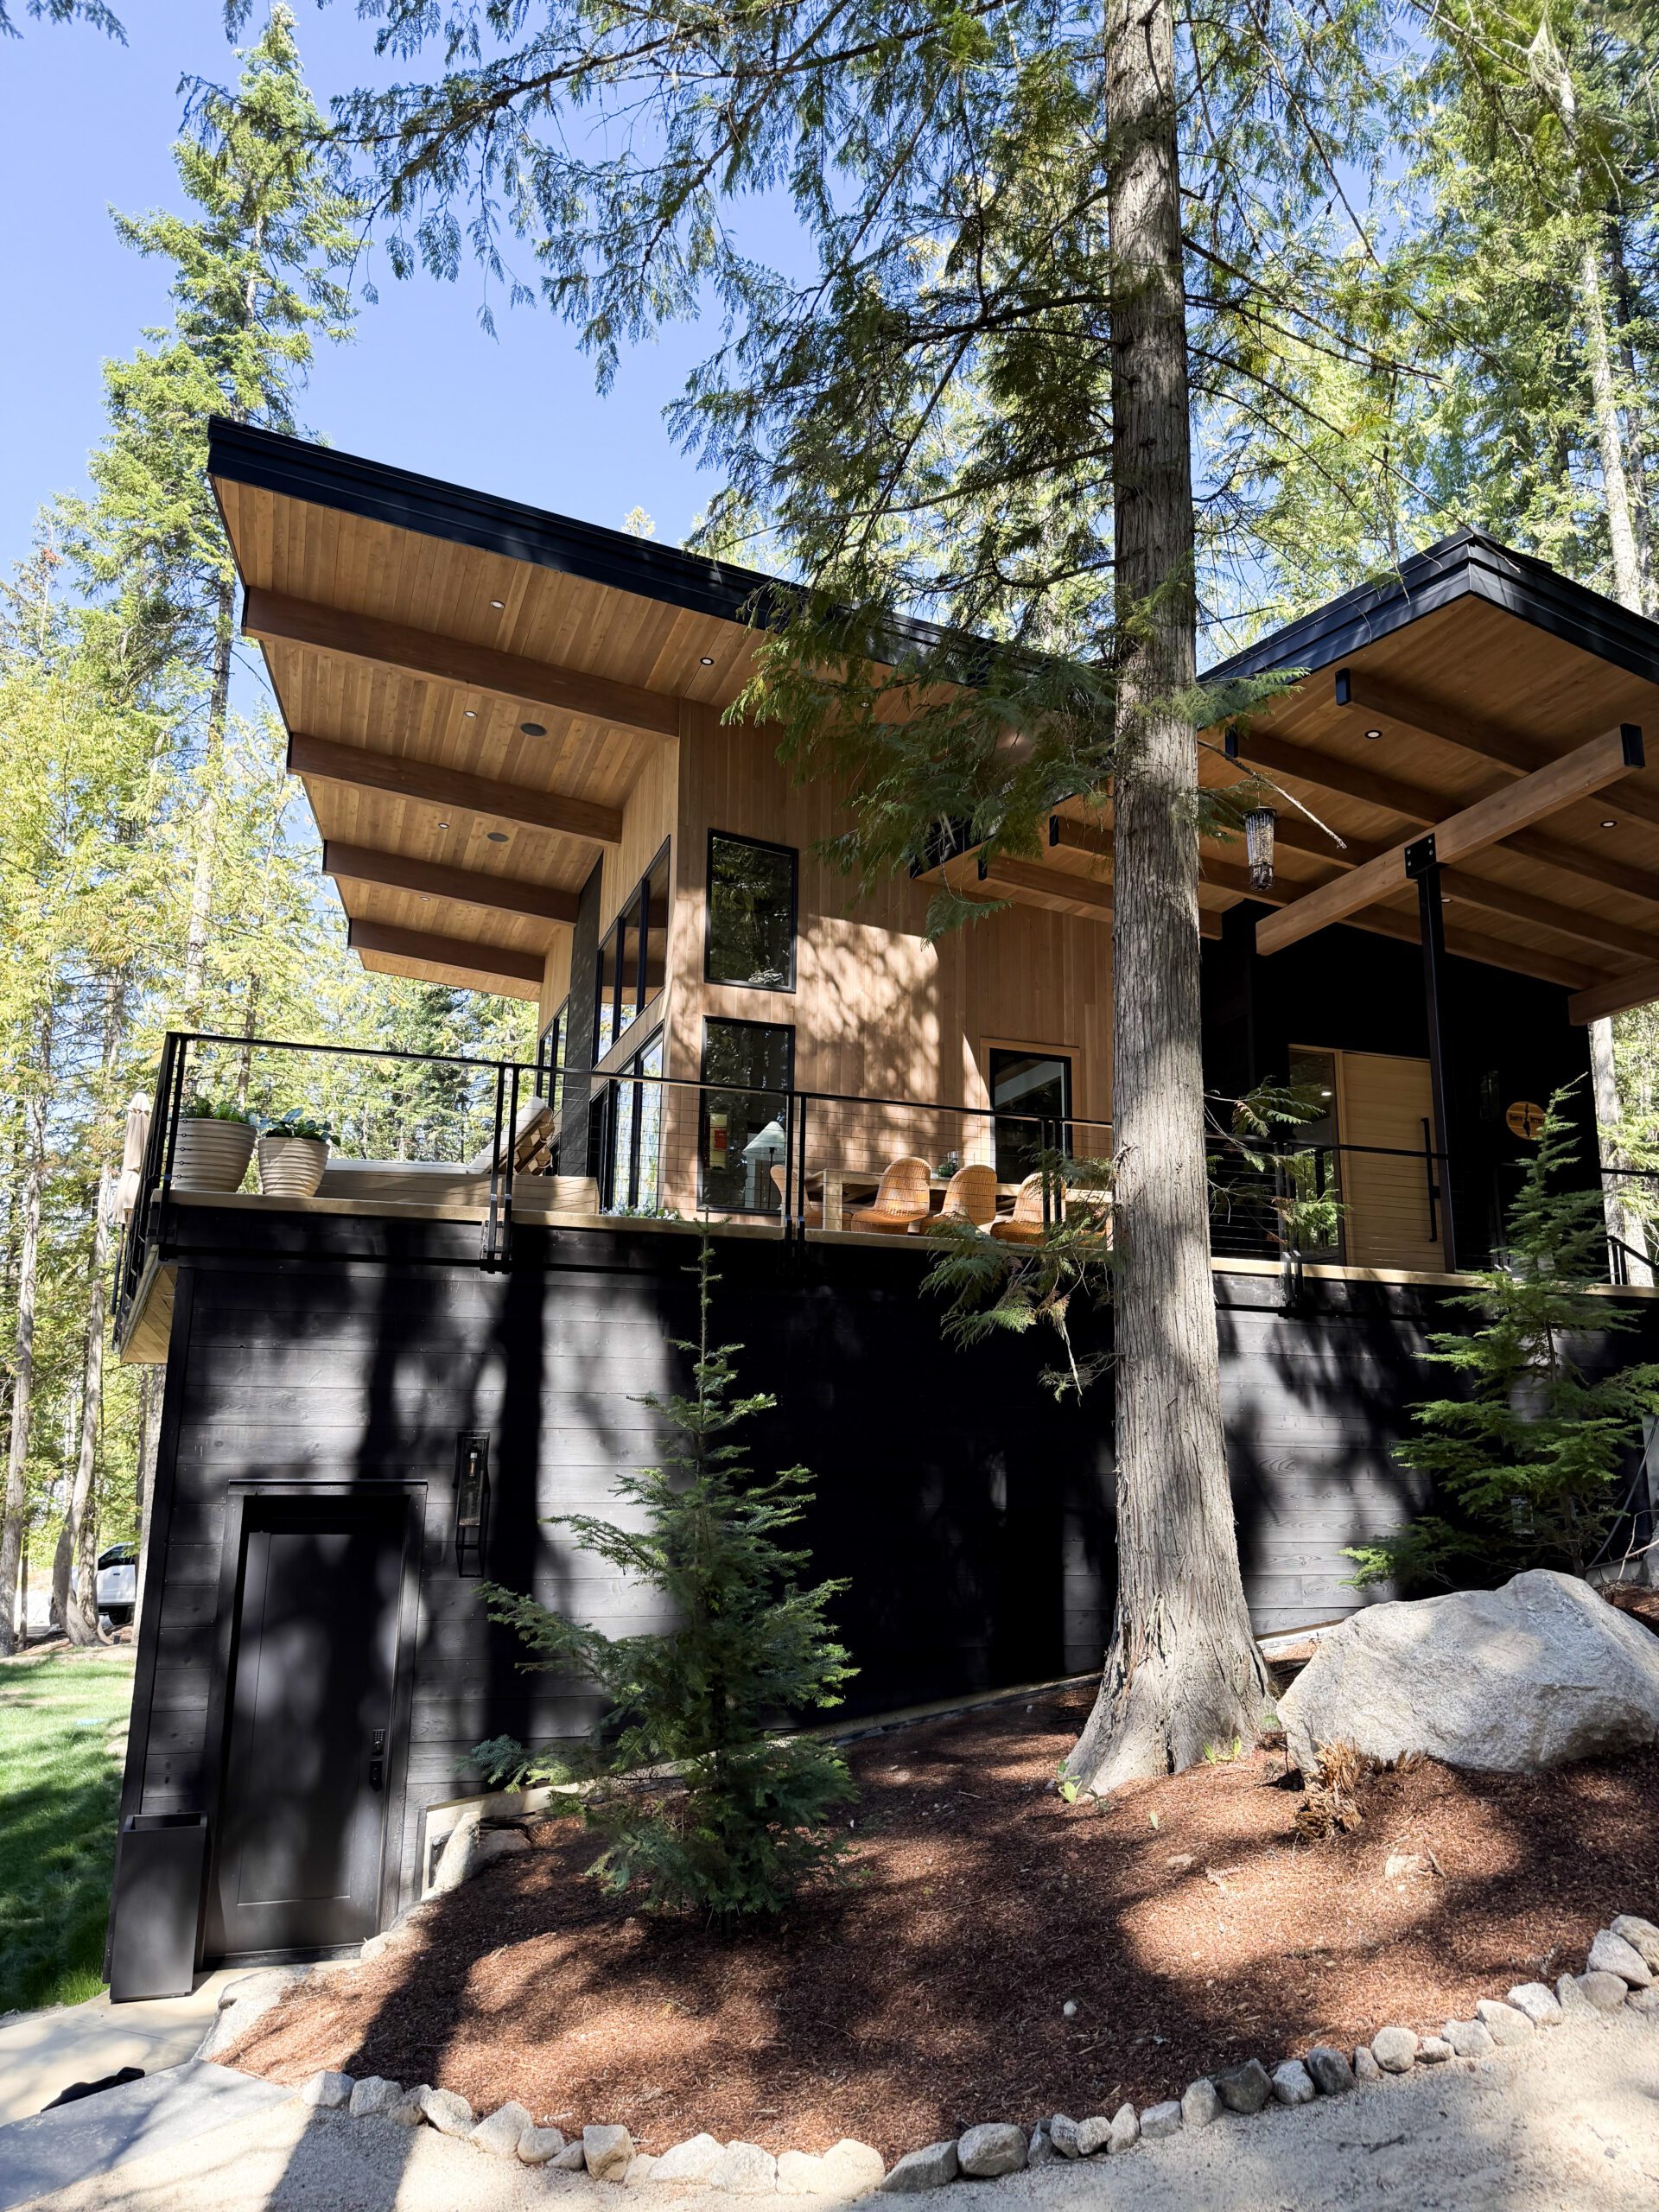
The visual success of this cabin exterior lies in the high-contrast, architectural pairing of two distinct Montana Timber Products lines. To physically ground the design, Charwood™ Midnight was used for the horizontal siding across the lower level and the sleek fascia boards. This deep, rich black tone anchors the home to the site. In striking contrast, the entire upper level, the garage doors, and the massive roof overhangs are clad in ranchwood™ Yellowstone. This warm, bright vertical siding draws the eye upward, making the modern, cantilevered upper floor almost appear to float against the forest backdrop.
A Grand Entryway with Pivot Door Company
A standout feature of the exterior is the gorgeous custom door from Pivot Door Company. Featuring a striking matte black handle, the wood door perfectly matches our ranchwood™ Yellowstone finish. It sits flawlessly within the contrasting Charwood™ Midnight horizontal siding. As Jordyn notes, the pivot door “makes even our modest cabin entryway feel expansive,” adding that, “It’s luxury you can feel every time we come home.”
Interior Harmony and High Contrast
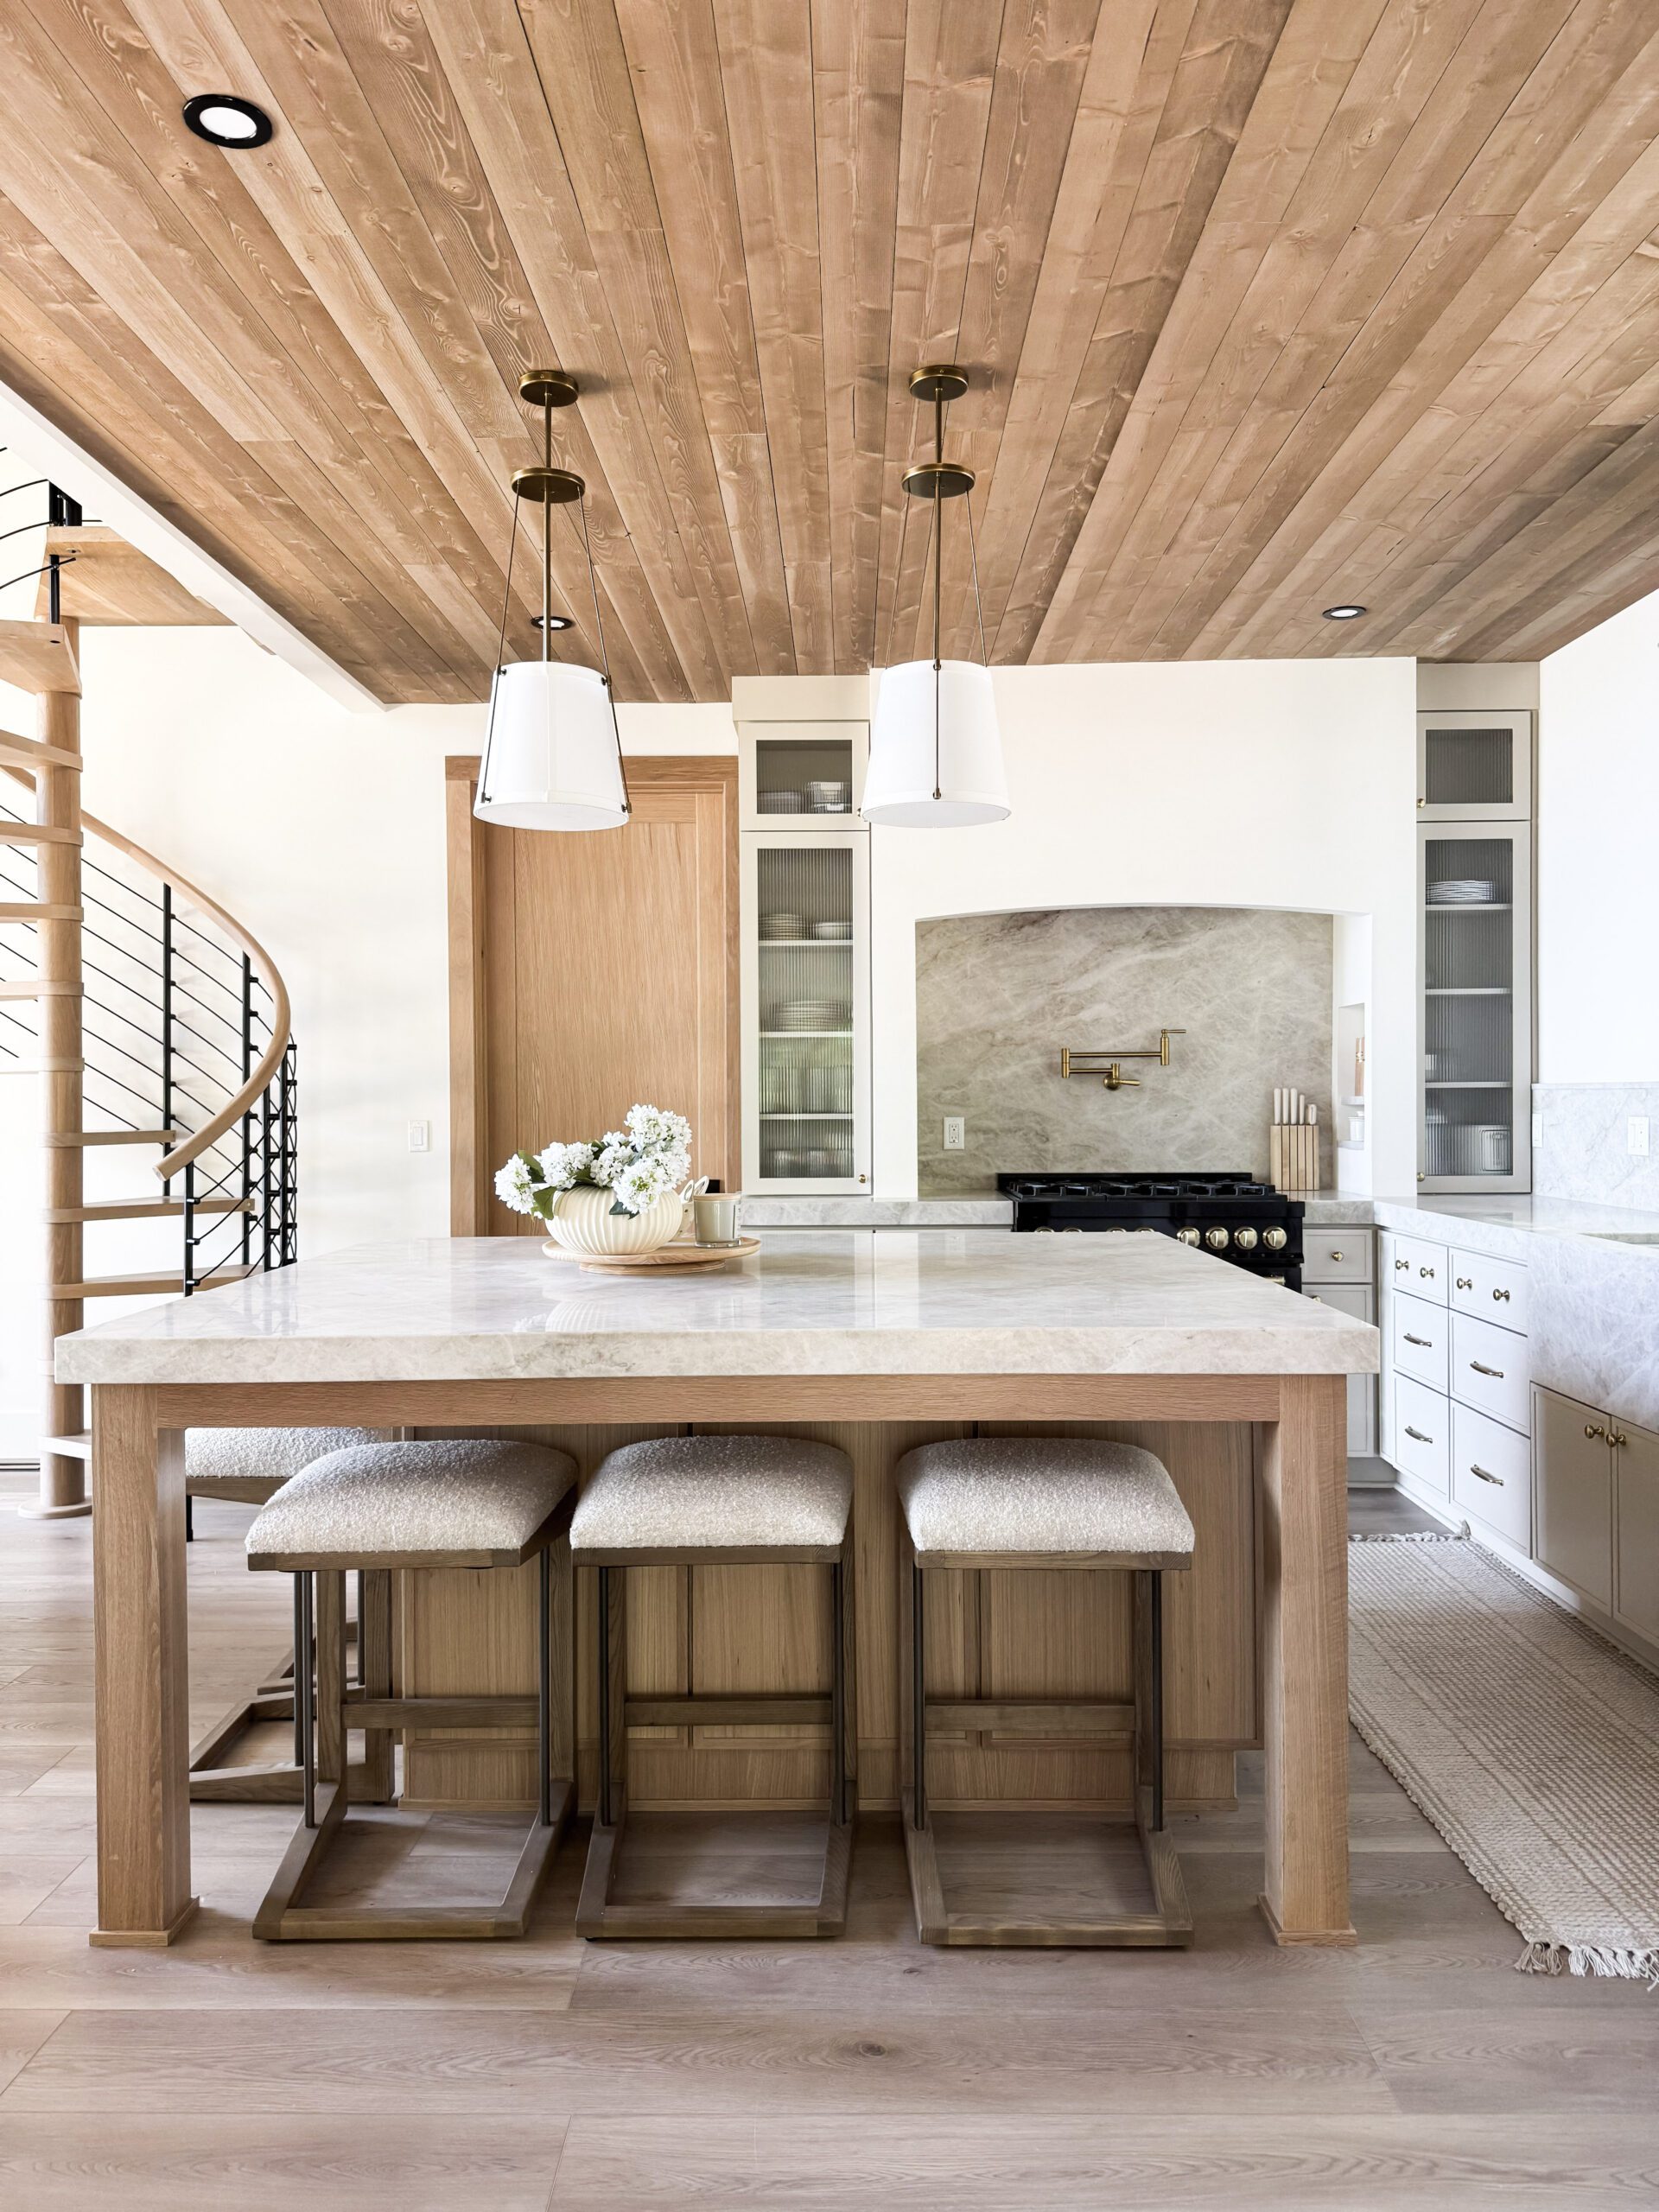
The interior perfectly executes her signature light, warm aesthetic. The ranchwood™ Yellowstone ceilings stretch across the open-concept kitchen, bringing an incredible organic warmth from above. This wood tone perfectly complements the light oak kitchen island and the treads of the stunning spiral staircase. To ground the airy space and maintain her high-contrast look, she incorporated striking black accents, most notably in the sleek metal staircase railing and the bold black oven range set against a creamy stone backsplash.
Seamless Indoor-Outdoor Living
A true hallmark of modern Pacific Northwest design is blurring the lines between the exterior and interior. By carrying the exact same wire-brushed ranchwood™ Yellowstone finish from the dramatic exterior soffits right into the interior ceilings, the home achieves a continuous visual flow that draws the eye outward to the beautiful lake surroundings.
The Ultimate Influencer Backdrop
Jordyn is a master seasonal stylist and designer for her product spotlights. For an Amazon shopping influencer, the home is more than just a residence; it is a working studio. The natural, non-reflective matte finishes of our prefinished wood provide the perfect, glare-free background for her aesthetic. Whether she is styling the kitchen island for the holidays or highlighting daily lifestyle finds, our wood tones elevate her content while staying perfectly true to her established brand identity.
The Results: A Serene Backdrop for Seasonal Styling
Designed by SOK Design Studio and built expertly by Winterhawk Construction, the Smith Retreat demonstrates how specific, intentional material choices can bring a very distinct personal brand to life.
By trusting the process and selecting the perfect balance of ranchwood™ Yellowstone and Charwood™ Midnight, Jordyn Smith has created a lake cabin that is both a serene family hideaway and a stunning architectural set for “Our PNW Home”. We are honored to be the backdrop to her beautiful content.
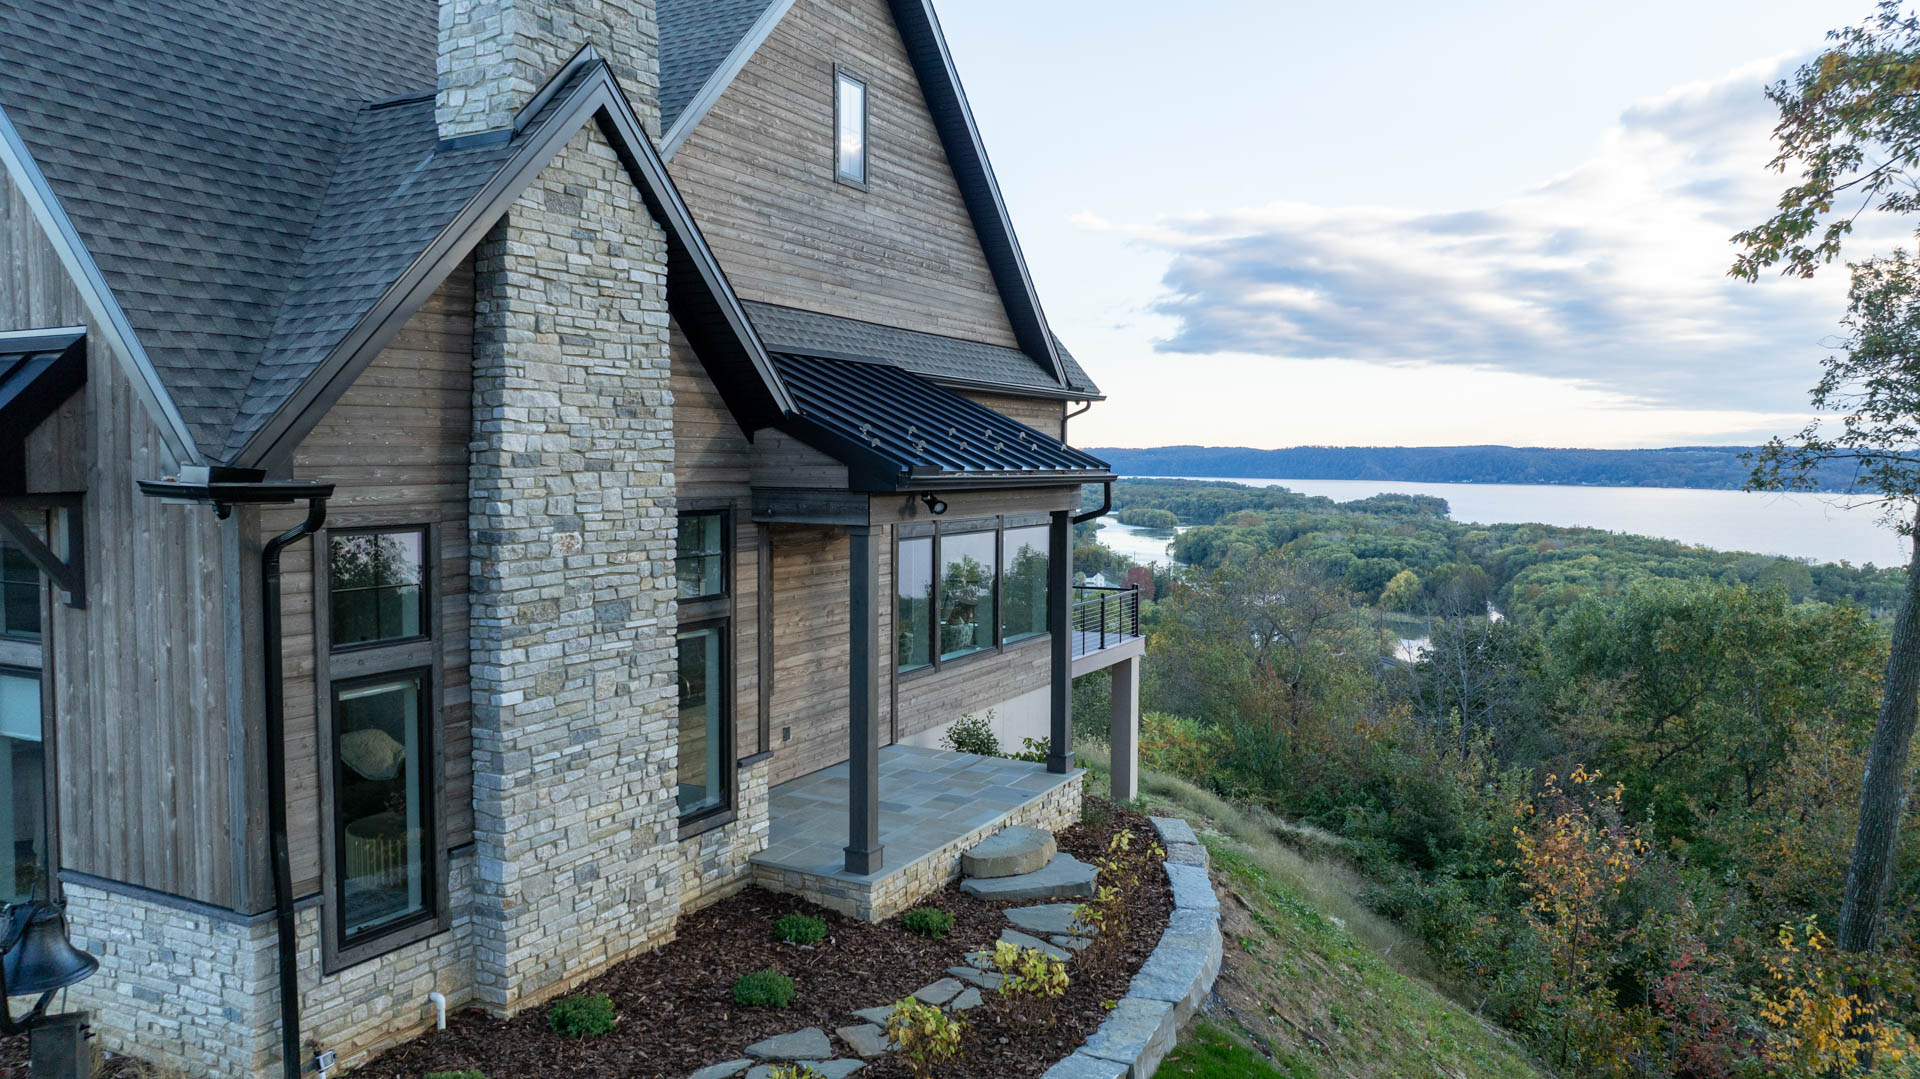
Stone & Cedar Harmony: A Pennsylvania Modern Craftsman
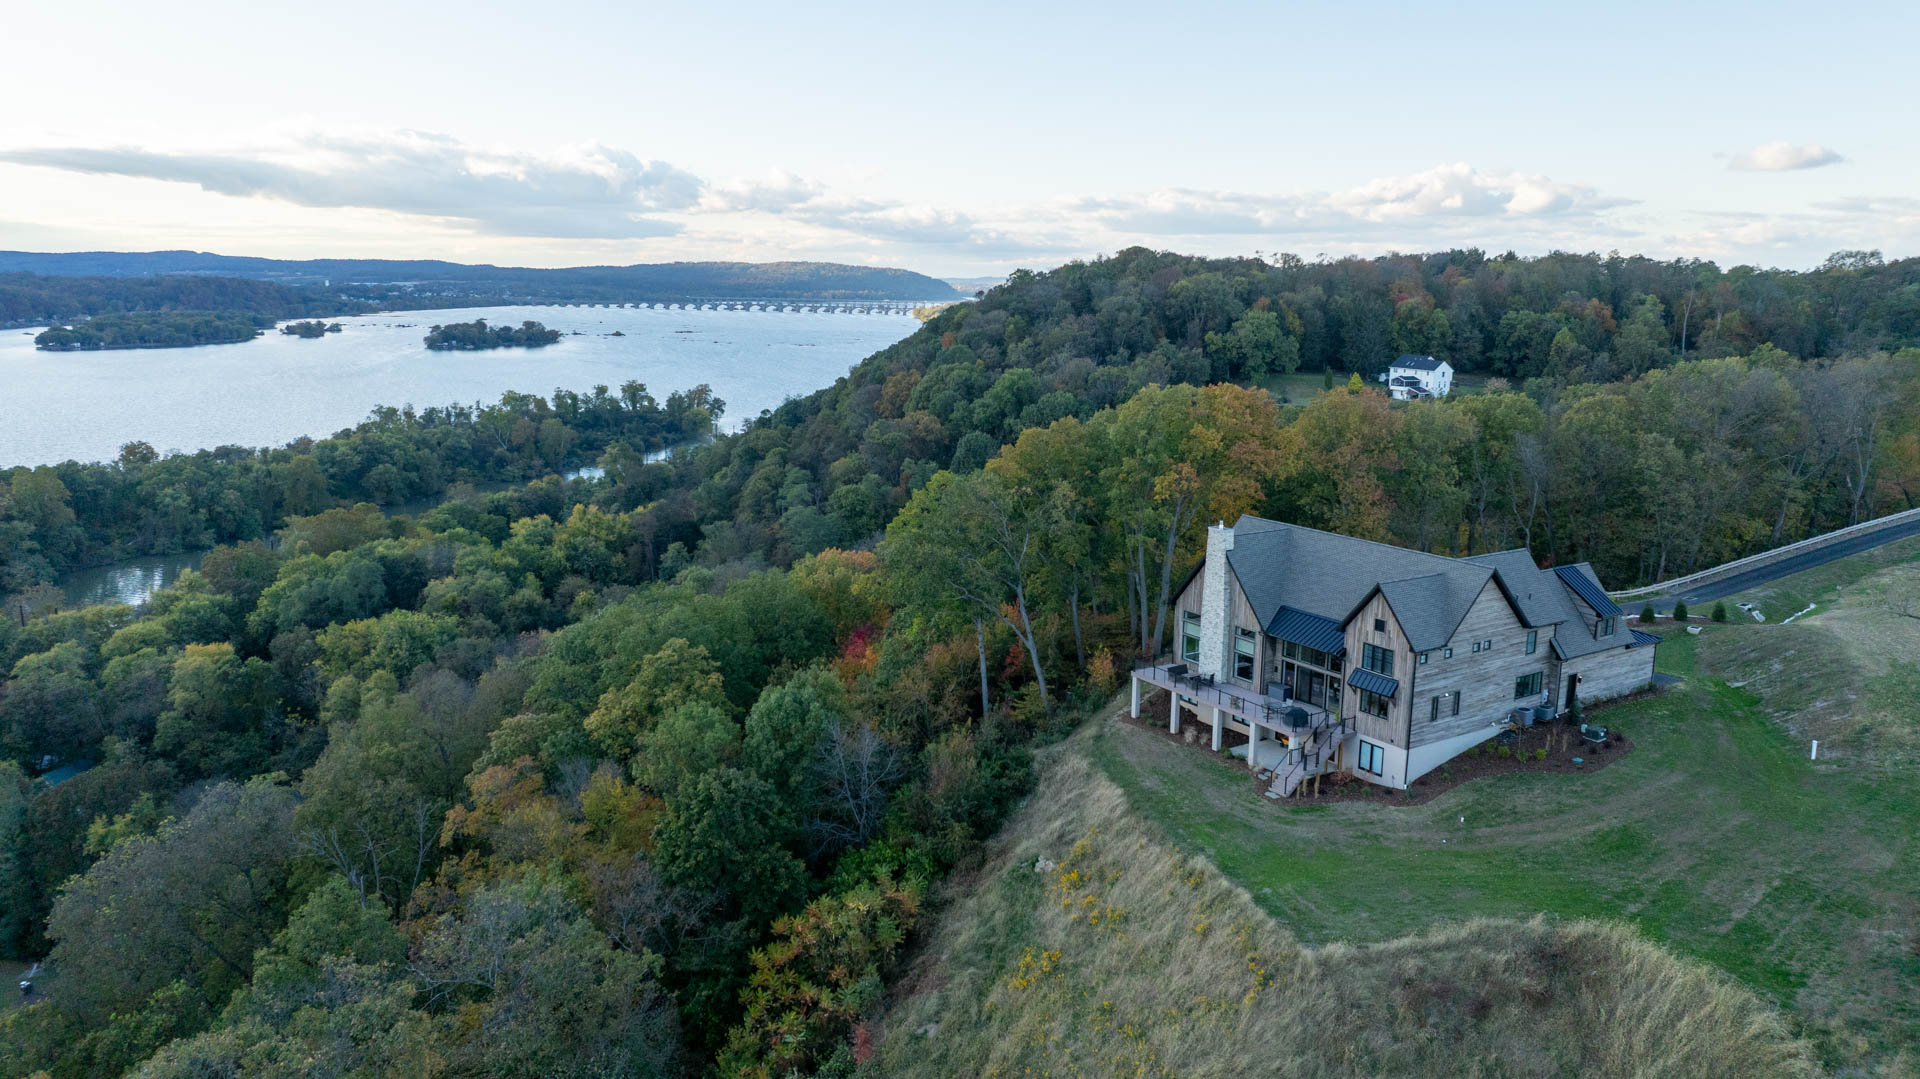
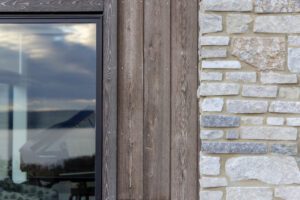
Perched on a Bluff Overlooking the Susquehanna River Defining the western border of Lancaster County, the Susquehanna River is a storied natural landmark. Perched on a bluff overlooking this recreational treasure sits a stunning new family home that reflects the dramatic, steep-banked beauty of the riverlands that bridge the gap between the region’s rugged rocky outcrops and refined modern living.
Professionally installed by S&M Siding Roofing & Siding, this Washington Boro, PA residence captures a Modern Craftsman aesthetic, blending natural stone wainscoting with the warmth of genuine Western Red Cedar. The design utilizes Montana Timber Products’ ranchwood™ Artisan collection to create a multi-textured facade that feels perfectly at home against the river valley backdrop.
The project utilizes a sophisticated two-tone palette from the ranchwood™ Artisan series, featuring “Homestead” for the primary siding and “Dusk” for the trim and accents to create intentional depth and contrast.
Application
Dimensions
Texture
Color
Ship Lap Siding
1″ × 8″ & 1″ × 6″
Raked
Homestead
Trim
1″ × 6″ & 1″ × 4″
Raked
Dusk
Fascia & Corners
1″ × 10″ & 1″ × 12″
Raked
Dusk
DESIGN HIGHLIGHTS
Material Harmony: Stone paired with Artisan Homestead and Dusk
A defining feature of this Modern Craftsman exterior is the interplay between masonry and timber. The natural stone isn’t relegated to just the foundation; it features prominently at the entrance, protective wainscoting, and with two full-length chimneys. This vertical stone element dramatically anchors the home’s riverfront elevation, creating a powerful visual connection between the earth and the roofline.
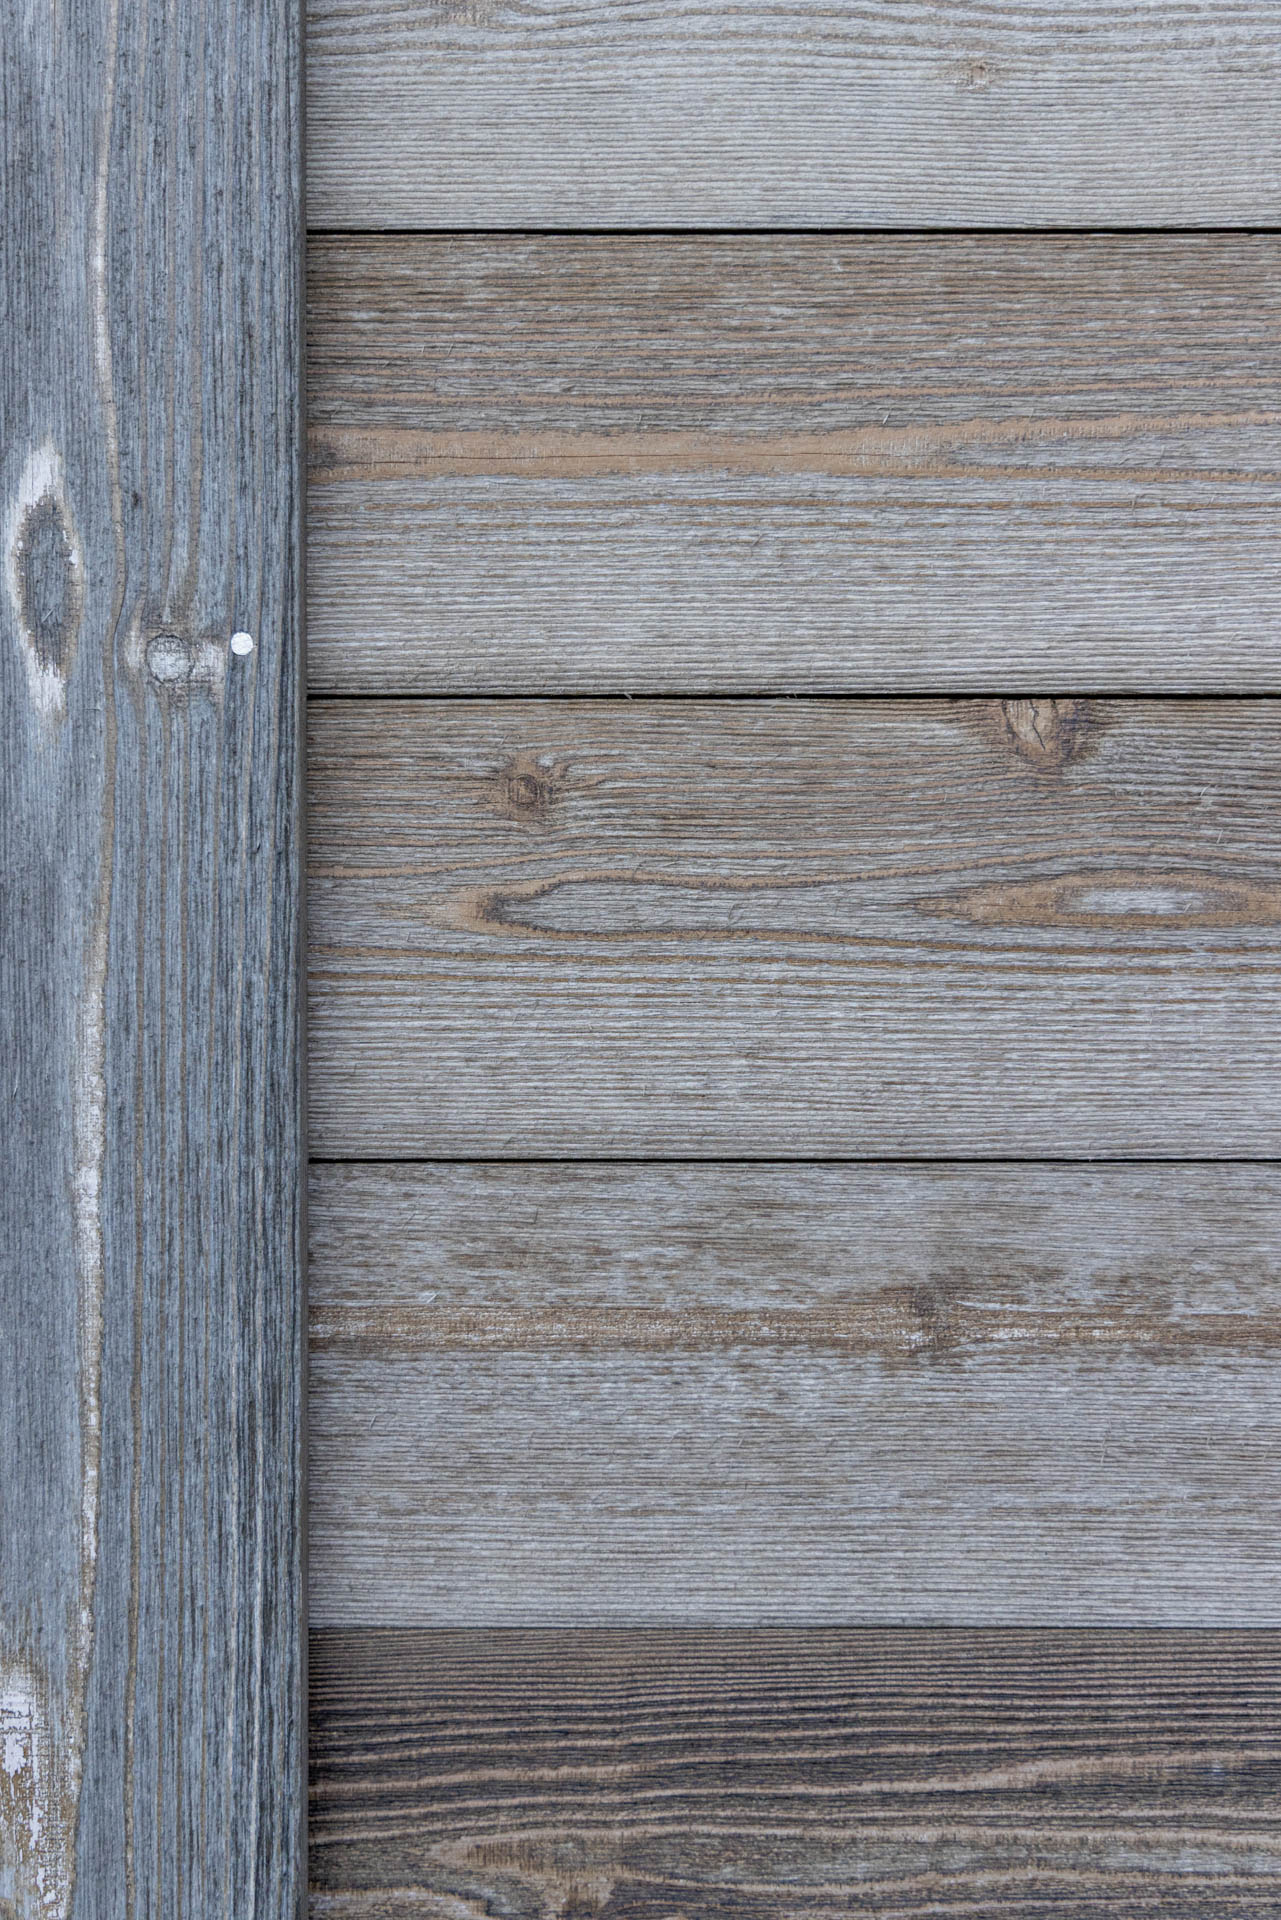
Cedar Siding with Textural Depth: The “Raked” Look
To add character to the facade, the homeowners selected a Raked texture for all Cedar siding components. This distinct milling process creates a dimensional surface that catches the sunlight and emphasizes the natural grain of the Western Red Cedar, enhancing the home’s rustic appeal without sacrificing its clean, modern lines.
Strategic Dormer Details, the upper-level dormers are clad in 1×6 and 1×8 Ship Lap siding finished in the lighter Homestead color. This choice draws the eye upward, breaking up the home’s massing and providing a bright contrast against the dark metal roof and window trim.
Raked Texture Detail of Artisan Homestead with Dusk trim finishes STK Cedar
Located on an exposed river bluff, the home must withstand wind, moisture, and intense sun. The siding is pre-finished with Seal-Once, a non-toxic, low-VOC waterproofer. It penetrates deep into the wood to protect against water ingress and UV damage while remaining safe for the family and the sensitive river ecosystem.
THE RESULTS
This Pennsylvania family residence is a testament to the versatility of Western Red Cedar in Modern Craftsman design. By pairing the earthy, weathered tones of ranchwood™ Artisan Homestead, S&M Siding Roofing & Siding helped create a family’s dream home that feels both grand and grounded perched high above the Susquehanna River.
Whether viewed from the driveway or the river below, the home stands as a beautiful addition to the Lancaster County landscape—a durable, natural retreat designed to last for generations.
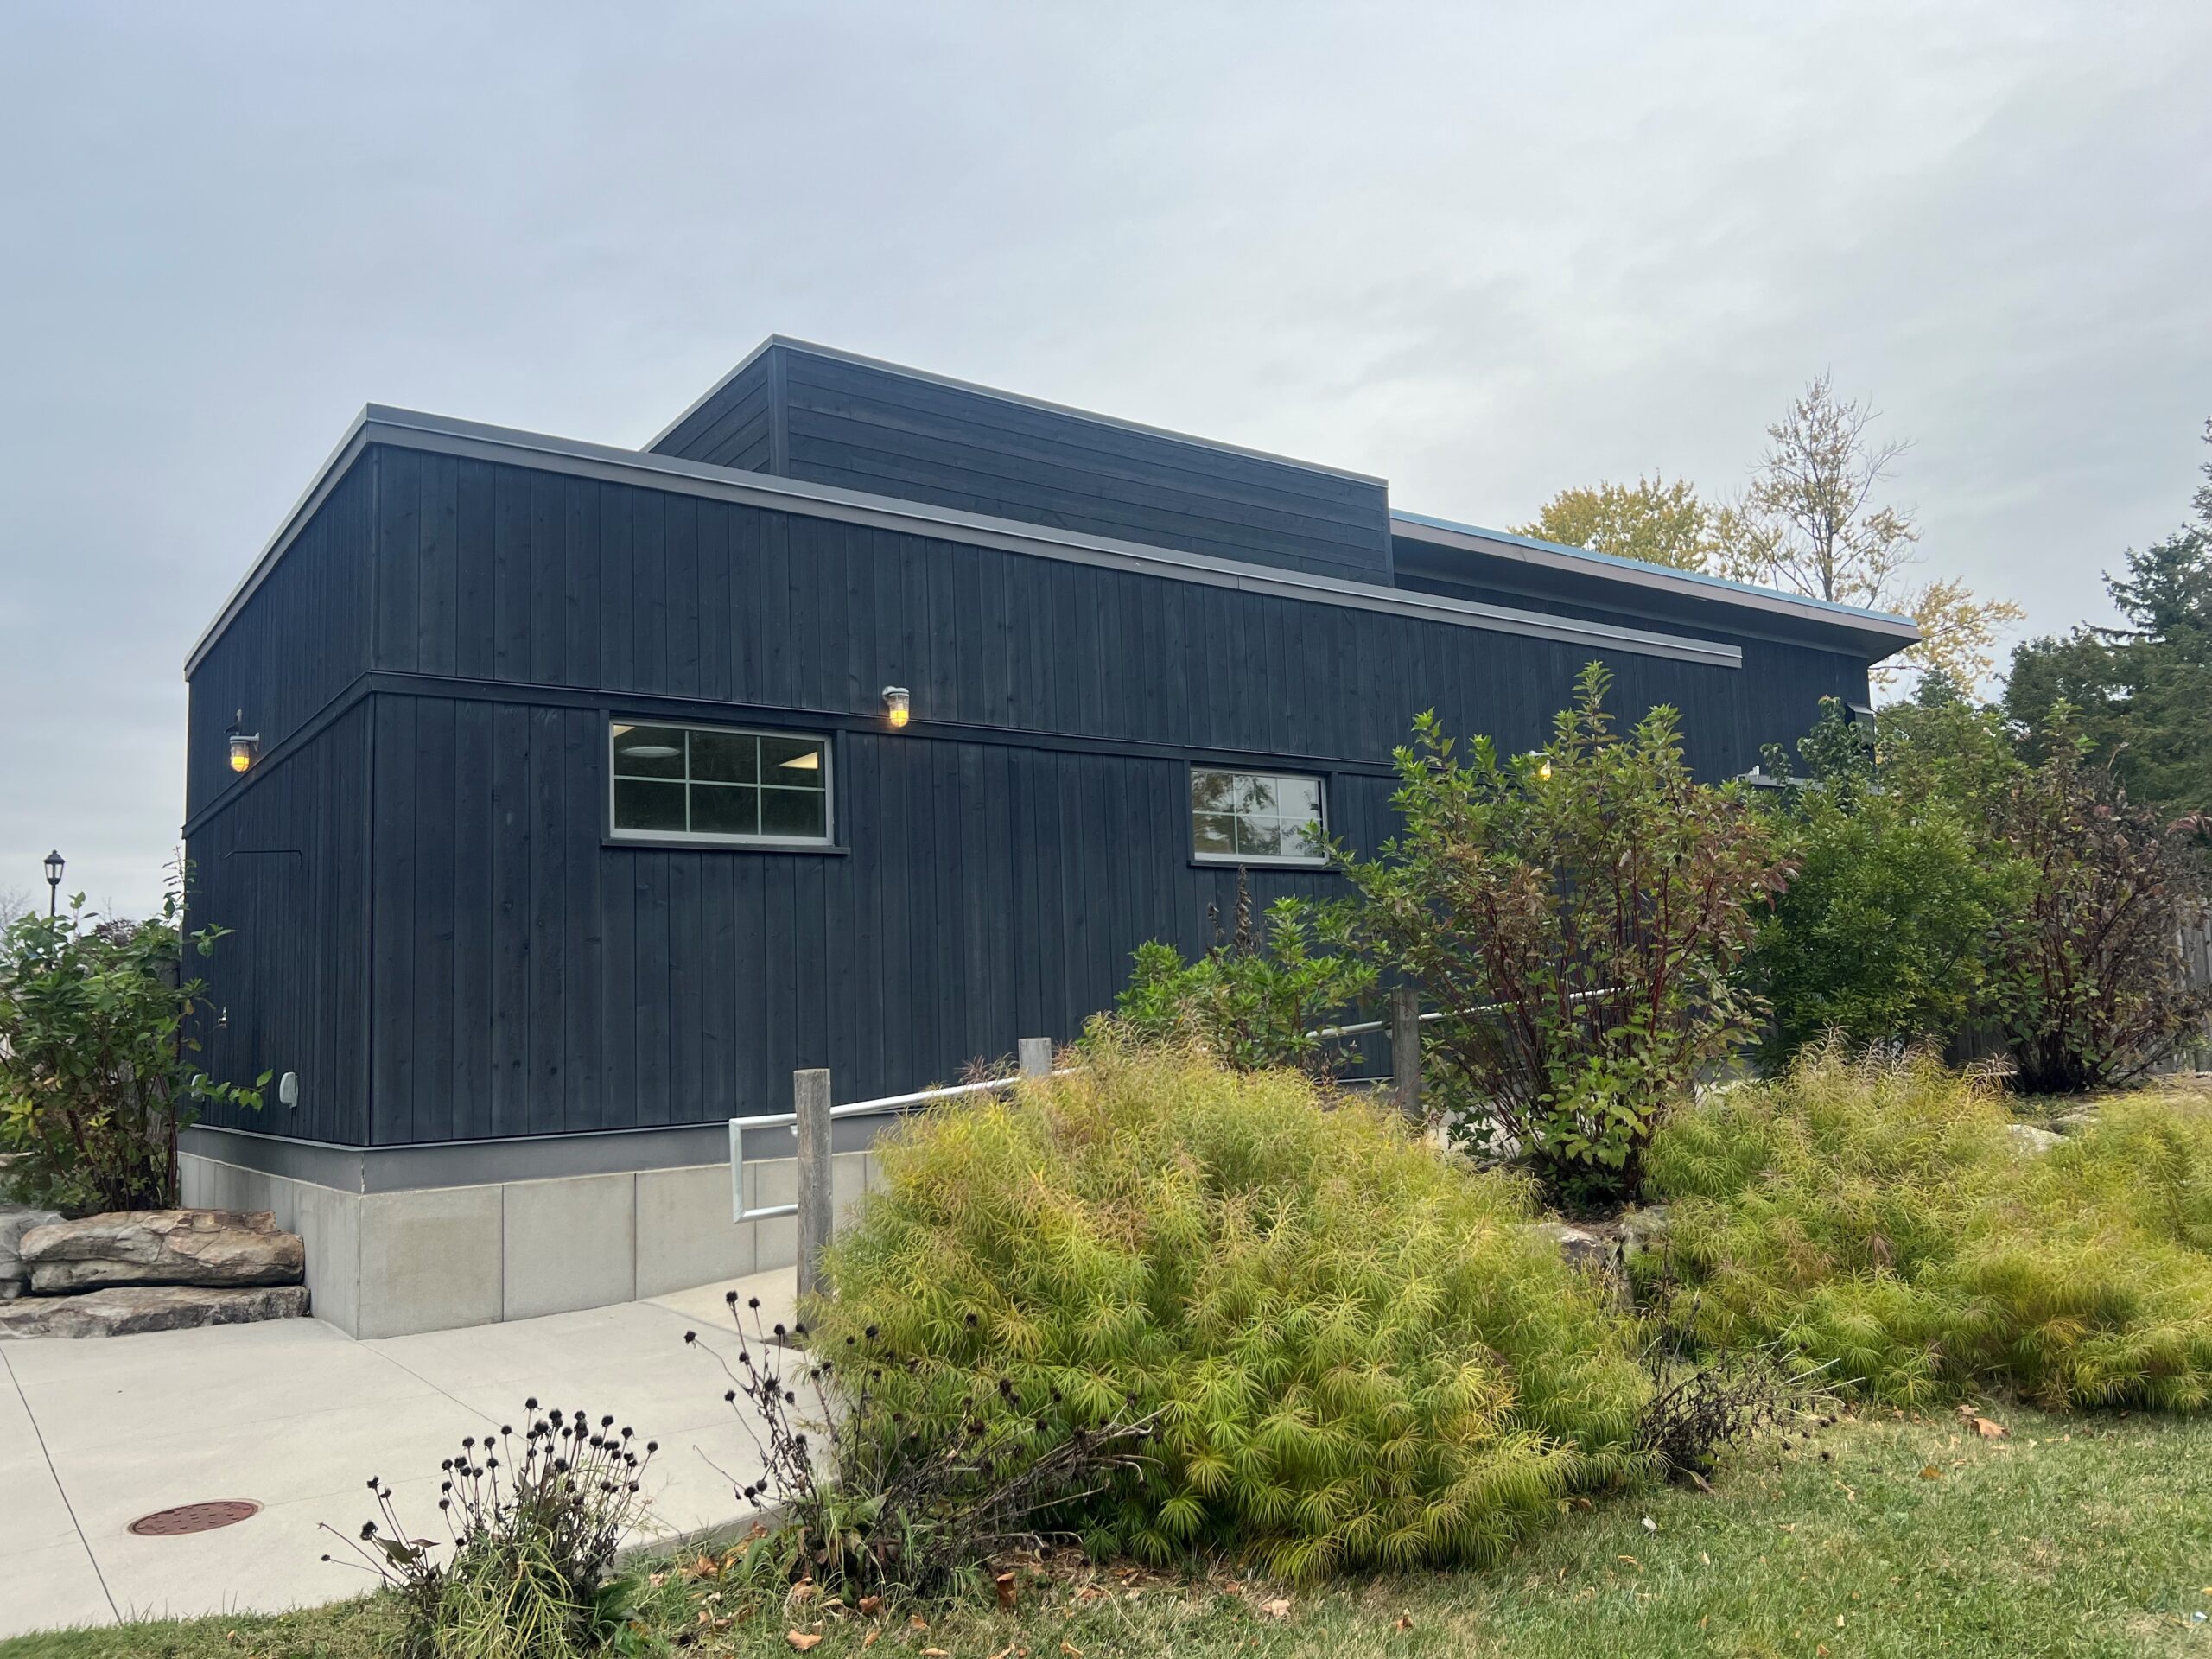
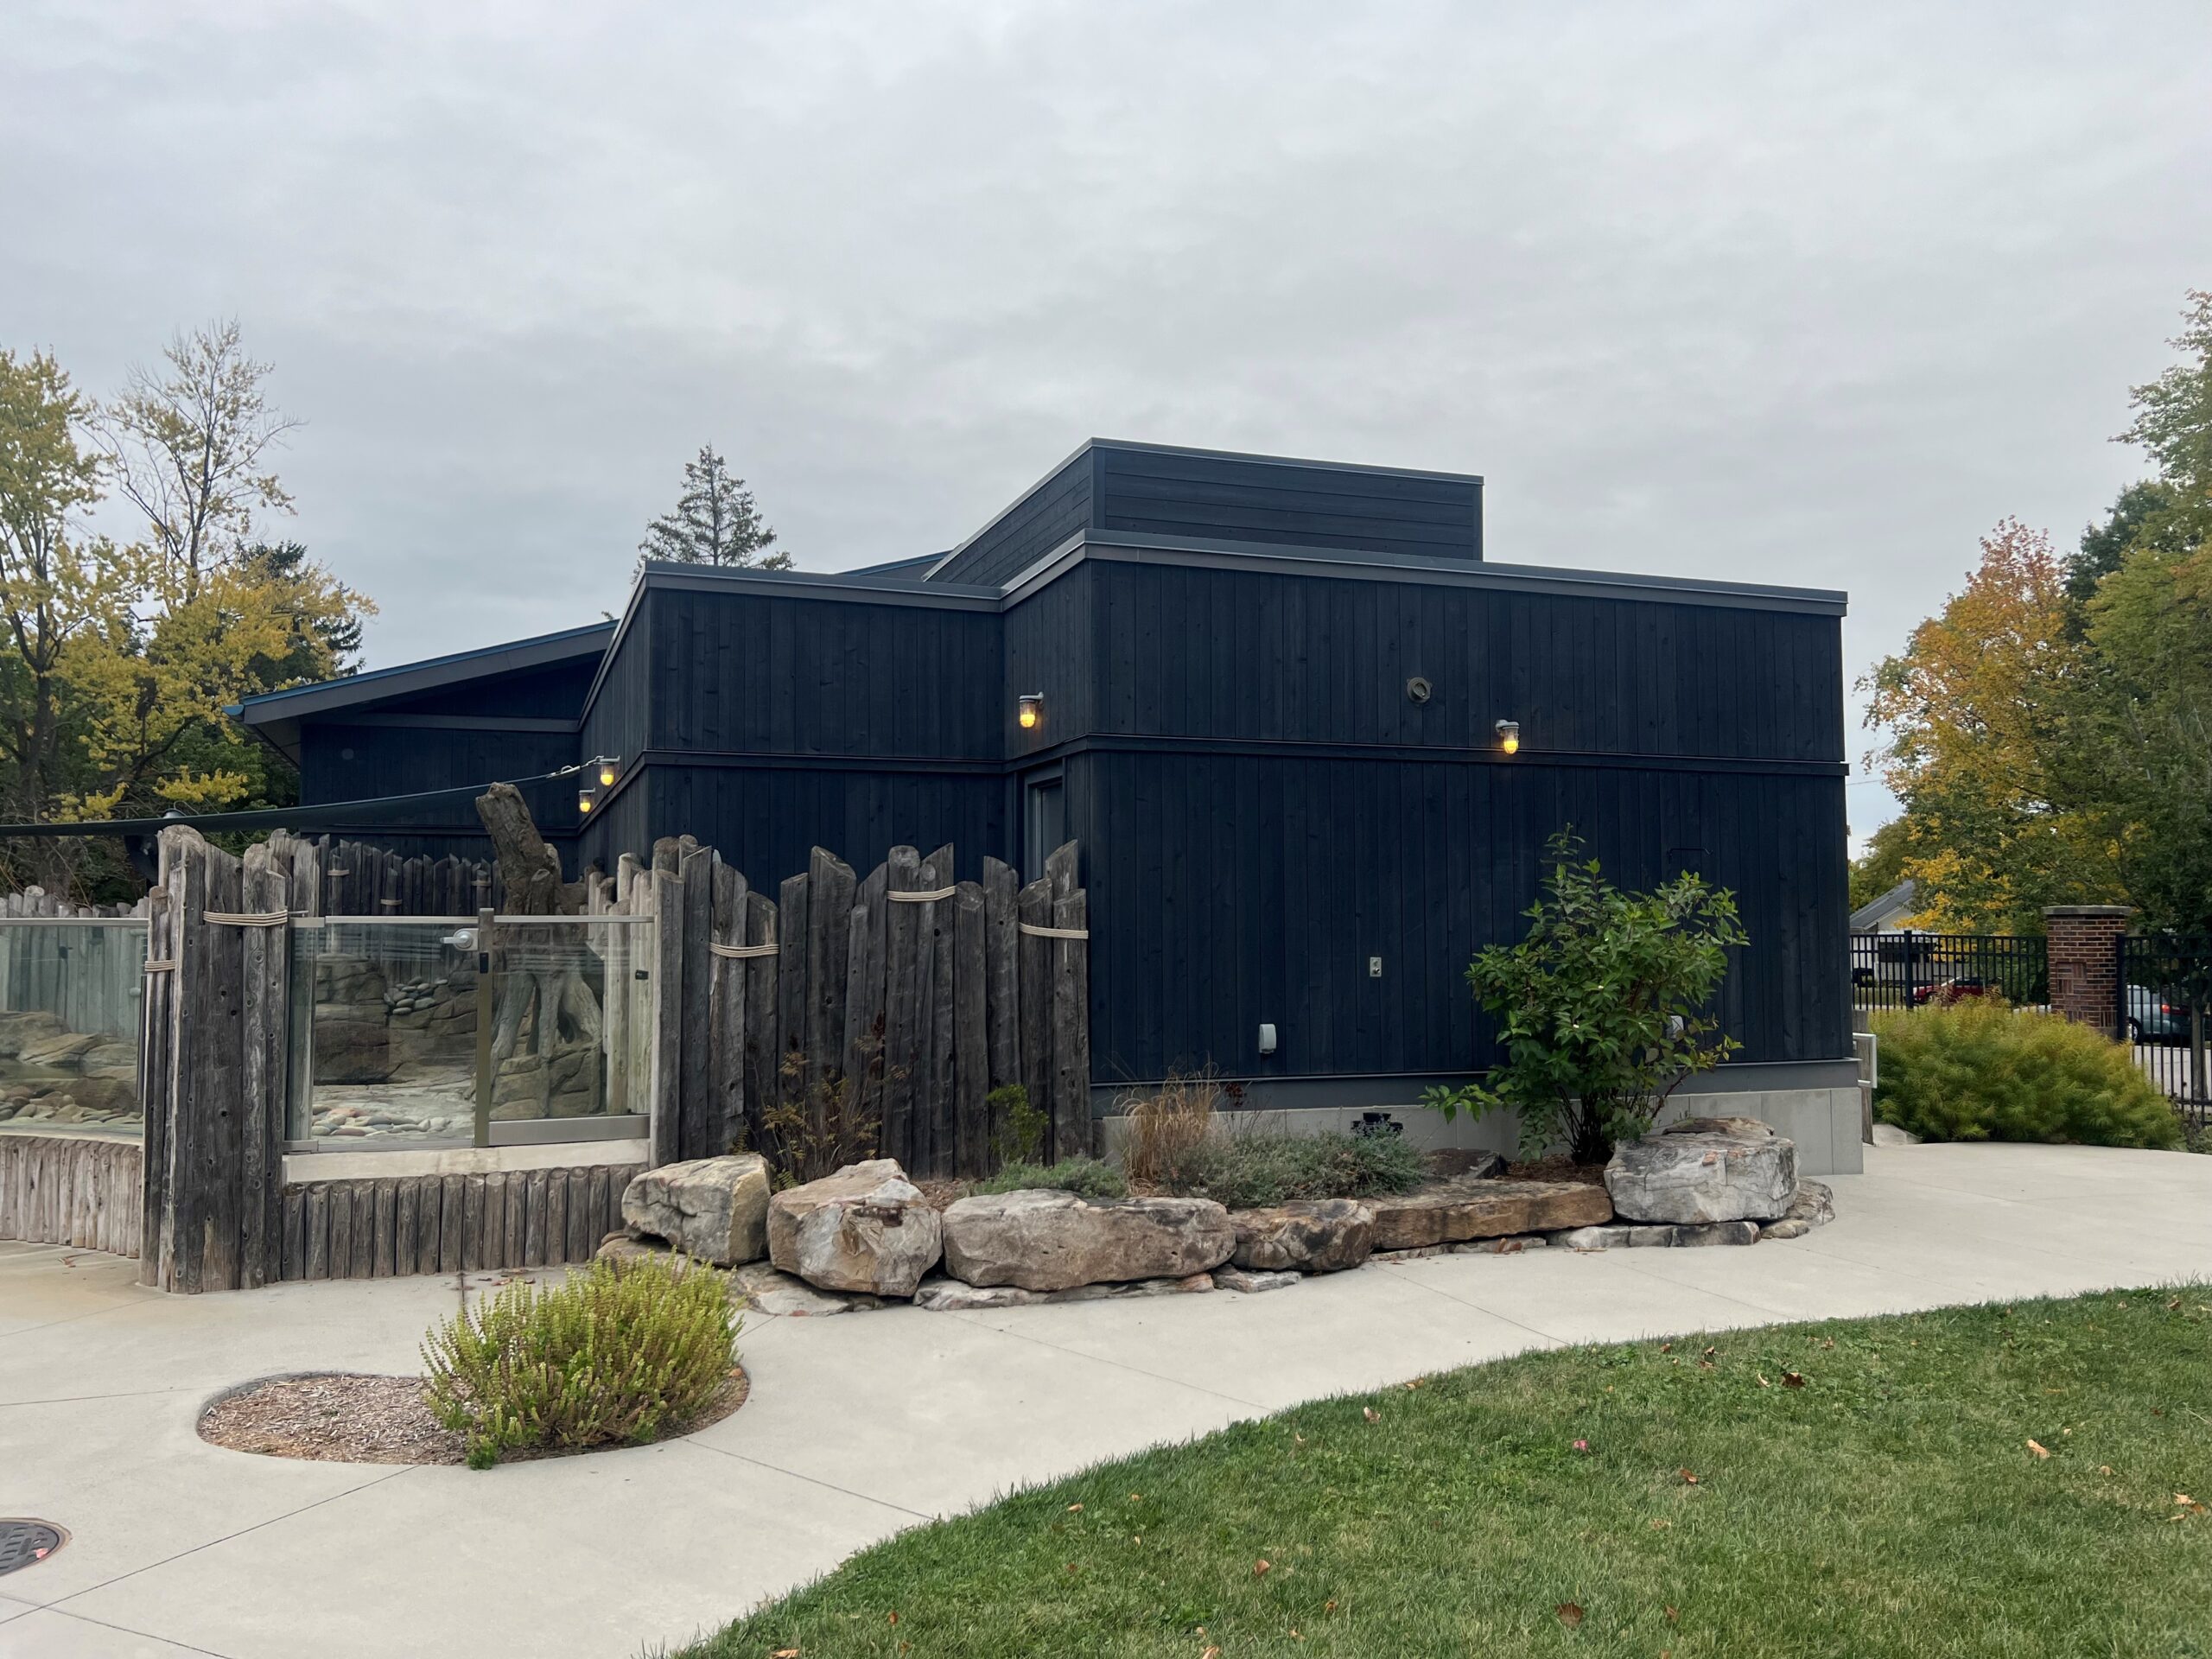
7-Year Wood Siding Maintenance at Columbian Park Zoo
Posted on: January 15, 2026
Restain Commercial Project Case Study Zoo in Lafayette, Indiana USA
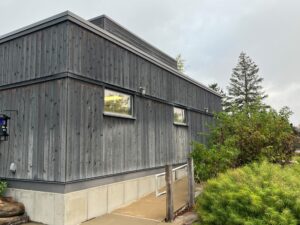
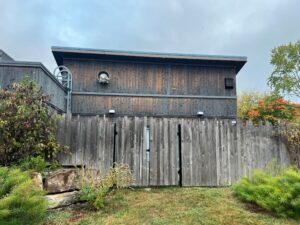
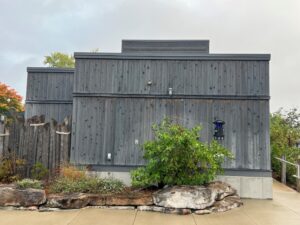
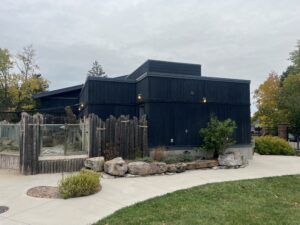
This commercial project highlight focuses on the commercial wood siding maintenance and stain reapplication at the Columbian Park Zoo penguin exhibit in Lafayette, Indiana. Installed in 2019, the project features Montana Timber Products siding that has been exposed to the elements for seven years.
We recently reviewed the results of a stain reapplication to demonstrate how the finish performs over time and to outline the specific protocols for maintaining commercial wood siding in sensitive environments.
Safe for the Penguins ? (and Future Primate Exhibit)
When working in sensitive environments like a zoo, safety is our top priority. We are pleased to note that the Columbian Park Zoo is currently expanding to include a new primate exhibit (details to come), utilizing Montana Timber Products materials to ensure a consistent and safe aesthetic throughout the park.
As standard with all our products, these exhibits are protected by SEAL ONCE, a high-performance water-based stain and sealant. Unlike traditional oil-based or acrylic stains, this non-toxic wood finish does not create a film and does not flake. This is a critical distinction for animal safety, as flaking paint or stain can pose ingestion hazards. The ultra-low VOC formula ensures a safe environment for the penguins currently inhabiting the space and the primates arriving soon.
The Role of Installation
The siding used, 1×8″ Cedar Shiplap, Aquafir™ Charcoal with a Wire Brush texture. The wood has performed exceptionally well over the last seven years.
As noted in our technical documentation, water will find any spot left unsealed. The longevity of this exhibit suggests the original installers followed the critical “End Cut” protocol sealing every cut edge during installation to prevent the wood from absorbing water like a sponge.
The Reapplication Strategy: Touch-Up vs. Full Coat
The Columbian Park Zoo engaged a professional contractor for this maintenance. It is important to distinguish between a touch-up and a full reapplication, as the techniques yield different visual results.
1. General Best Practices (Touch-Ups) For minor repairs or touch-ups, our internal guidelines emphasize “finesse.” Because the stain is water-based and tints sink to the bottom, the can must be stirred frequently. When touching up a scratch or nail hole, we advise blending the stain lightly to avoid creating a dark, saturated spot that stands out against the weathered wood.
2. The Strategy for This Exhibit (Full Recoat) For this project, the goal was not to blend, but to revitalize the aesthetic with high contrast against the exhibit’s driftwood log enclosure.
The Approach: The contractor applied the Aquafir™ Charcoal stain without dilution.
The Result: Because textured surfaces (like Wire Brush) may absorb the color pigment more, and the stain was applied at full strength, the result is darker and more saturated than the original installation.
While standard maintenance often involves diluting stain to match a weathered patina, this project utilized the reapplication to intentionally deepen the Charcoal tone, providing a bold, fresh look.
The 7-Year Reveal: Revitalizing Weathered Cedar Siding
After seven years, the Cedar siding was ready for a refresh. Since SEAL ONCE penetrates the wood rather than forming a surface film, the reapplication process was straightforward—no stripping or sanding was required.
The Cedar remains structurally sound, and the fresh coat has successfully updated the visual profile of the exhibit while continuing to protect the substrate.
Before & After Gallery Columbian Park Zoo
Before AquaFir™ Charcoal
Updated AquaFir™ restain
AquaFir™ Charcoal, 7 year patina exposed high pedestrian traffic
Commercial Walkway using AquaFir™ Siding
7 year Patina on AquaFir™
saturated reStain on AquaFir™
AquaFir™ Charcoal, 7 year Patina on WRC
Zoo pedestrian traffic Penguin Exhibit
Will update with sun orientation details once confirmed. Reach out to your local rep for any technical maintenance questions with Montana Timber Products. Contact Us
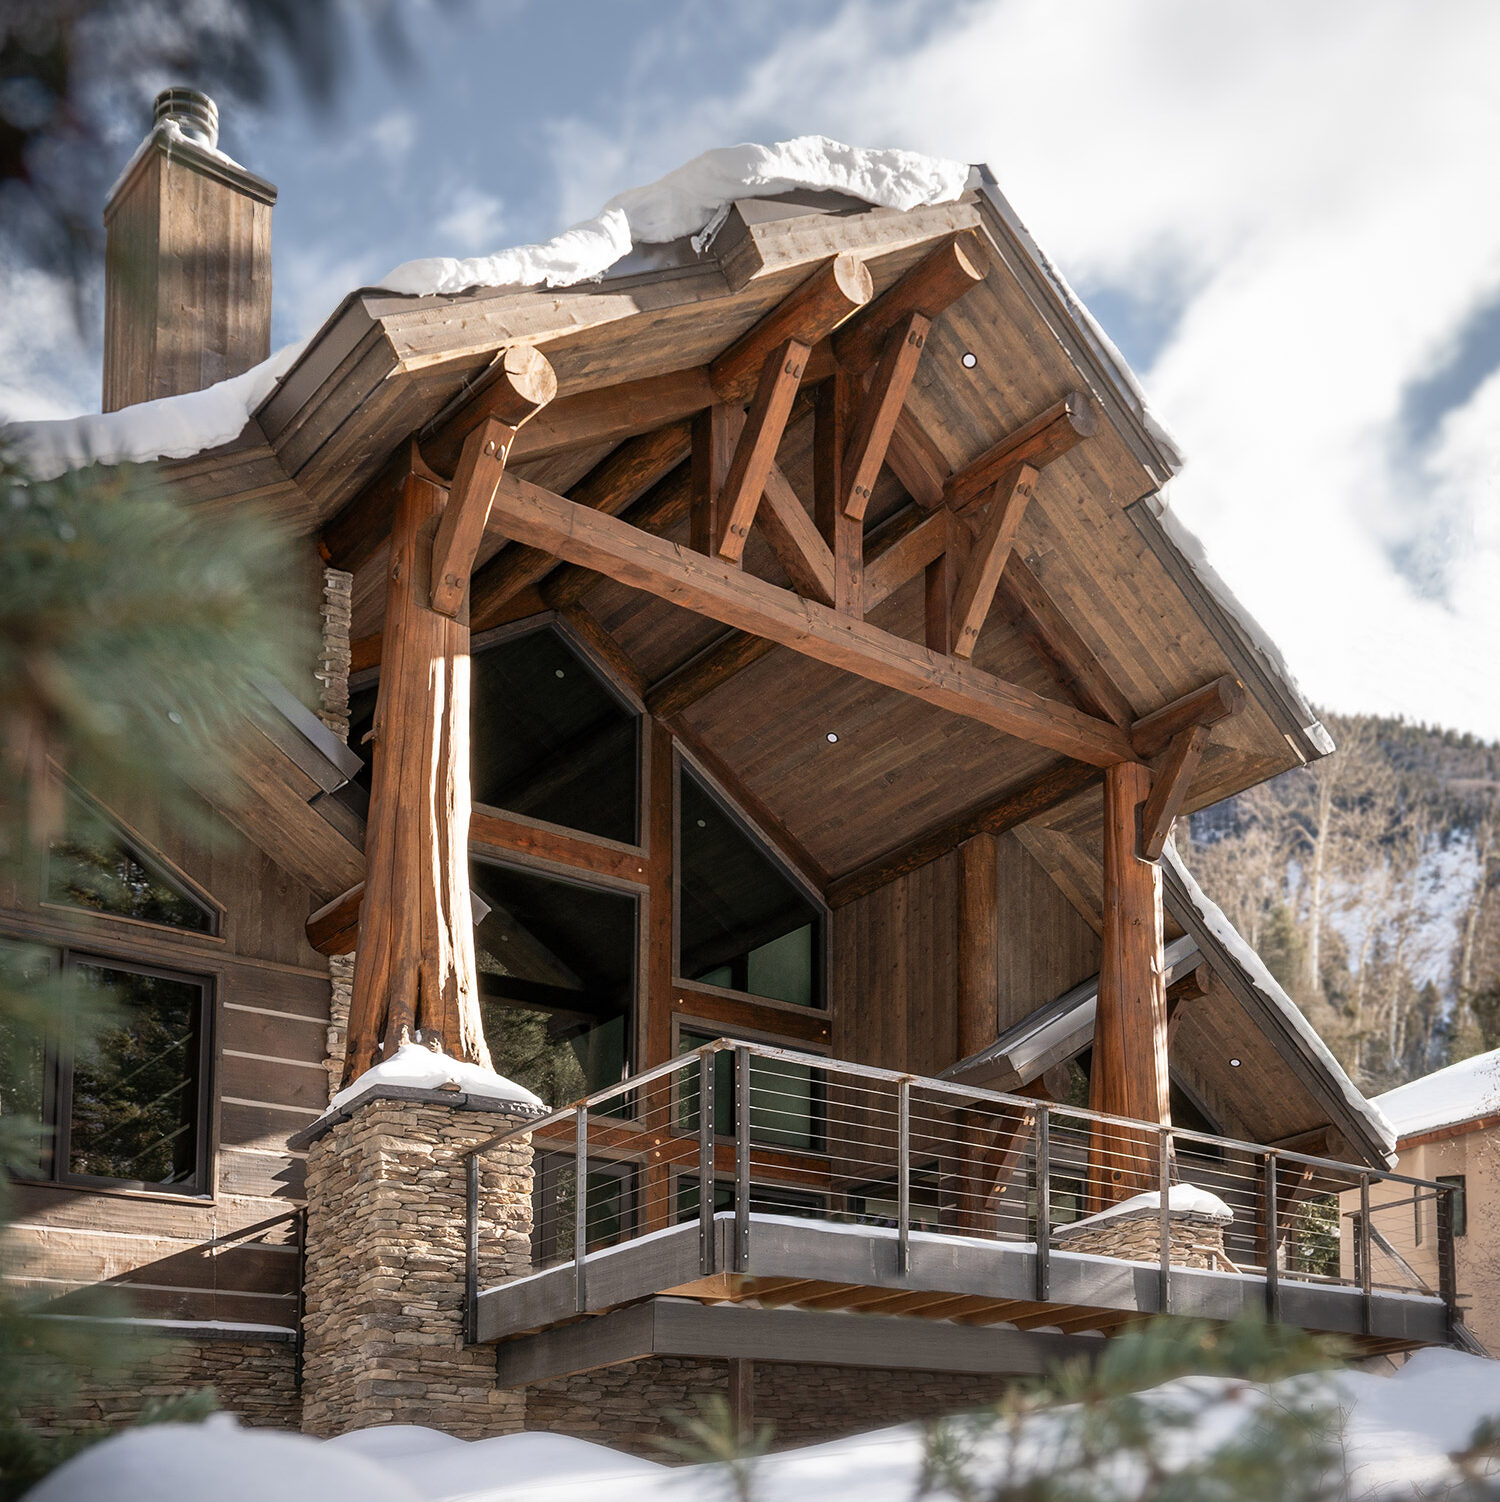
Hand Hewn Rustic Textures: A Winter Retreat in Taos, New Mexico
Posted on: December 16, 2025
Achieving a timeless log cabin aesthetic with prefinished ranchwood™ Western
Snow piles softly against the heavy timber beams, warm amber light glows from the frosted windows, and hand-crafted wood textures stand out in sharp relief against a blanket of white.
This stunning mountain estate in Taos Ski Valley, New Mexico, doesn’t just survive the winter—it embraces it. Designed and built by Magee Design Works, the home becomes especially magical at Christmas, where Montana Timber Products’ ranchwood™ Western creates a warm, grounded presence in the high-alpine landscape. It is the quintessential holiday cabin: rugged on the outside, inviting on the inside, and timeless in every detail.
The design team utilized our ranchwood™ product line in the Western colorway to achieve a unified, cohesive aesthetic across multiple species and textures.
Application
Species / Grade
Dimensions
Profile
Texture
Horizontal Siding
Douglas Fir – #2btr
2×12
Square Edge
Hand Hewn
Vertical Accents
Western Red Cedar – STK
1×8
Ship Lap
Circle Sawn
Trim
Western Red Cedar – STK
1×4
Square Edge
Wire Brushed
Garage Door Trim
Western Red Cedar – STK
1¼×4
Square Edge
Wire Brushed
Bedroom Ceilings and Walls
Douglas Fir – #2btr
1×6
Tongue & Groove
Wire Brushed
Stairwell, Loft, Master Hall Paneling
Douglas Fir – #2btr
1×8
Ship Lap
Wire Brushed
All materials are kiln-dried, prefinished, and arrive ready for installation.
DESIGN HIGHLIGHTS
Chinking Wood Siding for a Holiday Cabin Aesthetic
The defining feature of this home’s exterior is the traditional “log cabin” look achieved with modern materials. By installing 2×12 Hand Hewn Douglas Fir siding with wide spacing, the builder was able to apply chinking a flexible, textured sealant—between the boards. This technique replicates the historic method of sealing log homes against the cold, creating distinct horizontal lines that look striking when capped with snow. The chinking contrasts beautifully with the brown ranchwood™ Western tones, giving the home that classic “gingerbread house” charm that feels synonymous with a holiday cabin in the snow.
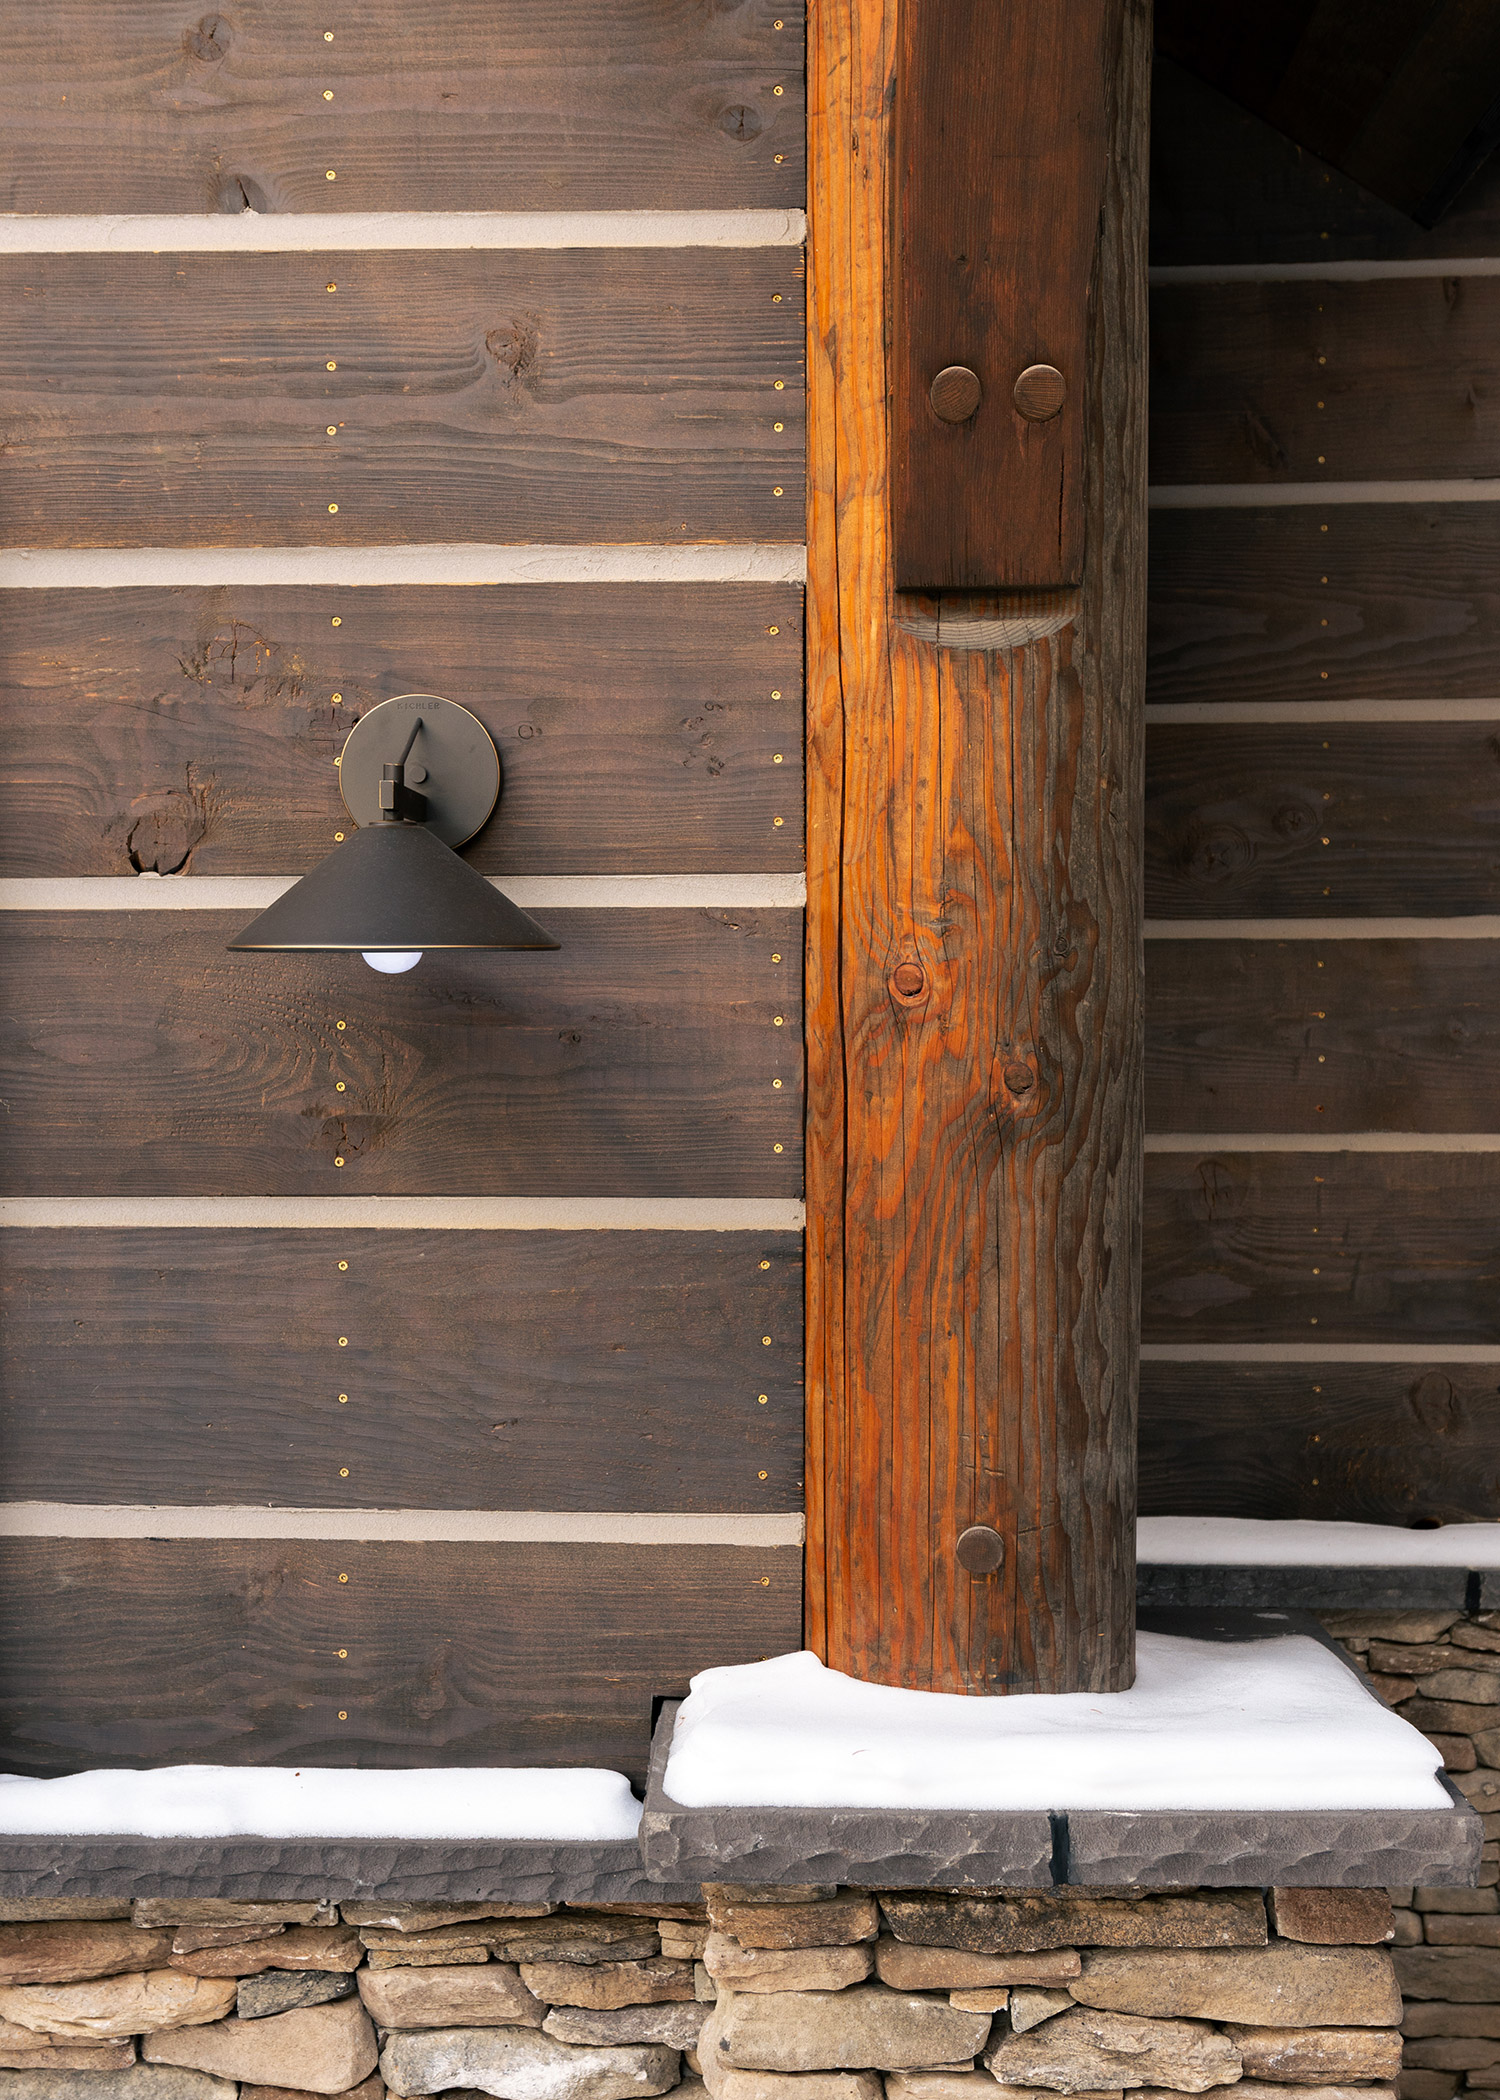
Structural Expression: Trusses & Texture
The home’s entrance features massive live edge timber trusses that pair incredibly well with the siding selection, creating a dialogue between structure and skin. Montana Timber Products offers a Hand Hewn siding texture, the adze-marked surface catches the low winter sun, creating deep shadows and highlights. This is perfectly balanced by the Circle Sawn textured vertical accents, which add a layer of rustic history and break up the facade with authentic saw-mark textures.
Built for Mountain Winters, Beauty in Taos must be matched by resilience. Combined with expert installation, our prefinished Douglas Fir and Western Red Cedar components are engineered to withstand extreme freeze–thaw cycles, high-altitude UV exposure, and heavy snowfall, ensuring this home looks as good in its tenth winter as it does in its first.
Interior Continuity & “Cozy Critters”
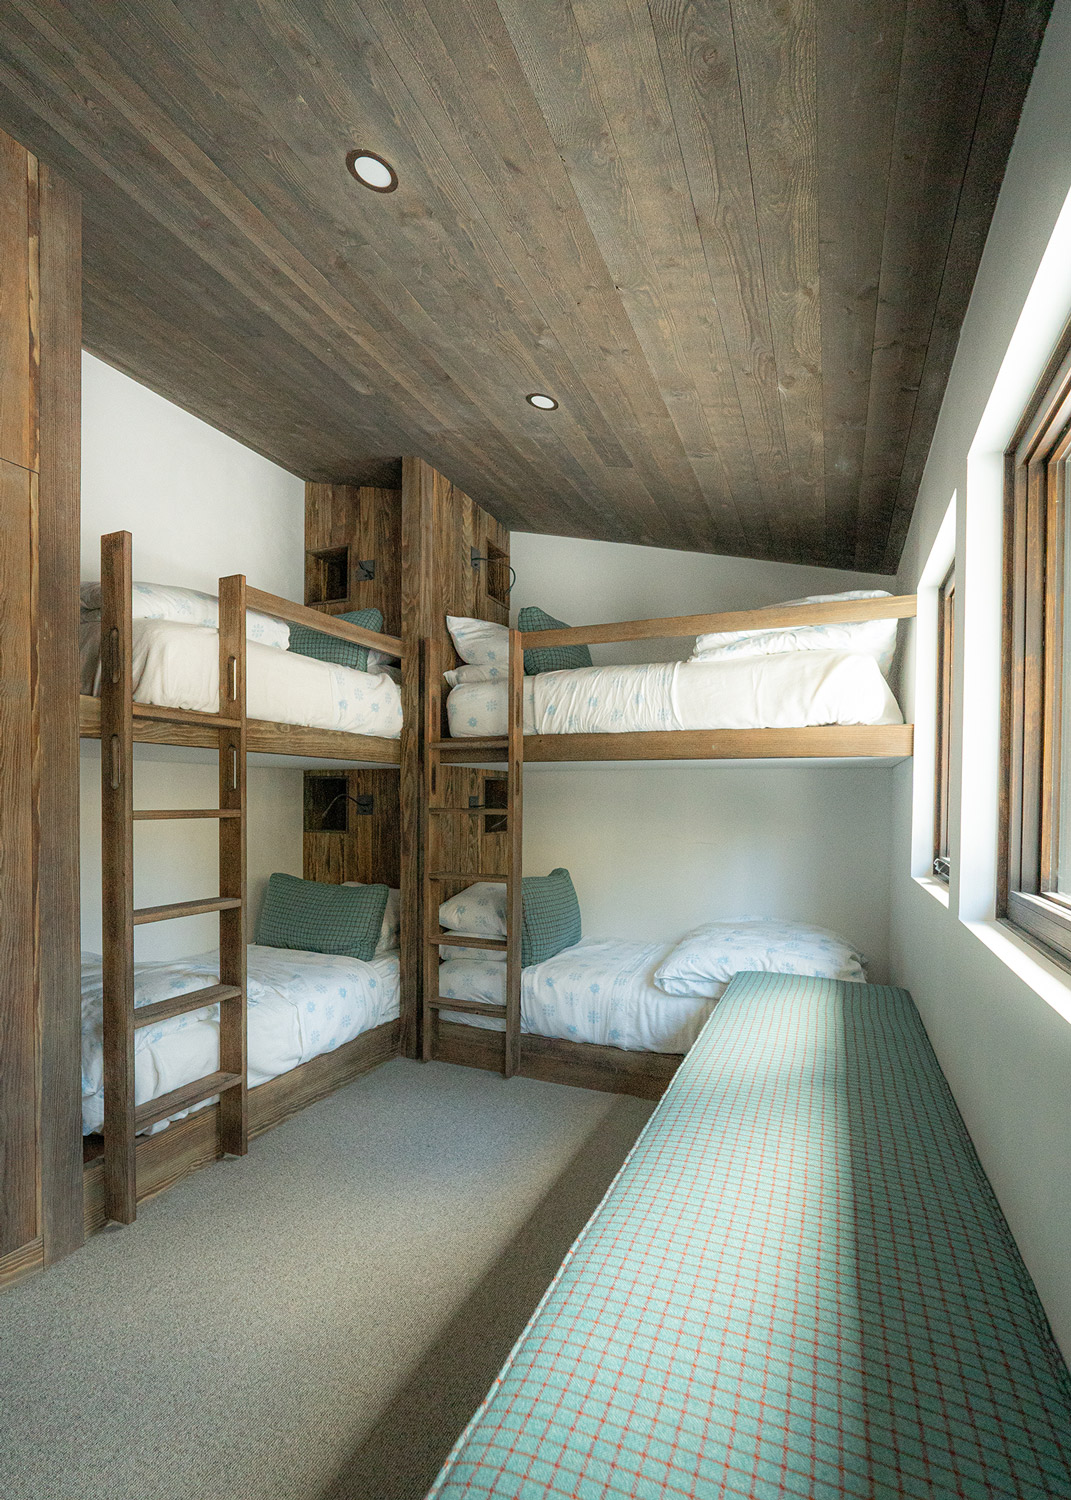
The holiday warmth extends indoors, where the ranchwood™ Western palette continues onto the ceilings and walls. The Wire Brushed Douglas Fir creates a soft, uniform interior tone that reflects the glow of a fireplace and Christmas tree. Designed for family gatherings, the layout includes a charming bunk room tailored for the holidays. With two custom built-in bunk rooms, it’s the perfect hideaway to sleep the cozy critters after a long day on the slopes.
Taos Cabin Gallery
THE RESULT
This Taos residence demonstrates how ranchwood™ in Western brings refined character and reliable performance to extreme alpine environments.
From the rugged chinking wood siding that guards against the cold to the warm, wire-brushed bunk room that shelters the family within, the home achieves a cohesive mountain-rustic aesthetic. It is a space that shines brightest in winter—where natural wood tones, dramatic textures, and precise craftsmanship come together to create a retreat built for making Christmas memories.
Featuring Thermally Modified Hemlock Siding & CVG Cedar Interior
This renovated Bellevue, Washington home proves that even a 1960s split-level can be reborn. Originally described by RRA Architecture as “dark, disjointed, and inefficient,” the home was completely reimagined by the architects and RW Anderson Construction. The project features Montana Timber Products’ ranchwood™ Artisan and AquaFir™ lines, which were key in the remodel to creating a bright, open, and inviting space.
The architect’s goal for the exterior was a “subtle, ‘low-contrast’ palette that allows the home to blend with its lush, wooded setting.” The neutral tone of the ranchwoodArtisan Ash siding achieves this vision perfectly. The hemlock and cedar provide a natural counterpoint to other modern materials used on the exterior, like formed concrete and rusted metal accents, creating a sophisticated and balanced facade.
1×6 Tex-Gap Thermally Modified Hemlock Siding
The horizontal orientation of the 1×6 Tex-Gap siding dramatically emphasizes the home’s new, modern proportions, giving it a clean and contemporary profile. But the material is far from flat; the RW Artisan’s raked texture on the thermal hemlock catches the Pacific Northwest light beautifully throughout the day. This subtle variation adds a layer of quiet depth and visual interest that animates the entire exterior.
TO SPEC | Stainless Steel Fasteners
Will prevent fastener “weeping”, and ensures long-term strength and durability.
Exterior Gallery
Seamless Indoor-Outdoor CVG Cedar
A key feature of this renovation is the cohesive flow between the interior and exterior spaces. The design achieves this by using the same CVG Cedar with an AquaFir Clear Coat for both the interior ceilings and the expansive outdoor patio enclosure. This continuous use of material blurs the lines between inside and out, creating a seamless transition and a unified material experience that highlights the natural beauty of the cedar paneling.
Inside, the home is flooded with beautiful natural light from generous, strategically placed skylights. The design uses the CVG Cedar paneling to frame these skylights, a choice that pays off dramatically. The incoming light activates the wood, pulling out the rich, warm tones and natural depth of the cedar and enhancing the feeling of being connected to the outdoors.
INTERIOR GALLERY
THE RESULT
A Beautiful Material Update to Split-Level
The use of ranchwood Artisan Ash siding and AquaFir clear coat interior ceiling was essential in transforming this split-level with lasting performance. The Thermal Hemlock siding and Cedar soffit showcase natural wood tones that not only age gracefully but also fulfill the design vision of a home connected to its wooded environment, both inside and out.
This project demonstrates how thoughtful use of prefinished wood can elevate everyday architecture through quality materials, refined texture, and precise detailing.
Contact Us to Learn more about our ranchwood Artisan and AquaFirProduct Lines
Reducing Fire Risks: Tips and Best Practices for Fire Hardening Your Home
Posted on: March 8, 2024
Wildfires are an increasing threat to homes and properties, especially in vulnerable regions. Protecting your home from this devastating force of nature is a wise investment and a crucial safety measure.
With fire hardening and home hardening techniques, you can significantly reduce the risk of your home catching fire during a wildfire.
Below, we will guide you through the process of hardening your home, creating a fire-resistant landscape, and complying with standard practices to ensure maximum protection.
Key Takeaways
Understand and assess the wildfire risk for your home
Implement fire prevention measures such as creating defensible space zones, using fire-resistant building materials, protecting vulnerable features & ensuring emergency vehicle access
Comply with local building codes to ensure adequate protection from wildfires
Understanding Fire Hardening and Home Hardening
Fire hardening your home is a process designed to reduce ignition risk and make a home more resistant to radiant heat and direct flame contact from wildfires. It serves a critical role in defending homes against wildfires and adheres to the National Fire Protection Association guidelines.
The steps involved in hardening a home include:
Assessing the wildfire risk
Creating a fire-resistant landscape
Selecting fire-resistant building materials
Protecting vulnerable home features
Ensuring accessibility for emergency vehicles
Planning for water supply and firefighting equipment
Complying with relevant building codes and standards
Homeowners looking to get started can use resources like the Fire Adapted Communities Learning Network, the Fire Adapted Communities Self-Assessment Tool (FAC SAT), and FAC Net. These offer guidance on correctly storing and handling combustible and flammable liquids.
Assessing Wildfire Risk for Your Home or Business
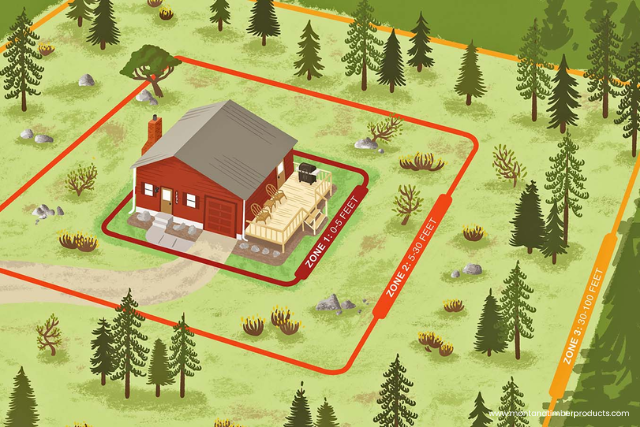
Assessing your home or business’ wildfire risk begins with examining the Immediate Zone, which extends 0-5 feet from your residence.
In this zone, flammable materials should be minimized to reduce the risk of ignition. To increase your home’s wildfire resistance in the Immediate Zone, use ignition-resistant siding, roofs, decks, attic vents, eaves, and windows, and remove flammable vegetation.
In the Intermediate Zone, careful landscaping can be employed to reduce the continuity of fuels and impede the spread of fire. For example, removing branches that overhang the structure is a critical step to help ensure your home doesn’t catch fire.
In the Extended Zone, trees and vegetation should be spaced and pruned to reduce the size of flames, keep them closer to the ground, and interrupt the fire’s path. For safety reasons, combustible materials should not be stored on or under decks in the Immediate Zone, as flying embers can easily ignite them during a wildfire.
Establishing defensible space zones around your home
Creating fuel breaks
Maintaining trees to minimize the chances of your home catching fire during a wildfire.
The following sections provide a detailed exploration of defensible space zones, fuel breaks, and tree maintenance.
Defensible Space Zones
Defensible space zones are areas surrounding a dwelling and its surrounding property cleared of combustible materials and vegetation to create a separation between the home and potential fuel sources. According to the Colorado State Forest Service, there are three home ignition zones:
Zone 1: which extends up to 5 feet from the home
Zone 2: which extends from the outer edge of Zone 1 to 30 feet from the home
Zone 3: aims to decrease the concentration of combustible vegetation and create an environment that restricts the advancement of fire.
The objective of interrupting the fire’s progression in Zone 2 is to contain the flames and ensure they remain on the ground. To achieve this, the following measures should be taken:
Clear vegetation from beneath propane tanks
Maintain a low density of fuels around the residence to provide additional time in the event of a fire
The recommended spacing between trees and bushes in Zone 2 is at least 10 feet.
Fuel breaks are strategically placed barriers that slow or stop the spread of wildfires. They are integral to wildfire prevention, as they regulate forest fuels and reduce fire intensity. Various fuel breaks exist, including:
Shaded fuel breaks
Brown strips
Mowed fuel breaks
Targeted grazed fuel breaks
Mechanical treatments
Manual treatments
Chemical treatments
Biological treatments
Prescribed fire treatments
To create adequate fuel breaks, homeowners should:
Prioritize assets and valued resources
Treat or graze vegetative fuel breaks to manage excess litter and invasive plants
Focus fuels reduction efforts in the Wildland-Urban Interface (WUI) zone
Consider factors such as suppression, weather, and fire behavior
Establish shaded fuel breaks
A fuel break for residential properties typically ranges from 2 to 15 feet in width, depending on the type of forest, fuel loading, and the recommendations of a wildland fire fuels specialist or Area Forester.
Tree Maintenance
Regular tree maintenance in wildfire-prone areas can help prevent the spread of fire. Here are some steps you can take:
Prune and remove dead branches to reduce the risk of fire hazards.
Maintain proper spacing between trees to help mitigate the risk.
Remove debris and excess yard waste to prevent fire from spreading. Late winter, from mid-February through early March, is the ideal time for pruning trees for wildfire prevention. Trees are still dormant, allowing maximum growth and the chance to identify and address potential problem areas.
When it comes to pruning trees in Zone 1, the focus is on preventing the spread of fire through foliage or vegetation. Removing low-hanging branches, shrubs, and other vegetation is a way to reduce the risk of a wildfire reaching the tree canopy. This is an essential step in preemptively protecting trees from wildfires. Regular tree maintenance not only keeps your property safe but also contributes to the overall health of your trees.
Selecting Fire-Resistant Building Materials
Selecting fire-resistant building materials is pivotal in fire-resistant construction, shielding your home from wildfires. Materials such as:
Taking measures to interrupt a fire’s path can significantly reduce the risk of your home catching fire during a wildfire.
The following sections delve deeper into fire-resistant roofing materials, siding options, and window and door choices.
Roofing Materials
The choice of fire-resistant roofing materials is critical to diminishing the likelihood of your home catching fire during a wildfire. Some fire-resistant roofing materials include:
Composition
Metal
Clay
Tile
To ensure the protection of your home’s roof, it is advisable to regularly remove any combustible debris, such as dry leaves, moss, and trash, from the roof.
The fire-resistance ratings for different roofing materials are classified as follows:
Class A: provides the highest level of fire resistance
Class B: provides moderate fire resistance
Class C: provides minimal fire resistance
Unrated: does not have a specified fire-resistance rating
When selecting roofing materials, it is essential to consider local building codes and regulations. In addition, make sure to enclose eaves with fire-resistant materials to reduce the fire risk.
Siding Options
Choosing fire-resistant siding options can significantly shield your home’s exterior from wildfires. Fiber cement, stucco, and pre-treated wood are all fire-resistant siding options.
When selecting siding materials, connecting the siding from the foundation to the roof is essential to prevent the passage of flames and embers.
Pre-treating wood to make it fire-resistant involves applying a fire-retardant treatment to the wood surface or impregnating it into the wood.
At Montana Timber Products, we offer both options.
Material that gets our Fireline Pressure-Treated treatment goes through a certified pressure-treatment process and exceeds the most stringent fire suppression standards, such as building in areas designated by the Wildland Urban Interface (WUI) code.
We also offer an in-house Class A-Rated fire retardant treatment that reduces flame spread and smoke development. This specialized non-toxic formula is UL Greenguard Gold Certified with low VOC content and emissions. Once properly coated, dried, and cured into the wood substrate in our facility, it is permanent and never needs to be reapplied.
If you want to learn more about our fire treatment options for natural wood products, check out our website’s Fire Treatment for Wood page.
Protecting Vulnerable Home Features
Minimizing wildfire damage requires a focus on safeguarding vulnerable home features such as vents, rain gutters, and garages. In the following sections, we will discuss the importance of protecting ventilation and attic vents, rain gutters, roof debris, garages, and storage sheds.
Ventilation and Attic Vents
Installing metal mesh screens on ventilation and attic vents is essential for preventing embers from entering your home during a wildfire. For fire resistance, 1/8-inch or 1/16-inch wire mesh is recommended for metal mesh screens on ventilation and attic vents. Fiberglass or plastic mesh should be avoided as they can melt and burn.
To ensure proper installation of metal mesh screens on ventilation and attic vents, follow these steps:
Select a metal mesh screen with a maximum opening size of 1/8 inch.
Securely attach the metal mesh screen to the vents, including under-eave and soffit vents and exterior attic vents.
Consider using baffles in addition to the metal mesh screen for vents in eaves or cornices.
Ensure the metal mesh screen is firmly attached to the vents for maximum protection.
Rain Gutters and Roof Debris
Regularly cleaning rain gutters and removing roof debris is essential for reducing the risk of fire spreading to your home. It is advisable to clean gutters bi-annually, in the spring and autumn, to reduce the risk of fire effectively.
Some practical ways to remove combustible debris from rain gutters include:
Utilizing a wet/dry vacuum with applicable accessories
Manually clearing the gutters and flushing them with water
Using a leaf blower
Washing away small particles and dirt with a garden hose or pressure washer
Performing regular gutter cleaning and upkeep.
Garage and Storage Sheds
Hardening your garage and storage sheds protects your property from wildfires. To do so, install weather stripping around garage doors, store flammable objects at a safe distance from the door, and cover windows and vents with metal mesh. Metal sheds and steel buildings are generally regarded as the most fire-resistant materials in garages and storage sheds.
To reduce fire risk, follow these guidelines:
Store flammable objects at least 10 feet away from the garage or shed.
Cover windows and vents in garages and sheds with 1/16-inch or 1/8-inch wire mesh.
Avoid using fiberglass or plastic mesh, as they may melt and burn.
Ensuring Accessibility for Emergency Vehicles
It’s vital to your property’s safety and that of firefighters to ensure your driveway and access roads are wide enough and free from obstructions, allowing emergency vehicles to reach your home during a wildfire. The recommended width for driveways to ensure accessibility for emergency vehicles during wildfires is 28 feet, with a minimum vertical clearance of 14 feet. Having a visible address number is also beneficial to firefighters in locating your residence quickly.
To ensure clear passage for emergency vehicles, the following actions should be taken:
Regular mowing and trimming of trees and bushes
Removal of overgrown branches and vegetation that obstruct visibility
Trimming back tree limbs and vegetation from sidewalks
Removal of trees or plants near fire hydrants
Creating spacing between shrubs and trees
Planning for Water Supply and Firefighting Equipment
Proactive planning is vital to safeguard your home in the event of a wildfire. Here are some steps you can take to be prepared:
Ensure you have an accessible water supply. This can include installing a water storage tank or connecting to a nearby water source.
Invest in firefighting equipment. Non-collapsible fabric fire hoses or hoses designed explicitly for firefighting purposes are the most suitable options for firefighting scenarios at home.
Consider acquiring equipment such as electric pumps, portable tanks, and wildland firefighting equipment like engines, water tenders, dozers, and caterers.
By taking these steps, you can increase your readiness and protect your home from a wildfire.
It is also essential for homeowners to have emergency kits with items like:
water
food
flashlights
batteries
first-aid supplies
prescription drugs
clothing
Consult with local fire departments or fire safety experts to determine the amount of water needed to extinguish a fire in your specific building during the pre-planning stage.
FREE: Home Hardening Guide
We have put together a free home hardening checklist full of tips and best practices to help guide you through the process of hardening your home from the threat of wildfires.
Adherence to local building codes and standards is crucial in optimizing your home’s fire resistance. The relevant building codes and standards for fire resistance include the NFPA Codes and Standards, the International Building Code (IBC), and Fire Prevention and Safety Codes. These codes and standards are in place to ensure people’s safety and the public’s welfare by regulating design, construction practices, and the quality of construction materials.
Building codes and standards for fire resistance can vary regionally, considering factors such as climate, local building materials, and historical fire incidents.
Therefore, it is essential to refer to the specific building codes and standards of the region where the construction occurs to guarantee compliance with local fire resistance regulations.
Summary
In conclusion, fireproofing and implementing home hardening techniques are essential to protecting your property from the devastating effects of wildfires.
By assessing your home’s wildfire risk, creating a fire-resistant landscape, selecting fire-resistant building materials, protecting vulnerable home features, ensuring accessibility for emergency vehicles, planning for water supply and firefighting equipment, and complying with building codes and standards, you can significantly reduce the risk of your home catching fire during a wildfire.
Frequently Asked Questions
Can you completely fireproof a house?
It is not possible to completely fireproof a house, but by using fire-resistant or fire-retardant building materials, you can reduce the danger of fire threatening your property.
What is the difference between fireproof and fire-resistant?
Fireproofing and fire resistance are not the same, as fireproofing involves protecting the material from combusting, while fire resistance entails protecting the material from the effects of fire, such as heat and smoke. Knowing the difference is crucial for safeguarding homes or businesses from fires.
What are the key steps involved in fire hardening a home?
Critical steps for fire hardening involve assessing the wildfire risk, creating a fire-resistant landscape, selecting fire-resistant building materials, protecting vulnerable home features, ensuring accessibility for emergency vehicles, planning for water supply and firefighting equipment, and complying with relevant building codes and standards.